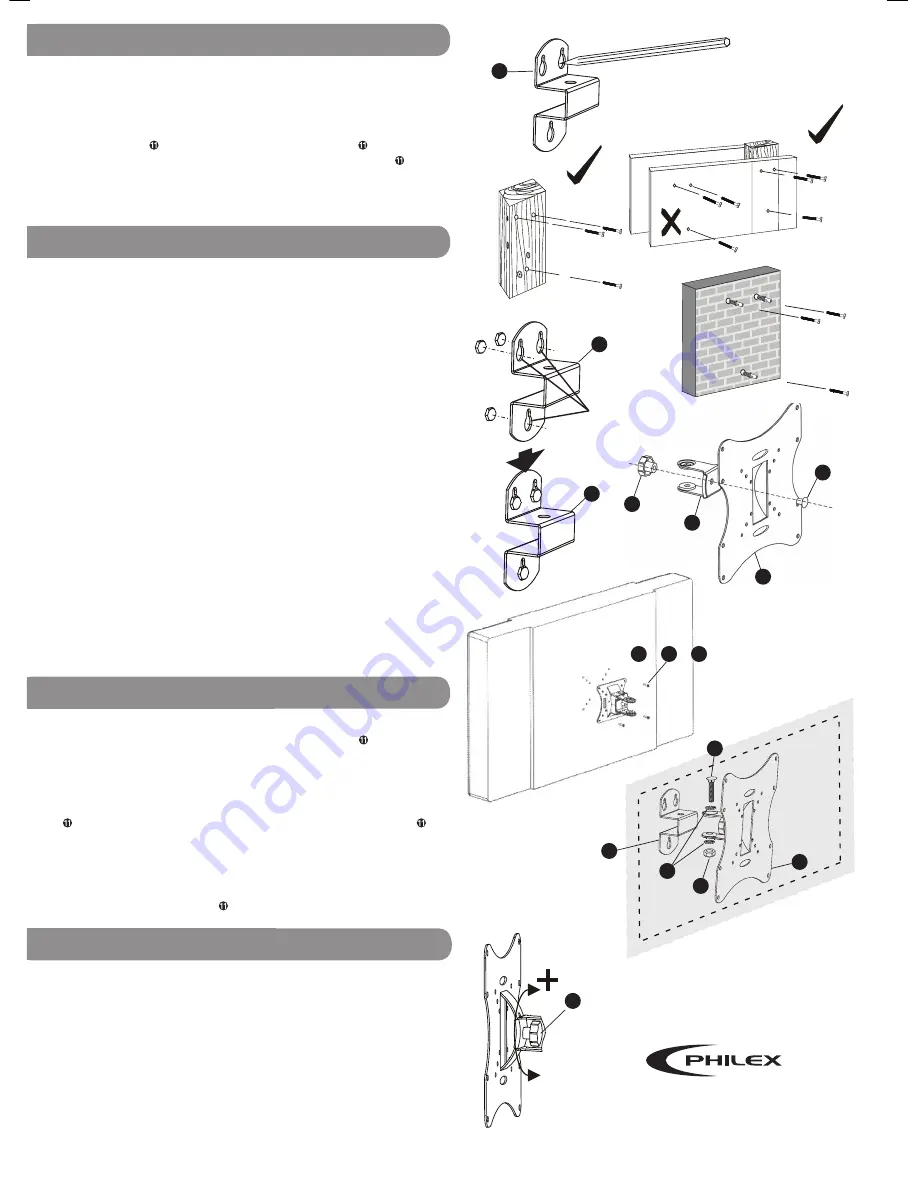
Fixing to Wood (Stud Walls)
The wall bracket
➒
is attached to the wall using three appropriate screws/
bolts two at the top and one below. Make sure the screws/bolts are
suitable for wood and large enough to support the weght of the TV and
bracket (if in doubt ask for advice at your local DIY/hardware store and
remember to make sure that the heads of the screws/bolts are the correct
size to hold the bracket securely in position).
As the uprights in stud walls are often quite thin the wall bracket
➒
has
been designed with two holes close together for mounting to wooden
uprights, see Fig. 3.
Mark and drill three holes into the wood as close as possible to the centre
of the upright. To mark the holes, hold the bracket
➒
to the wall, using a
spirit level to make sure the bracket is level, and mark the centre of each
hole, see Fig. 2. Drill the three holes. Attach the bracket
➒
to the wall
using the appropriate screws/bolts.
Tighten the screws/bolts in the positions shown in Fig. 3 and 4. Make sure
the screws are tight enough to hold the bracket
➒
flush to the wall but
loose enough to allow you to slide the bracket up and off the key slots.
Fixing to Concrete/Brick Walls
This process is similar to attaching to wood except that you will need
suitable screws/bolts/wall plugs for the type of wall you are mounting
onto (if in doubt ask for advice at your local DIY/hardware store and
remember to make sure that the heads of the screws/bolts are the correct
size to hold the bracket securely in position). When fixing to walls screws/
bolts should be fixed into bricks/stone not into mortar courses.
Step 2
Attach the swivel/tilt clamp
➓
to the TV mounting plate , see Fig 7.
Step 3
Check which size of the fitting screws supplied fits your television (M4,
M5 or M6
➊
,
➋
or
➌
). Then locate the fitting holes on the mounting plate
that match your televisions mounting holes and attach the plate
firmly to the back of your television, see Fig. 8.
Step 4
Attach the wall bracket
➒
to the swivel/tilt clamp
➓
now attached to the
TV via the TV mounting plate , see Fig. 9.
Now that the mounting bracket is fully assembled and securely fastened
to the television, lift the TV and bracket assembly and align the keyhole
slots on the wall bracket
➒
(see Fig. 5 & 6) with the heads of all three
screws/bolts in the wall and slide the bracket
➒
down until it slots
securely into position.
If the television feels loose on the wall, lift the mount off the wall screws/
bolts and tighten them to decrease the gap between the screw/bolt head
and wall. Finally adjust the tilt and swivel to the required angle as shown
in Fig. 9.
PLEASE NOTE: It is recommended that especially with larger/heavier TVs
it is easier and safer if more than one person does any lifting required.
STEP 5 - Attaching the bracket and TV to the wall
Mounting your TV
Once you have decided where to locate your TV and where the bracket
needs to be positioned, mounting requires the 5 steps described below.
Step 1
: mark and drill fixing holes in the wall and attach the wall bracket
➒
to the wall using suitable screws/bolts, then slide the wall bracket off
the screws/bolts.
Step 2
attach the swivel/tilt clamp
➓
to the TV
mounting plate .
Step 3
attach the TV mounting plate
to the TV.
Step 4
attach the swivel/tilt clamp and TV mounting plate
➓
&
assembly to the wall bracket
➒
.
Step 5
Lift the TV and bracket assembly
align the keyhole slots on the wall bracket
➒
with the heads of all three
screws/bolts in the wall and slide the bracket down securely into position.
Fig. 2
Fig. 3
Fig. 4
Fig. 5
Fig. 6
STEP 2 - 4 - Bracket Assembly
Fig. 10
Fig.7
7
4
Keyhole
Slots
STEP 1 - Preparing Wall Fixings
6
1
2
or
9
10
11
8
© Philex Electronic Ltd. 2010. V1.3
Fig. 8
For further information or any queries please contact
Customer Careline: 0901 293 0038
Calls are charged at £1 per minute from a BT landline.
Call charges from other networks may vary.
Technical Support: www.philex.com/support
-
+
Tilt Clamp
Rotate the tilt clamp knob anticlockwise (-)
while supporting the weight of the TV,
tilt
the TV to the required position and turn
the knob
➐
clockwise to tighten and lock.
Tilt
Clamp
Knob
3
or
5
9
9
9
11
TV Screen
Back of TV
Fig. 9
7


