1. Use as directed:
This product serves exclusively lighting purposes and may:
only be used with a voltage of
230V ~50Hz
.
not be exposed to strong mechanical loads or to strong
contamination.
only be installed and operated after a condition inspection if the
product is dirty or has been moistened through storage.
not be modified or converted.
If these points named above are not adhered to, a short circuit or
electrical shock may occur!
2. Technical Data:
229964/66/68
229974/76/78
Operating voltage:
230V ~50Hz
Safety class:
I
Safety type:
IP 44
Bulb:
QT14, G9, max.25W
GX53, max. 9W
Dimensions (Ø/H):
18 / 8 cm
Weight:
0,58 kg
Importeur: SLV
Elektronik
GmbH
IP 44
: Protection against foreign objects > Ø 1,0mm - Protection against
splashing water from all directions.
3. Installation
The electric connection may be executed only by an electric expert
who is familiar with the valid directives!
Caution:
Switch off the power of the mains supply line or
respectively of the connection lead before doing any works
.
Use only
parts, which are supplied with the product or are described as accessories!
Otherwise the product or the installation might not be sufficiently safe.
Installation place:
The product is suited for
wall installation
.
Make sure that the product is mounted on a
stable, even and tilt-fixed
background
.
The
light exit
should be placed at least so far from the illuminated surface,
as indicated as
minimum distance
on the type plate of the luminaire:
.
Pay special caution
to easily inflammable objects (e.g.
foliage).
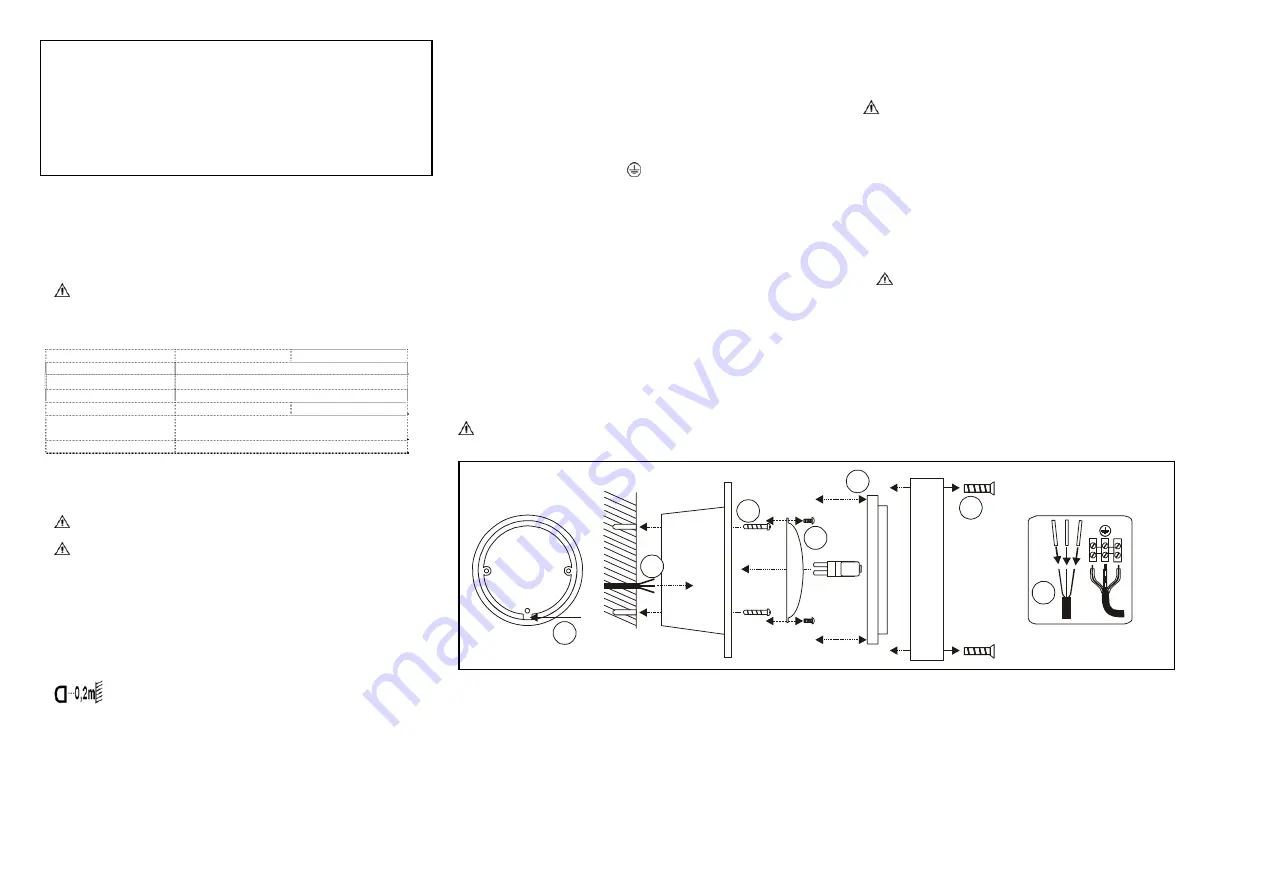
Separate Installation Steps
1: Remove the front cover.
2: Carefully remove the glass with the gasket.
3: Remove the inner cover. The G9 version has a metal cover. The
cover of the GX53 version is made out of plastic.
4: Important!
: The recess on the backside of the fitting must be located
on the bottom, that excess moisture can flow off.
Determine the place of installation and mark the holes to be drilled. Note
that the cable outlet of the mains supply corresponds with the cable inlet
of the fixture. Do not damage the power supply line, e.g. by drilling,
screws or strong bending.
5: Direct the mains lead through the rubber gasket.
6: Mount the fitting housing on the mounting surface.
7: Electrical Connection
The product must be able to be separated by an all pole separation
from the current supply.
Equip the three wire ends with protective tubes.
For electric connection attach the black or brown wire (live conductor)
of the mains supply with the
clamp L
and the blue wire (neutral
conductor) of the mains supply with the
clamp N
. The green-yellow
wire (protective conductor) of the mains supply has to be tightly
screwed into the
earth clamp
of the product.
Reattach the cover inside the housing.
Inserting the bulb: QT14
: Stick the bulb into the socket.
GX53
: Insert
the light source with a slight turn to the right.
Reattach the glass with the gasket by screwing the front cover back on
the housing.
Ensure that the light fixture holds securely!
The product is now ready for operation.
4. Operation
:
Information for the user:
Operate the product only if it is working correctly. Switch off the product
with a malfunction immediately and operate it again only after examination
by an electrical specialist. This is the case, when:
visible damages appear.
the product does not work.
smoke, steam or crackling sounds appear.
an overheating is recognisable.
Repairs of the product or work on mains voltage-prominent sections may
only be carried out by qualified electricians.
Warning:
Here exists mortal danger from an electric shock!
How to avoid failure and fire risk:
Do not cover the product - provide free air circulation!
Do not hang or fasten anything on the product, especially no decoration.
Replace damaged protection glasses immediately!
Never let children play unsupervised with electric products! Children
can not always estimate dangers in dealing with electric energy correctly.
The following enviromental influences may have unwanted effects on
the surface of the product:
acid rain and sour soil
high salt content in the air
thawing salt
cleaning agents
other chemical substances (e.g. herbicides)
Protect the product by adequate means to avoid unwanted changes of the
surface.
Cleaning tip
: Switch off power! Clean the product with a damp
cloth.
What is to do if a bulb is defect or does not work?
Disconnect the product from power
, before you exchange the bulbs.
Caution
: Let the bulb cool down first before replacement – otherwise
considerable risk of injury exists because of the hot surface.
Replace the bulbs only with bulbs of the same data like socket, power
and capacity. Every other sort of bulb can lead to damages of the light.
Replacing the bulb
: see Installation.
5. What else has to be considered?
Disconnect the product from power
, before you…
clean or maintain the product.
do any works on the product or its components (electric expert).
Art.-Nr. 229964/66/68/74/76/78 11/2007
©
by SLV Elektronik
GmbH
Daimlerstr. 21-23 52531 Übach Palenberg Germany
Technical Details are subject to change.
Duplication prohibited !
ENGLISH
Instruction Manual
for wall fitting
BULLSEYE
Please read carefully and keep for further reference !
L
N
!
1
3
4
5
6
7
2


