Slinex SONIK 7 Cloud Скачать руководство пользователя страница 10

SONIK


Cloud

17

18

Main menu

Settings

Door

Main menu 

→ 

Settings 

→ 

System

Device ID

 − this monitor model can only be «Master» in the system;

Time 

− current date and time settings;

Date format

 − date format setting;

Standby clock

 − clock display in standby mode time, from 10 to 180 sec. or Off;

Language

 − menu language setting;

Keytone

 − enable/disable screen touching sound;

Door panel backlight

 − enable/disable call button backlight on the outdoor panel.
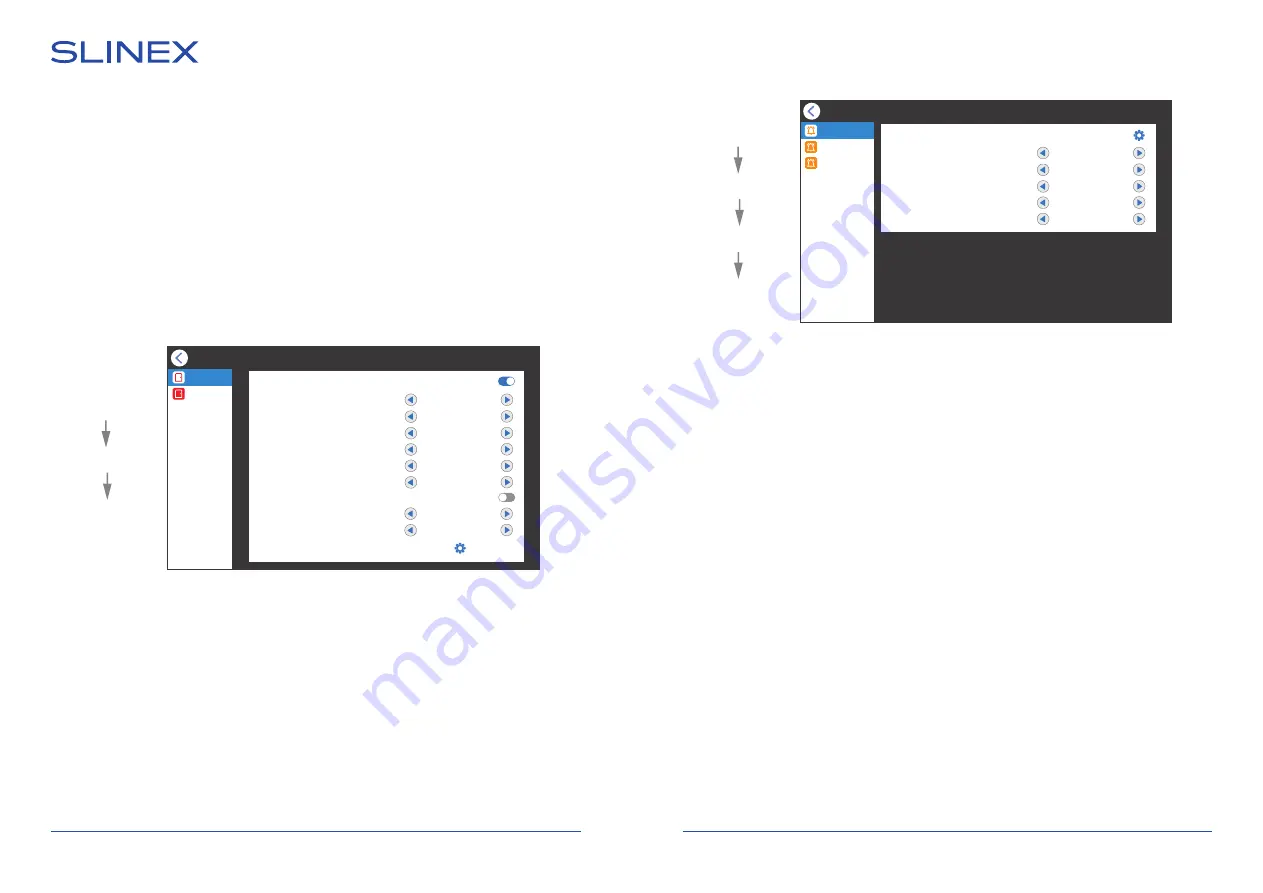
8.2. Door settings

Press «Settings» icon in the main menu then press «Door» icon to enter outdoor panels settings menu:

Main menu 

→ 

Settings 

→ 

Door

Channel activation

 − include or exclude current video channel from viewing list;

Signal mode 

− PAL, NTSC or Automatic;

Signal type

 − AHD 720P / AHD 1080P / TVI 720P / TVI 1080P /CVI 720P / CVI 1080P / CVBS;

Unlock time

 − relay unlocking time, from 1 to 10 sec.;

Record mode

 − record type when incoming call or motion event occurs, «Snapshot» or «Video»;

Motion detection

 − enable and set the sensitivity of program motion detection;

Motion detection duration

 − program motion detection recording time;

Motion display

 − enable/disable screen activation if program motion detection occurs;

Motion ringtone

 − enable and set the melody if program motion detection occurs;;

Message 

− delay time before message recording if nobody answers incoming call;

Ring setting

 − outdoor panels melody settings;

Door 1

Channel activation

Signal mode 

PAL

Signal type 

AHD1080

Unlock time 

 2 Sec

Record mode 

Video

Motion detection 

Medium

Motion detection duration 

10 Sec

Motion display

Motion ringtone 

3

Message 

30 Sec

Ring setting

Door 1

Door 2

Main menu

Settings

Door

Ring setting

Door 1 / Ring 1

Schedule 

06 : 00 - 12 : 00

Time 

10 Sec

Ring mode 

Standard

Ring select 

4

Ring volume 

5

Outdoor panel volume 

Off

Ring 1

Ring  2

Ring  3

Main menu 

→ 

Settings 

→ 

Door

 → 

Ring setting

Schedule 

− time of the day to apply following settings;

Time 

− incoming call melody ringing time from 5 to 45 sec.;

Ring mode 

− «Standard» - default melodies from internal memory or «Customize» - choose mp3 

melody from the «Ring» folder on microSD card;

Ring select 

− choose the melody for the current outdoor panel;

Ring volume 

− set incoming call melody volume level on the monitor, from 0 to 10;

Outdoor panel volume 

− set call melody volume level on the outdoor panel, from 1 to 10 or Off.

8.3. Custom MP3 ringtone

Create «Ring» folder in the root of microSD card, if it isn’t already created by the monitor. Paste MP3 files 
you would like to use as a ringtone into this folder. File names must have only English letters and figures in 
its names and its quantity must not exceed 8 symbols to be visible on the monitor. 
Insert microSD card into the monitor and go to the «Settings» 

 «Door» 

 «Ring setting»


menu. Then 

choose «Ring mode» 

→ 

«Custom» and choose the melody to use as a ringtone in the «Ring select» menu.

Pay attention that melody is active only for the time period specified in the «Schedule» menu. There are 3 
time periods for every outdoor panel specified as «Ring 1», «Ring 2» and «Ring 3» bookmarks on the left 
bar. Every time period has its own melody, volume and ringing time.

Содержание SONIK 7 Cloud

Страница 1: ...SONIK 7 Cloud Design Uniqueness Innovations Design Uniqueness Innovations User manual 1 34 35 68 Technical support...

Страница 2: ...Don t throw away the device with other industrial or nutritive trash if you see that symbol Some regions have separation and recycling systems for the electronic equipment Connect with local authorit...

Страница 3: ...1 pkg User manual 1 pc 2 Specification 1 SONIK 7 Cloud 3 4 1 2 3 5 4 4 6 SCREEN 7 color IPS with touch screen RESOLUTION 1024 600 px VIDEO SYSTEM PAL NTSC AHD TVI CVI 720p 1080p AUDIO TYPE Half duplex...

Страница 4: ...between 80 and 100 meters 262 328 ft then use a 3 wire cable with 0 75 mm2 AWG 18 square of one wire and RG 59 or RG 6 coaxial cable for the video signal c Shielded or non shielded twisted pair not r...

Страница 5: ...ake four anchors from the kit and hammer them into the drilled halls 4 Fix surface mount bracket on the wall with four screws from the kit 5 Connect all communication wires and fix the monitor on the...

Страница 6: ...all button on the first outdoor panel Visitor presses call button on the second outdoor panel Melody is ringing on the monitor and outdoor panel image from the outdoor panel appears on the monitor scr...

Страница 7: ...r can view the image from outdoor panels and cameras on any monitor inside this system The image will be transferred from the Master monitor outdoor panels and cameras to the Slave monitors 2 If someb...

Страница 8: ...ter value Increase current parameter value Call redirection Enable disable image and volume settings bar Start stop video recording Video input switch Image monitoring screen has following elements Re...

Страница 9: ...001_DOOR1 jpg Not read 20210105061548_0001_DOOR1 jpg Not read 20210105061546_0001_DOOR2 jpg Read 20210105061544_0001_DOOR2 jpg Read 20210105061950_0010_DOOR2 mov 00 00 00 03 7 DOOR2 05 01 2021 06 19 5...

Страница 10: ...cord mode Video Motion detection Medium Motion detection duration 10 Sec Motion display Motion ringtone 3 Message 30 Sec Ring setting Door 1 Door 2 Main menu Settings Door Ring setting Door 1 Ring 1 S...

Страница 11: ...ardware motion sensor There are two types of sensors that can be connected to the monitor sensor with normally opened contacts NO and sensor with normally closed contacts NC Depending on the type of s...

Страница 12: ...rrent active mode sound notifications type changes User can change current mode by touching corresponding icon in the main menu Sound notifications are enabled both on the monitor and on the outdoor p...

Страница 13: ...Background volume set background music volume in photo frame mode 11 Standby clock If Standby clock function is enabled in Settings System menu then user can see the folowing screen after exiting from...

Страница 14: ...on process Use your Email as a login for 13 2 Wired network connection steps 1 Use twisted pair CAT5 or CAT6 cable to connect device to the router 2 Connect mobile device into the same local network 3...

Страница 15: ...ssword 12345678 9 When mobile phone is connected to the Wi Fi hotspot come back to the mobile application The monitor will be connected to the Wi Fi network specified on the 7 th step and paired to th...

Страница 16: ...and paired to the current account of the Smart Call application 13 5 Operation Press device icon to start monitoring Go to the main menu Enable conversation mode Outdoor panel 1 Outdoor panel 2 Camera...

Страница 17: ...pplication Every mobile phone must use it s own account in the application 3 Using master account enter device monitoring screen press icon on the right upper corner of the screen and enter Add sharin...

Страница 18: ...ct wasn t properly installed according reccomendations from the manual the sticker on the backside of the product was broken the product was not used for its intended function This limited warranty co...

Страница 19: ...5 1 43 5 2 44 5 3 45 5 4 46 6 46 7 48 8 50 8 1 50 8 2 51 8 3 MP3 52 8 4 53 8 5 C 54 8 6 C 55 8 7 55 9 56 10 56 11 57 12 58 13 59 13 1 59 13 2 59 13 3 Wi Fi AP 61 13 4 Wi Fi EZ 62 13 5 63 13 6 65 13 7...

Страница 20: ...7 IPS 1024 600 PAL NTSC AHD TVI CVI 720p 1080p 70 MicroSD 256 7 11 100 240 176 133 20 10 55 C 1 2 3 4 5 6 microSD 3 133 176 20 1 Sonik 7 Cloud 1 C 1 1 7 1 1 2 1 SONIK 7 Cloud 37 38 1 2 3 5 4 4 6...

Страница 21: ...1 2 C 4 4 1 4 25 0 22 2 25 50 0 41 2 50 80 0 75 2 80 100 3 0 75 2 RG 59 RG 6 25 25 50 0 50 50 80 80 100 RG 59 RG 6 0 20 20 40 4 2 1 Sonik 7 Cloud SONIK 7 Cloud 39 40 1 Sonik 7 loud 2 13 5 12 2 12 1 R...

Страница 22: ...1 2 1 2 C Sonik 7 loud 1 2 1 2 1 2 1 2 2 Sonik 7 Cloud Sonik 7 13 5 100 240 4 3 1 150 160 2 4 3 4 5 SONIK 7 Cloud 41 42 Sonik 7 Sonik 7...

Страница 23: ...5 2 60 60 60 60 5 5 1 120 30 SONIK 7 Cloud 43 44 1 1 1 1...

Страница 24: ...6 5 4 2 5 3 2 1 2 SONIK 7 Cloud 45 46...

Страница 25: ...7 47 48 SONIK 7 Cloud 1 1 2 1 2 06 10 2021 12 01 1 2 1 2 06 10 2021 12 01 REC 08 35 27 29 REC...

Страница 26: ...1 mov 20210105061727_0001_DOOR1 mov 20210105061725_0001_DOOR1 jpg 20210105061724_0001_DOOR1 mov 20210105061549_0001_DOOR1 jpg 20210105061548_0001_DOOR1 jpg 20210105061546_0001_DOOR2 jpg 20210105061544...

Страница 27: ...8 2 PAL NTSC AHD 720P AHD 1080P TVI 720P TVI 1080P CVI 720P CVI 1080P CVBS 1 PAL AHD1080 2 10 3 30 1 2 1 1 06 00 12 00 10 4 3 5 1 2 3 5 45 mp3 Ring microSD 0 10 1 10 8 3 MP3 C microSD c Ring MP3 8 mi...

Страница 28: ...Fi SmartLife b1e24f 12345678 SONIK 7 Cloud 53 54 PAL NTSC AHD 720P AHD 1080P TVI 720P TVI 1080P CVI 720P CVI 1080P CVBS 1 2 40 AP Wi Fi EZ Wi Fi Wi Fi IP IP EZ MAC MAC EZ 8 4 8 5 C 1 PAL AHD1080 4 20...

Страница 29: ...SONIK 7 Cloud 55 56 8 6 C 8 7 SD microSD UUID SD microSD update ius microSD SD Ok Ok Ok Ok 3 0 0 1 2021 10 21 SD 7 1G 7 2G UUID 04be4d97 9 3 10 C microSD c Digital Frame JPG 30 JPG c 2560 1440...

Страница 30: ...icroSD 5 5 3 30 11 11 28 26 10 2021 0 2 2 1 WAN 1 2 3 4 WAN 1 2 3 4 Android iOS 3G Wi Fi Sonik 7 Cloud Sonik 7 Cloud 12 SL 07IP SL 07IP Wi Fi Android iOS 3G Wi Fi Wi Fi LAN AP Android iOS Smart call S...

Страница 31: ...59 60 SONIK 7 Cloud 13 Google Play Android Apple App Store iOS Smart Call 13 1 1 Smart Call 2 3 4 6 13 2 1 CAT5 CAT6 2 3 Cable 4 4 5 6...

Страница 32: ...61 62 SONIK 7 Cloud 13 3 Wi Fi AP 1 Wi Fi 2 3G 4G 3 4 5 AP 6 7 Wi Fi c 8 Wi Fi SmartLife xxxxxx 12345678 9 Wi Fi Smart all Wi Fi 7 13 4 Wi Fi EZ 1 Wi Fi 2 3G 4G 3 4 5 EZ...

Страница 33: ...63 64 SONIK 7 Cloud 7 Wi Fi c 8 Wi Fi 13 5 1 2 1 2 888888...

Страница 34: ...67 68 SONIK 7 Cloud 13 6 1 Smart Call 2 Smart Call 3 4 13 7...

Страница 35: ...67 68 SONIK 7 Cloud 14 12...

Отзывы: