Skywalker SAK140 Скачать руководство пользователя страница 6

6

ASSEMBLY    

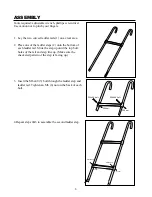
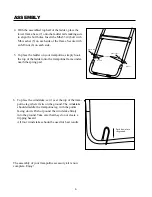
4.  With the assembled top half of the ladder, place the 

lower frame base (7) onto the ladder rails making sure 

to align the bolt holes. Insert the M6x33 (4) bolt with 

M6 washer (5) on each side of the frame. Secure with 

an M6 nut (6) on each side.

5.  To place the ladder on your trampoline, simply hook 

the top of the ladder onto the trampoline frame under-

neath the spring pad. 

M6x33 bolt

M6 washer

M6 nut

M6 nut

M6x33 bolt

The assembly of your trampoline accessory kit is now 

complete. Enjoy!

6.  To place the windstake, set it over the top of the tram-

poline leg where it sits on the ground. The windstake 

should straddle the trampoline leg with the points 

facing down. Push or pound the wind stake firmly 

into the ground. Take care that they do not create a 

tripping hazard. 

  All four wind stakes should be used for best results.

Push down into 

the ground

Содержание SAK140

Страница 1: ...this equipment Save this manual for future reference User weight limit 275 lbs Ladders allow young children to climb onto the trampoline Trampolines are not for children under 6 years of age Do not u...

Страница 2: ...vel so they will not create a tripping hazard In addition the top of the stakes should be covered if necessary so that users will not be injured by falling on the stakes Even with the use of windstake...

Страница 3: ...days To help us assist you please mention the model number of the product when calling www skywalkertrampolines com CARE AND MAINTENANCE If your ladder becomes dirty spray with water to clean Do not a...

Страница 4: ...e parts used The numbers in the circles to the left of each part will be used to help differentiate the parts in the instructions 1 2 5 6 3 4 7 8 Key No Qty Description 1 2 Curved Ladder Rails 2 2 Lad...

Страница 5: ...p line up Make sure the checkered pattern of the step is facing up 3 Insert the M6x40 3 bolt through the ladder step and ladder rail Tighten an M6 6 nut on the back of each bolt 4 Repeat steps 2 3 to...

Страница 6: ...nto the trampoline frame under neath the spring pad M6x33 bolt M6 washer M6 nut M6 nut M6x33 bolt The assembly of your trampoline accessory kit is now complete Enjoy 6 To place the windstake set it ov...

Страница 7: ...service center or to products used for commercial or rental purpose No other Warranty beyond that specifically set forth above is authorized by Skywalker Holdings LLC SKYWALKER HOLDINGS LLC IS NOT RE...

Отзывы: