


Merlin 2003 DV and MPEG-2 Recorder and Dual Stream Decoder
Page 32
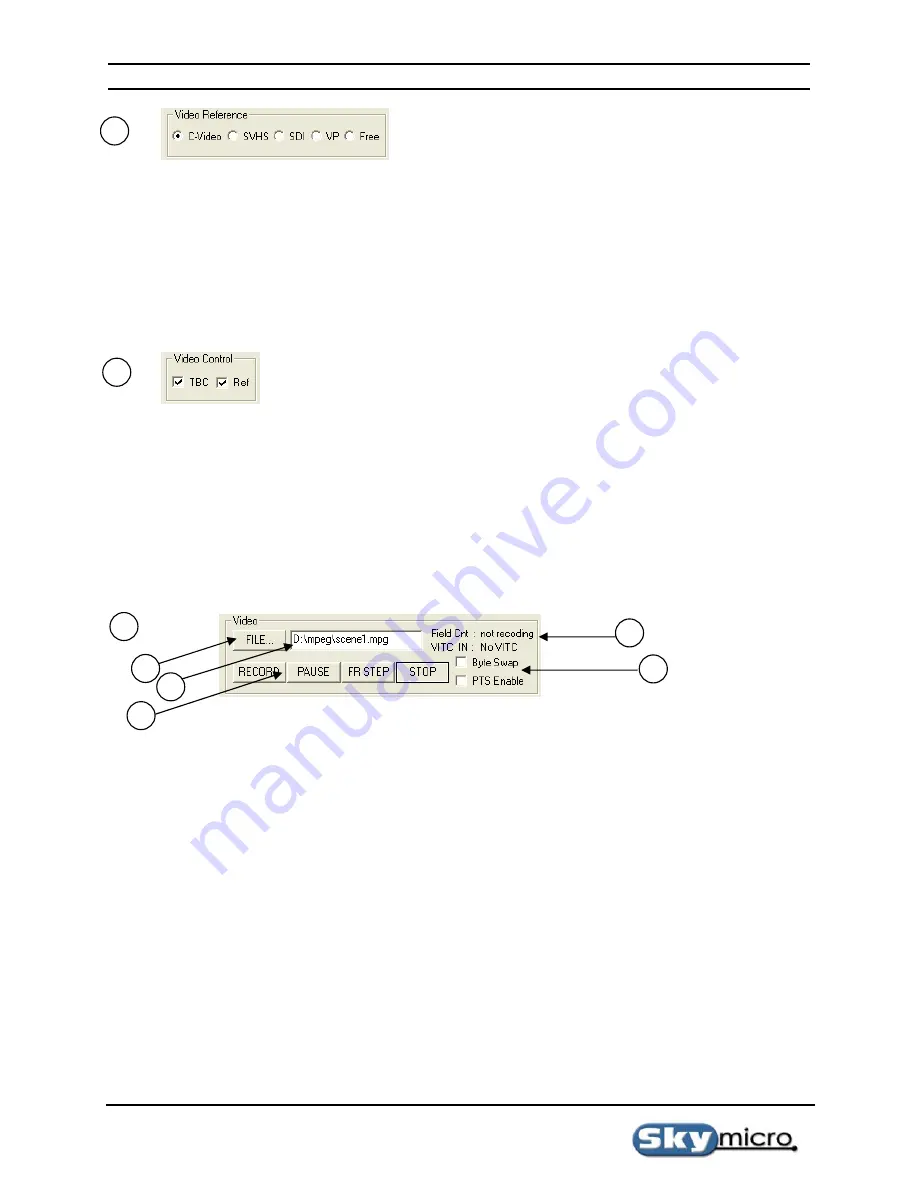
This section of the recorder application shows you the currently selected reference input and allows you to switch to
other input references. The input reference is what will be recorded when the record button is pressed as well as
what will be seen on your output video monitor if viewing reference video is selected.
C-Video - Selects the yellow Composite video input connector.
SVHS – Selects the Black S-VHS 4 pin mini din video input connector.
SDI – Selects the BNC Serial Digital Video(SDI) input connector.
VP – Selects the 26 pin internal VIP port connector (not available on Merlin boards).
Free – Selects Freerun mode. In this mode no reference is used for sync timing.
This Section of the recorder application allows you to turn on and off the TBC (Time Base Corrector), and allows
you to view Reference video.
The TBC is a circuit on the Merlin board that samples incoming video, stores it in a temporary buffer, and then
reads from the temporary buffer using an extremely low jitter clock. This has many benefits in video applications.
The reason it was included on the Merlin board is that it allows analog video that comes from a jittery source to pass
through the Merlin board and get jitter reduced so that it can be passed out the D1 port and have low enough jitter to
meet the very tight jitter requirements of D1 serial digital video.
Viewing reference video lets you see what will be recorded when the record button is pressed.
This section of the recorder application allows you to control Video recoding.
a)
File button – This button brings up a dialog box allowing you to select a video file.
b)
File name – This text box specifies the current video file and also lets you type a file name directly.
c)
File position – This field shows you the time code of the current video frame. If a source is connected that
generates VITC. The VITC frame number of the source will be displayed by the VITC IN text.
d)
Motion control buttons – These four buttons are used to control video motion.
1)
RECORD – Starts Recording video.
2)
PAUSE – Pauses video and freezes at the current frame. If the video is stopped it pauses the
video at the after recording 1 frame.
3)
STOP – Stops the recording video.
4)
FR STEP – Records one frame of video and then stops. If the video is not paused it pauses the
video. This is useful for recording one frame at a time for animation or stop motion video.
e)
Byte Swap – This allows you to record a byte swapped video files if needed.
3
4
c
e
5
a
b
d


