background image


MOSQUITO 3D PRO - INSTRUCTION MANUAL

page -14-

MOSQUITO 3D PRO --- MOSQUITO

 3D PRO --- MOSQUITO 3D PRO

MOSQUITO 3D PRO --- MOSQUI

TO 3D PRO --- MOSQUITO 3D PRO

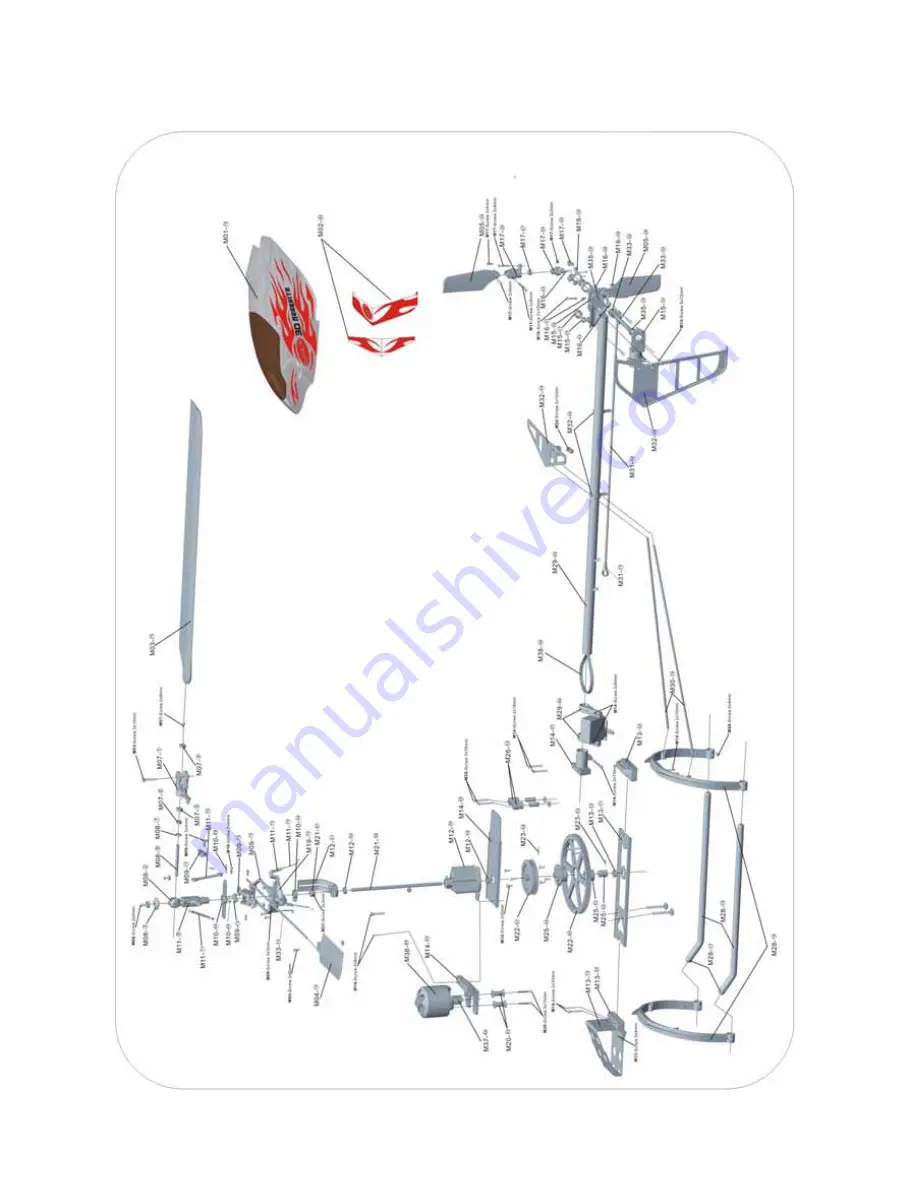
6. Complete mechanic overview

Содержание MOSQUITO 3D PRO

Страница 1: ...icro R C helicopter has the most advanced capabilities 120 degree CCPM control collective main and tail rotors belt tail drive and brushless motor ensure top performance MAX MAIN ROTOR RPM 3000 MOTOR SKYARTEC 4100KV MAIN ROTOR DIAMETER 520mm LENGTH 485mm WEIGHT 360 380g RTF SKYARTEC USA INC copyright September 2006 All rights reserved SKYARTEC USA INC 18107 Valley Blvd City of Industry CA 97144 ww...

Страница 2: ...ction 3 2 Gerneral information 3 3 Required items 3 4 Assembly instruction 4 5 Connection and diagnostics for the electronic components 13 6 Complete mechanical overview 14 7 Spareparts I 15 8 Spareparts II 16 9 Spareparts III detail description 17 10 Spareparts as in mecanical overview 18 11 Canopy decals 11 13 Additional information about helicopter mechanics 20 ...

Страница 3: ...Always turn your transmitter on before powering the model Always turn off the model by disconnecting the helicopter battery prior to turning off the transmitter Always start the helicopter with throttle in the low position Always perform a pre flight inspection for safe operation Attention If you purchased your MOSQUITO without SKYARTEC 4100KV motor and are going to mount any other brushless mo to...

Страница 4: ... lock glue before mounting the screw as shown After assembling those parts to the one end push the axis through the ro tor head 2 and assebmle the other side of the rotor holder Use two screwdrivers to tighten the holding screws Finally mount the top 3 to the rotor head Take the preassembled rotor head from step 1 and mount the pitch connectors 9 to the rotor blade holder 1 Then con nect the trans...

Страница 5: ...both ends of the balance bar 14 and mount the fixing screws Make sure the blades are aligned in one level to each other and to rotating frame 10 Mount the landing bars 16 into the the landing gear 18 Set in the four screws which hold its position but do not tighten them until mounting the entire gear onto the main body later on Mount the four tip ends 16 into the bars ends 16 Mount the front suppo...

Страница 6: ...the screw lock glue Afterwards mount the other side the same way also using the screw lock glue Finally mount the tail rotor blades 28 as shown to the rotor holders 26 Set in the tail axis holding screw into the center pie ce 24 but do not thighten it now Mount bearing 30A into tail frame 1 29 and the other bearing 30B into tail frame 2 34 Set tail axis 33 32 and the tail belt guide roller 31 and ...

Страница 7: ... 43 Shove the preas sembled tail rotor from step 7 over the tail axis 33 until ithe centerpiece 24 is aligned with the axis s end Lock the tail axis with previously set in screw at the centerpiece 24 Mount the ball link 42 to the L lever 40 Mount the L lever 40 using the L lever spacer 41 to the tail frame from step 8 and also over the bolt 39 Mount to the other end of the tail boom 48 the tail ro...

Страница 8: ...two belt guide rollers 53 and the bearings XX by using screw lock glue as shown to the upper main fra me 50 Mount the main gear holder 59 to the main gear 60 with three screws Mount the inner spacer 61 and one way bea ring 62 into the main gear holder 59 Afterwards mount the complete main gear by using the main axis bolt 63 to the main axis 56 Mount the belt gear 57 to the main axis 56 using anoth...

Страница 9: ...tor 64 with two screws by using the two motor spa cers 65 Finally mount the retaining ring 67 with the screw Make sure that the axis is fixed through the retai ning ring and that there is no game at the main axis in the axial direction Mount the swashplate 70 to the main axis of the preassembled body from step 14 Put the rotorhead fixing ring 49 and the the O stabilizer 68 together with the rotorh...

Страница 10: ...m may have to be created by cutting a full or cross arm After testing the radio equip ment the servos will be in their center po sition Remove the servo retaining screw and the orignial servo arm Replace the original arm with one of the long half arms Some servo arms require widening the hole in the arm in order for them to accept the Mosquitos pushrods 74 using a 55 drill bit 1 34mm or 0 052 Leav...

Страница 11: ...pu shrods 74 73 into the servo arm and connect the other end with the balls link of the swashplate 70 Make sure that all connectors are at the same length and that the centered servo arm position will also center the swashplate s travel from high to low pitch position Mount the main rotor blades 75 by using the screws Make sure that both ro torblades are equally tight holded by the screw To do so ...

Страница 12: ...all link connectors 77 to both ends of the tail servo rod 76 Connect the tail servo rods ends with the ball links at the servo and at the tail frame Even tually adjust the position of the servo holders 46 so that the center tail servo position will result in the center position of the pitch shifter 38 after wards thighten the servo holder screws Finally clip the tail servo rod 76 into the two tail...

Страница 13: ...tter and receiver Be certain that the channel frequency matches 2 Note that all electroincs plug into the receiver with the wires as pictured orange wire faces receiver label Follow the diagram for each electronic connection Once the electronics system is con nected and the transmitter is turned on follwo this step by step process to check your equipment STEP by STEP component test 1 Turn on the t...

Страница 14: ...MOSQUITO 3D PRO INSTRUCTION MANUAL page 14 MOSQUITO 3D PRO MOSQUITO 3D PRO MOSQUITO 3D PRO MOSQUITO 3D PRO MOSQUITO 3D PRO MOSQUITO 3D PRO 6 Complete mechanic overview ...

Страница 15: ...MOSQUITO 3D PRO INSTRUCTION MANUAL page 15 MOSQUITO 3D PRO MOSQUITO 3D PRO MOSQUITO 3D PRO MOSQUITO 3D PRO MOSQUITO 3D PRO MOSQUITO 3D PRO 7 Spareparts I ...

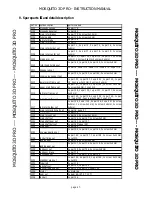
Страница 16: ...MOSQUITO 3D PRO INSTRUCTION MANUAL page 16 MOSQUITO 3D PRO MOSQUITO 3D PRO MOSQUITO 3D PRO MOSQUITO 3D PRO MOSQUITO 3D PRO MOSQUITO 3D PRO 8 Spareparts II ...

Страница 17: ...t M2 M 15 tail rotor frame set 1x part 29 1x part 34 1x part 31 1x part 37 5x screw 2x12mm M 16 tail pitch shifter set 2x part 43 1x part 38 1x part 39 1x part 40 1x part 41 1x part 42 1x screw 2x10mm 1x nut M2 M 17 tail rotor holder set 1x part 24 2x part 25 2x part 26 2x part 27 2x screw 2x4mm 1x screw 3x3mm 2x screw 2x8mm 2x screw 2x8mm M 18 main rotor pitch shaft set 3x part 8 6x part 7 M 19 s...

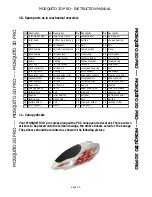
Страница 18: ...oss wing 65 motor spacer 6 spacer 26 tail rotor holder 46 tail servo holder 66 motor pinion 7 o ring 27 bearing 47 tail boom holder 67 retaining ring 8 pitch axis 28 tail rotor blade 48 tail boom 68 O stabilizer 9 pitch connectors 29 tail frame 1 49 rotorhead fixing ring 69 bolt 10 rotating frame 30 bearing 50 servo support 70 swashplate 11 translation lever 31 tail belt guide roller 51 swashplate...

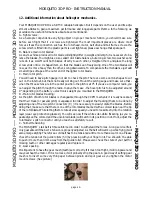
Страница 19: ...omputer radio you can adjust the pitch through the radio In any other case the hover pitch is to be adjusted around 9 depending on the battery electronics weight you mounted to the MOSQUITO D Main rotor blades tracking As the pitch of both rotor blades is changeable through the CCPM mechanic it is really necessary that their track or parallel pitch is equalized In order to adjust the tracking that...

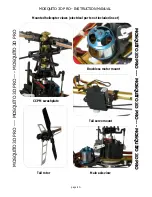
Страница 20: ...20 MOSQUITO 3D PRO MOSQUITO 3D PRO MOSQUITO 3D PRO MOSQUITO 3D PRO MOSQUITO 3D PRO MOSQUITO 3D PRO Mounted helicopter views electrical parts not included in set Brushless motor mount CCPM swashplate Tail servo mount Tail rotor Main axis view ...

Отзывы: