background image

8

Battery Charging Procedure 

The craft’s lithium-polymer battery must be charged before the unit can be flown. 
Before charging, be sure  the craft and remote control are powered off. Failure to do so 
may result in injury. 

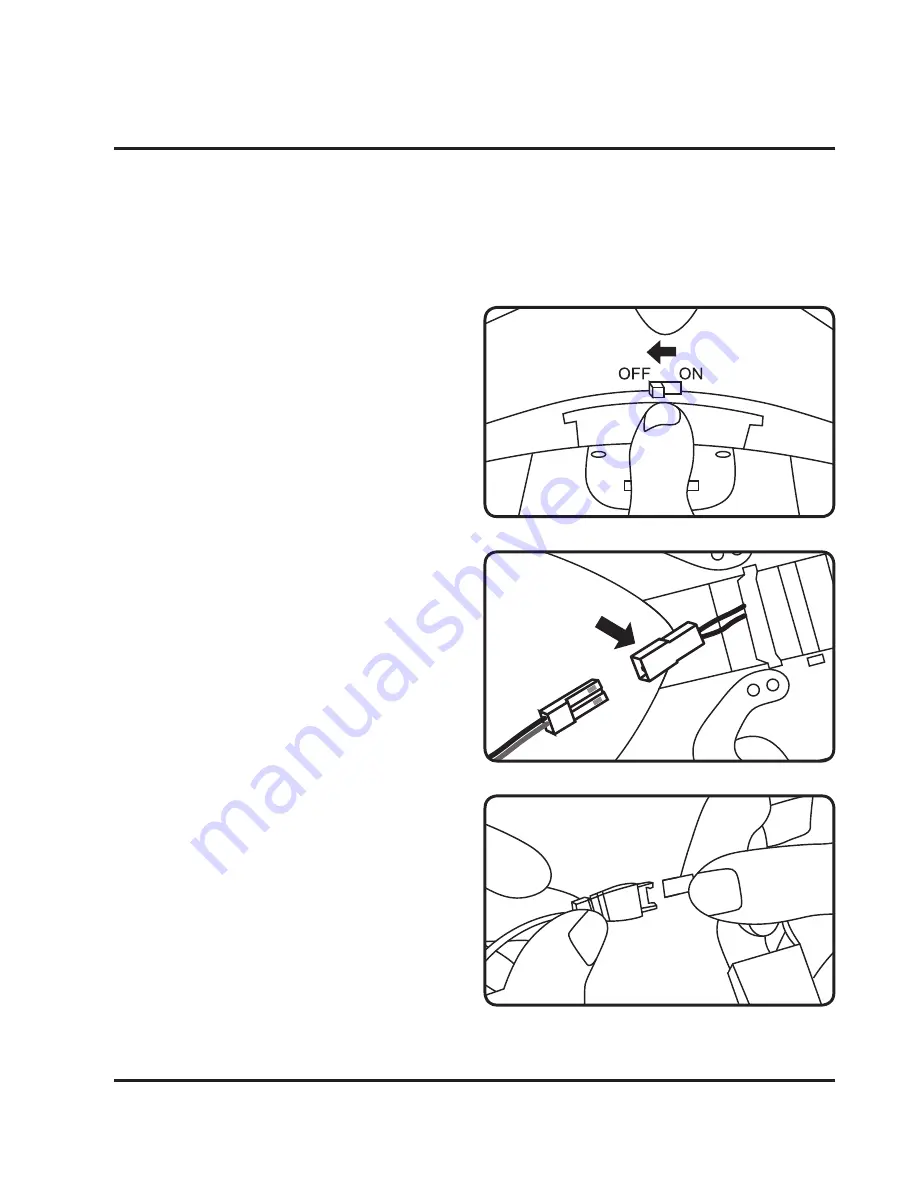
Step 1

Make sure the craft is powered OFF, then 
open the battery cover by gently pulling 
towards the rear of the craft.

Step 2

Disconnect the battery and craft power 
plugs. Slide the battery out of its bay for 
easier access or replacement.

Step 3

Attach the plug on the battery to the 
corresponding plug on the USB charging 
cable (included).
Be sure to match the plugs correctly or 

damage may occur�

Содержание EAGLE PRO DRW676

Страница 1: ...User s Guide for Model DRW676 v1657 01 ...

Страница 2: ...uipment does cause harmful interference to radio or television reception which can be determined by turning the equipment off and on the user is encouraged to try to correct the interference by one or more of the following measures Reorient or relocate the receiving antenna Increase the separation between the equipment and receiver Connect the equipment into an outlet on a circuit different from t...

Страница 3: ...k Trim Adjustment 12 Setting Trim Countering Drift Flying Tips Features 14 Tips for Safe Operation Speed Setting Auto Reverse Headless Mode Flips Tricks WiFi Mode 16 Sky Rider Drones App WiFi Flight Start Screen Flight Screen Intuitive Mode Virtual Reality VR Mode for VR Headsets Attaching the Smartphone Cradle Factory Reset 21 Reset Procedure Troubleshooting 23 Repair 24 Rotor Replacement Parts 2...

Страница 4: ...250g and 55 lbs 25kg The SkyRider Eagle Pro meets this requirement and must be registered and your FAA Registration ID Number must be permanently affixed to the craft Aircraft that weigh more than 55 lbs have a different set of criteria for registration Who Can Register Anyone 13 years of age or older A person who does not meet this age requirement must have their UAS registered by someone 13 year...

Страница 5: ...y USB cable for battery recharge 6 replacement rotors Screwdriver Detachable smartphone cradle Orientation Rotor Guard Landing Skids Battery Camera under side Overview Rotors White rotors indicate front of craft Craft Chassis LED Formation Lights under side White LEDs indicate the front of the craft ...

Страница 6: ...d backward Roll Bank push left right Flip Press and push Right Control Stick to perform a flip Lights Flight Control Sensitivity Push forward to turn lights ON or OFF Push downward to adjusts the control speed and sensitivity Trim Adjustment Adjusts trim settings for smooth and level flight Power Switch Antenna Power Status Indicator Remote Control ...

Страница 7: ...ies Remote Control Battery Installation Battery Info BATTERY TYPE SPECIFICATION DURATION CHARGE TIME Craft Li Po Battery 3 7V 750mAH 6 to 8 minutes flight time Approx 120 minutes Remote AA Batteries 1 5V Approx 18 hours Non rechargeable Batteries Charging ...

Страница 8: ...ult in injury Step 1 Make sure the craft is powered OFF then open the battery cover by gently pulling towards the rear of the craft Step 2 Disconnect the battery and craft power plugs Slide the battery out of its bay for easier access or replacement Step 3 Attach the plug on the battery to the corresponding plug on the USB charging cable included Be sure to match the plugs correctly or damage may ...

Страница 9: ...te reconnect the power plugs and close the battery cover Be sure to match the plugs correctly or damage may occur LIGHT STATUS Red Light ON Charging Red Light OFF Ready While charging the red light in the USB charging cable will be ON When charging is complete the red light in the USB charging cable will be OFF ...

Страница 10: ... craft and remote powered off Step 3 Power the craft ON The LED formation lights will blink in unison as the craft searches for a signal from the remote An audible chime will sound when the remote and the craft have linked with each other Step 1 Place the craft on a flat level surface before you begin Step 2 Power the remote control ON The light on the remote will blink as it searches for the sign...

Страница 11: ...ctly backward and wait for a second chime When this last chime has sounded the craft is calibrated and ready to fly Step 5 Attempt a stable hover low to the ground or surface you started on If you notice a tendency to drift you may need to adjust the trim controls to fine tune the handling see next section ...

Страница 12: ...ot make any sudden movements with the flight controls Adjust one trim setting at a time to avoid confusion Remember the white propeller blades LEDs indicate the front of the craft Note that while adjusting the trim will help with drift it will not eliminate it entirely Turbulence and other environmental factors may still act on the craft to influence its direction and flight Craft yaws spins in pl...

Страница 13: ...13 Front Front Craft rolls banks left or right Use RollTrim buttons under the Right Control Stick Craft pitches angles forward or backward Use PitchTrim buttons left of the Right Control Stick ...

Страница 14: ... and roll controls forward backward and left right on the Right Control Stick to fly the craft similar to the way an airplane flies After mastering this try the yaw controls left right on the left thumbstick to spin the craft in place and perform more complex maneuvers When you crash throttle down the engines IMMEDIATELY to reduce the chance of permanent damage to the craft and other objects If an...

Страница 15: ...user This can be useful if you become disoriented while flying or cannot visually determine which direction is true front To activate Headless Mode press down into the body of the remote control on the Left Control Stick Press again to deactivate Headless Mode Craft will perform flip in the desired direction Press and hold the Flip button then move the Right Control Stick in any direction Auto Rev...

Страница 16: ...found on the Apple App Store or Google Play Store by searching for Sky Rider Drones Step 1 Place the craft on a flat level surface before you begin Step 2 Power the craft ON The LED formation lights will blink in unison as it awaits a signal from your smartphone WiFi Flight Note that WiFi control may be disabled if the flying area is experiencing interference from nearby 2 4G equipment It is recom...

Страница 17: ...etworks menu Once connected open the app and click on the Play or Start icons to begin flying When WiFi mode is active you can save video and images directly to your smartphone Start Screen Play Press to begin using the app and fly the craft Settings Customize settings for the app Help Press to access Help Screen ...

Страница 18: ...aft Speed 30 60 100 Gallery Access pictures and video Intuitive Mode See below Screen Controls Enable disable flight controls Rev Flips camera image VR Mode Splitscreen ON OFF for use withVR headset Intuitive Mode This mode uses the G Sensor in a connected smartphone for directional control during flight Tilt the phone forward back left right to change the craft s direction Throttle and yaw contro...

Страница 19: ...ontrols are locked out in VR Mode you must have the regular remote connected in order to fly the craft Images and video captured in VR Mode are not saved with the splitscreen view WARNING We do not recommend flying the craft using only VR Mode and a headset The app only displays what the craft s camera can see your peripheral vision and situational awareness will be completely obscured by the head...

Страница 20: ...ft just by watching the screen Step 1 Slide the cradle into position on the remote antenna and handle Step 2 Gently press on the cradle until it locks into place Step 3 Pull upwards on the top of the cradle so that it will fit your smartphone Step 4 Place your phone in the cradle and release the top portion Your phone should sit firmly in place Removal Gently pull the cradle off of the remote in a...

Страница 21: ...unit may need to be reset to the factory default settings Step 1 Power ON the remote control Step 2 Power on the craft Step 3 When the LED lights on the craft shift from flashing quickly to flashing slowly push the throttle all the way forward wait for a chime to sound then pull the throttle all way rearward and wait for the chime The lights on the craft will stop flashing and change to solid ...

Страница 22: ...al surface then push both control sticks on the remote all the way down and left and hold for 2 3 seconds The lights will begin quickly flashing again When the lights stop flashing and are solid again the craft has been reset and is ready to fly ...

Страница 23: ...yroscopes may be misaligned Perform Pre Flight Calibration again see pg 10 Perform factory reset see pg 20 Craft drifts while in flight Trim not set or needs adjustment Adjust trim settings see pg 11 Craft suffers from mechanical difficulty or vibrates excessively Damage to body rotors or other major components Check to make sure the craft has not taken significant damage Replacement parts may be ...

Страница 24: ...off of the rotor Use a small Phillips head screwdriver included and remove the screw connecting the rotor to the electric motor shaft Remove the damaged rotor and replace it with a new one then screw it back into place on the motor shaft and replace the rotor cap REMINDER It is extremely important to use the correct rotor A or B for replacement Using the incorrect rotor will cause the craft s flig...

Страница 25: ... repair you can order new parts by contacting the customer support number or by following the web address below to the product page and clicking on the Parts and Accessories tab Product web address http gpx com drw676 html Parts 01 04 05 02 03 06 07 08 09 10 12 11 Parts Diagram ...

Страница 26: ...26 PART NAME QUANTITY 1 Rotor A 3 2 Rotor B 3 3 Motor A 3 4 Motor B 3 5 Lower Frame 1 6 Rotor Cap 6 7 Upper Frame 1 8 PCB 1 9 Battery 1 10 Battery Cover 1 11 LED Cover 6 12 Landing Skid 2 Parts List ...

Страница 27: ...nir des réponses à des questions fréquemment posées consultez la rubrique d assistance sur www gpx com Contact Information Website www gpx com Email Support prodinfo dpiinc com Email Parts partsinfo dpiinc com Phone Support 1 888 999 4215 Copyright 2016 Digital Products International DPI Inc All other trademarks appearing herein are the property of their respective owners Specifications are subjec...

Страница 28: ......

Отзывы: