


Отзывы:
Нет отзывов
Похожие инструкции для DRW358S

spry
Бренд: SWELLPRO Страницы: 2

X600W
Бренд: SYMA Страницы: 16

X140HV
Бренд: Eachine Страницы: 8

Matrice 200 Series V2
Бренд: dji Страницы: 87

Mavic 3
Бренд: dji Страницы: 118

AGRAS T16
Бренд: dji Страницы: 39

Hubble-11
Бренд: Estar Страницы: 60

XMISSION
Бренд: XAG Страницы: 16

AR
Бренд: Parrot Страницы: 4

Waterproof Quad-Copter
Бренд: Mariner Страницы: 4

Smartfly
Бренд: Valore Страницы: 5

FPV ORBIT
Бренд: Rage Страницы: 8
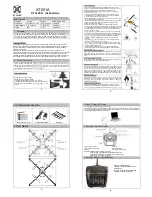
XT 001A
Бренд: XT FLYER Страницы: 2

H850
Бренд: YUNEEC Страницы: 88

NH90083 NANO
Бренд: NINCOAIR Страницы: 20

Streaming Video Spider-Drone
Бренд: sky viper Страницы: 2

FlyTech BLADESTAR
Бренд: WowWee Страницы: 20

GLINT 2.0
Бренд: Hunan Страницы: 11


