SKY KING DR775 Скачать руководство пользователя страница 15

Customer Support: 1-888-999-4215

15

Using the Camera

This unit is equipped with an on board camera and SD memory card that allows you to 
document your flights and view them later. The camera will record stills and video as 
JPEG and AVI files. The video files (AVI) can be viewed on a computer with any common 
video playing software, like Quicktime or Windows Media Player. 
To take video during your flight, press the Left Trigger on the remote control to 
begin recording. When the camera is recording video the power/status indicator will 
turn green. 
To take still shots during your flight, press the Photo button to the right of the Left 
Control Stick. The power/status indicator will flash green when it will takes a photo. 
Press & hold the Photo button for a 3 photo burst. 
When the light on the unit is flashing blue, the SD card’s memory is full and will need 
to be downloaded to a computer, and the card formatted, before it can be used again. 
The SD card is stored in a slot on the rear of the camera/battery housing. To remove 

the SD card, lightly push against it until it springs partially out of its slot, then  pull the 
card out. Use the included USB/SD card reader to connect to your computer.
After you’ve connected and opened the SD Card file folder (”NO NAME” drive), open the 
“DCIM” folder, then “100DSCIM”. You should be able to see and play any of the AVI video 
files on the card. 
NOTE:
•  The video camera does not record sound.
•  Proper orientation of the SD Card in the slot (see figure on next page).
•  You can format the SD card at any time without worry, the camera will automatically 

re-create the DCIM and 100DSCIM file folders.

On Board Camera

Camera info continued on the following page.

Содержание DR775

Страница 1: ...QuadcopterDronewithVideoCamera User s Guide for Model DR775 v1396 01 For the most up to date version of this User s Guide go to www gpx com ...

Страница 2: ... rooftops or trees Always launch the quadcopter from a flat level surface Never launch the quadcopter from your hand Never leave the quadcopter unattended while it is powered on FCC Warnings Warning Changes or modifications to this unit not expressly approved by the party responsible for compliance could void the user s authority to operate the equipment NOTE This equipment has been tested and fou...

Страница 3: ...ive heat such as sunshine fire or the like Les piles ne doivent pas être exposées à de forte chaleur tel qu à la lumière du soleil au feu ou autres choses de semblable Keep new and used batteries away from children If the battery compartment does not close securely stop using the product and keep it away from children Gardez les piles neuves et d occasion à partir des enfants Si le compartiment de...

Страница 4: ...nnect Step 2 Take Off Trim Adjustment 11 Countering Drift Setting Trim Flying Tips 13 Flight Control Sensitivity Tips for Safe Operation Stunts 14 On Board Camera 15 Using the Camera Troubleshooting 17 Repair 18 Body Repair Rotor Replacement Parts 19 Parts Replacement Parts Diagram Parts List Company Information 22 Contact Information International Support Warranty Table of Contents ...

Страница 5: ...Remote control requires 6 AA batteries not included USB cable for battery recharge 4 GB SD card and Card Reader 4 replacement rotors Orientation Electric Motor Gears Housing Landing Feet Battery Receiver Board Camera Housing under side Rear View ...

Страница 6: ...ate front of quadcopter black indicates rear Orientation Styrofoam Shell Rotor A Rotor B Rotor B Rotor A Quadcopter Chassis Receiver Light under side Flashes red and blue to indicate remote and quadcopter are connected Top View ...

Страница 7: ...ight Right Control Stick Pitch push forward backward Roll Bank push left right Stunt Press to perform a forward flip Flight Control Sensitivity Adjusts the speed sensitivity and stunt controls of the quadcopter Trim Adjustment Adjusts trim settings for smooth and level flight Power Switch Antenna Power Status Indicator Reset Press to reset trim to factory default Photo Press to take a photo Remote...

Страница 8: ...ull on the connector plugs only pulling on the wires may result in damage to the plugs or wires Step 2 Connect the battery plug to the matching plug on the included USB charger then connect the USB charger to a USB power source such as a powered on computer or USB power adapter recommended not included The red light in the plug of the USB charging cable will indicate battery charge status see tabl...

Страница 9: ...ps Head Screwdriver AA x6 Remote Batteries Battery Usage Info BATTERY TYPE SPECIFICATION DURATION CHARGE TIME Quadcopter Li Po Battery 3 7V 650mAH 6 to 8 minutes flight time 60 to 70 minutes Remote AA Batteries 1 5V Approx 18 hours Non rechargeable ...

Страница 10: ...scopes in the quadcopter and connect it to the remote YOU MUST PERFORM THIS ACTION QUICKLY FOR IT TO TAKE EFFECT When the receiver light at the front of the styrofoam body begins slowly blinking red and blue and the Power Status indicator on the remote is red the quadcopter and remote are successfully calibrated and linked Step 2 Take Off Add light throttle until the quadcopter is in the air If th...

Страница 11: ...low to the ground as possible Remember the red propeller blades indicate the front of the quadcopter If the trim adjustments do not seem to be helping or seem to be making the problem worse press the Reset button to the right of the Left Control Stick to reset the trim to factory default settings and try again Quadcopter yaws spins left or right Drift Type Trim settings continued on the following ...

Страница 12: ...rolls left or right Press L R buttons under the Right Control Stick Front Trim Adjustment Quadcopter pitches moves forward or backward Press Up Down buttons to the left of the Right Control Stick Front Drift Type Solution ...

Страница 13: ...the pitch and roll controls forward backward and left right on the Right Control Stick to fly the quadcopter like the way an airplane flies After mastering this try the yaw controls left right on the left thumbstick to spin the quadcopter in place and perform more complex flights When you crash throttle down the engines IMMEDIATELY to reduce the chance of permanent damage to the quadcopter and oth...

Страница 14: ...ight Trigger to perform a forward flip Set the Flight Sensitivity Control to 100 and use the Right Control Stick to perform a flip in any direction The Stunt button does not need to be used in this case though it will still function Note that in this setting the Right Control Stick will only perform stunts and will not adjust the pitch or roll of the quadcopter Use this mode with care to avoid dam...

Страница 15: ...oto button for a 3 photo burst When the light on the unit is flashing blue the SD card s memory is full and will need to be downloaded to a computer and the card formatted before it can be used again The SD card is stored in a slot on the rear of the camera battery housing To remove the SD card lightly push against it until it springs partially out of its slot then pull the card out Use the includ...

Страница 16: ...16 Press Left Trigger for video Use Photo button to the right of the left thumbstick for still shots or 3 shot burst On Board Camera Camera Indicator SD Card Slot ...

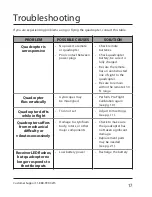
Страница 17: ...pes may be misaligned Perform Pre Flight Calibration again see pg 10 Quadcopter drifts while in flight Trim not set Adjust trim settings see pg 11 Quadcopter suffers from mechanical difficulty or vibrates excessively Damage to styrofoam body rotors or other major components Check to make sure the quadcopter has not taken significant damage Replacement parts may be needed see pg 21 Receiver LED fla...

Страница 18: ...necting the rotor to the electric motor shaft Remove the damaged rotor and replace with a new one then screw it back into place on the motor shaft REMINDER It is extremely important to use the correct rotor A or B for replacement Using the incorrect rotor will cause the quadcopter s flight to be erratic and impossible to control The marking can be seen on the top of the rotor In the event that the...

Страница 19: ...ts of the quadcopter are damaged beyond repair you can order new parts by contacting the customer support number or by following the web address below to the product page and clicking on the Parts and Accessories tab Product web address http bit ly 1Hl5ziY Parts Parts Diagram ...

Страница 20: ...20 Parts Parts Diagram ...

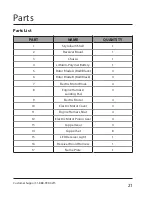
Страница 21: ... 5 Rotor Blade A Red Black 4 6 Rotor Blade B Red Black 4 7 Electric Motor Block 4 8 Engine Harness Landing Pad 4 9 Electric Motor 4 10 Electric Motor Cover 4 11 Engine Harness Strut 4 12 Electric Motor Pinion Gear 4 13 Copper Gear 4 14 Copper Set 8 15 LED Receiver Light 1 16 Receiver Board Harness 1 17 Name Plate 1 Parts Parts List ...

Страница 22: ...our obtenir des réponses à des questions fréquemment posées consultez la rubrique d assistance sur www gpx com Contact Information Website www gpx com Email Support prodinfo dpiinc com Email Parts partsinfo dpiinc com Phone Support 1 888 999 4215 Warranty See included 30 Day Warranty for warranty information Warranty and the most up to date version of this User s Guide can also be found at www gpx...

Отзывы: