background image


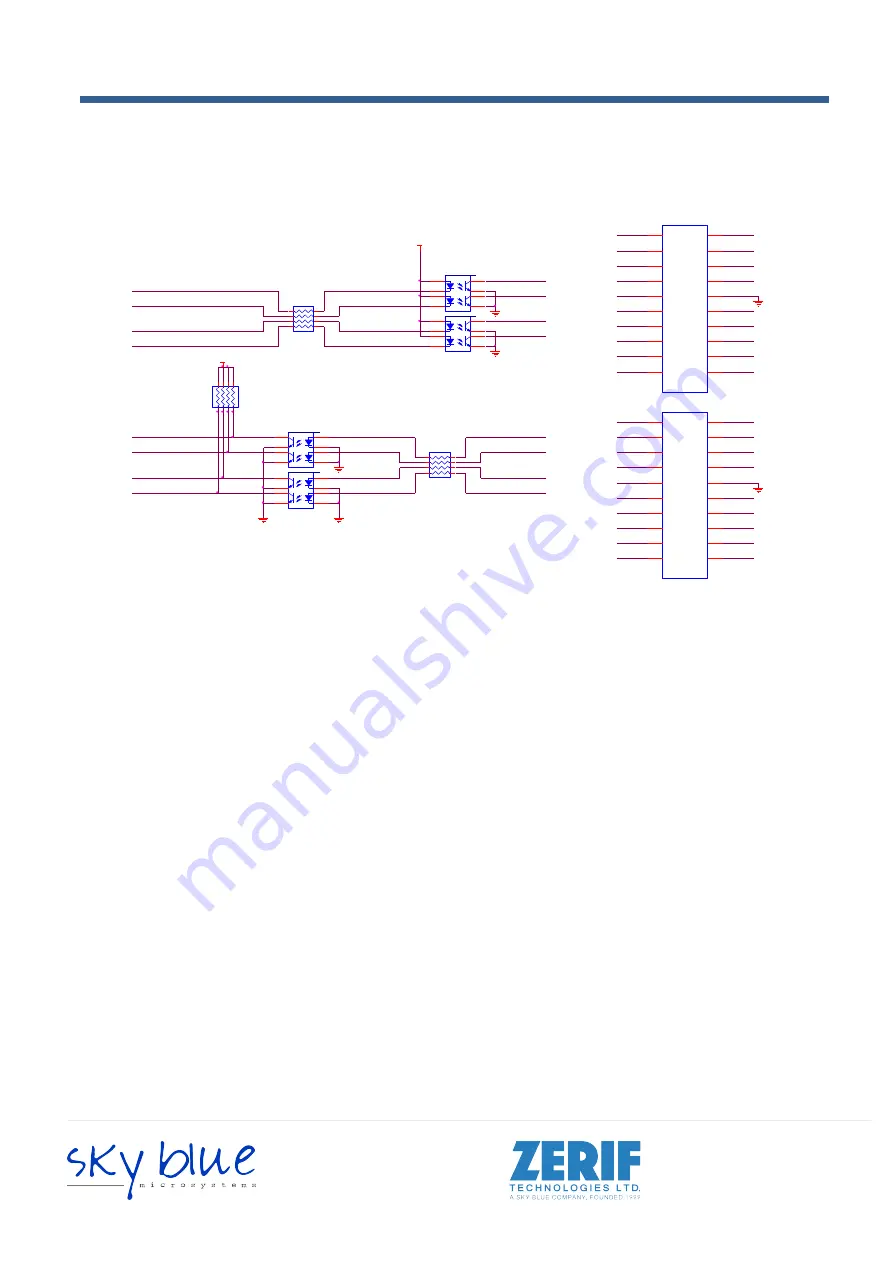
The electrical connection of the Opto-isolated signals is designed as on following principal 
schematic diagram: 


Figure 8: Opto-isolated IO’s schematic 

J9

HEADER_2x10x100mil_SMT

1

1

2

2

3

3

4

4

5

5

6

6

7

7

8

8

9

9

10

10

11

11

12

12

13

13

14

14

15

15

16

16

17

17

18

18

19

19

20

20

J7

HEADER_2x10x100mil_SMT

1

1

2

2

3

3

4

4

5

5

6

6

7

7

8

8

9

9

10

10

11

11

12

12

13

13

14

14

15

15

16

16

17

17

18

18

19

19

20

20

RN2
4x1k

1

8

2

7

3

6

4

5

RN1

4x120R

1

8

2

7

3

6

4

5

IO_OUT0

IO_OUT3

IO_OUT2

IO_OUT1

RN3

4x1k

1

8

2

7

3

6

4

5

GPIO0

GPIO3

GPIO1

GPIO2

IO_IN_EXT0

IO_OUT_EXT3

IO_OUT_EXT2

IO_IN_EXT2

IO_IN_EXT1

IO_IN_EXT3

MOCD207R2M

1

8

2
3

4

6

5

7

MOCD207R2M

1

8

2
3

4

6

5

7

EXT_GND2

IO_OUT_EXT1

IO_OUT_EXT0

IO_OUT_EXT2

IO_OUT_EXT3

MOCD207R2M

1

8

2
3

4

6

5

7

MOCD207R2M

1

8

2
3

4

6

5

7

IO_IN_EXT1

IO_IN_EXT0

IO_IN_EXT3

IO_IN_EXT2

DOUT1n

DOUT1p

DOUT2p

IO_IN3

DOUT2n

IO_IN2

IO_IN1

IO_IN0

IO_OUT_EXT1

IO_OUT_EXT0

EXT_GND1

RIN3p

RIN3n

DOUT4p

RIN4n

RIN4p

DOUT3n

DOUT3p

RIN2p

RIN1p

RIN1n

RIN2n

DOUT4n

GPIO_5V_0

GPIO_5V_3

GPIO_5V_2

GPIO_5V_1

GPIO_5V_6

GPIO_5V_5

GPIO_5V_4

GPIO_5V_7

3.3V

3.3V

EXT_GND2

EXT_GND1

EXT_GND1

EXT_GND2


Installation and Configurations 

Sky Blue Microsystems GmbH

Geisenhausenerstr. 18
81379 Munich, Germany

+49 89 780 2970, [email protected] 

www.skyblue.de

In Great Britain:

Zerif Technologies Ltd.

Winnington House, 2 Woodberry Grove

Finchley, London N12 0DR
+44 115 855 7883, [email protected]

www.zerif.co.uk

International Distributors

Содержание Kaya KY-Chameleon

Страница 1: ...n May 2014 Sky Blue Microsystems GmbH Geisenhausenerstr 18 81379 Munich Germany 49 89 780 2970 info skyblue de www skyblue de In Great Britain Zerif Technologies Ltd Winnington House 2 Woodberry Grove Finchley London N12 0DR 44 115 855 7883 info zerif co uk www zerif co uk International Distributors ...
Страница 2: ...iagram 9 4 1 External View of the Board 9 4 2 5 Mechanical Specifications 11 Essentials to get started 11 5 1 Power supplies 11 5 2 Absolute maximum ratings 11 5 3 Mechanical dimensions 12 5 4 6 Installation and Configurations 13 Installation instructions 13 6 1 Connecting to CoaXPress output connectors 13 6 2 Chameleon LEDs 14 6 3 Chameleon Hardware Reference 15 6 4 Chameleon Board Block Diagram ...

Страница 3: ...FIGURE 8 OPTO ISOLATED IO S SCHEMATIC 23 Tables TABLE 1 ABSOLUTE MAXIMUM RATINGS 11 TABLE 2 COAXPRESS LINKS STATUS LED S 14 TABLE 3 BOARD STATUS LED S 15 TABLE 4 J7 CONNECTOR PINOUT 19 TABLE 5 J9 CONNECTOR PINOUT 20 TABLE 6 LVDS OUTPUT DC SPECIFICATIONS DRIVER OUTPUTS 21 TABLE 7 LVDS INPUT DC SPECIFICATIONS RECEIVER INPUTS 21 TABLE 8 LVTTL INPUT SPECIFICATIONS 22 TABLE 9 LVTTL OUTPUT SPECIFICATION...

Страница 4: ...ot disassemble repair or modify the product Otherwise a fire or electric shock may occur due to a short circuit or heat generation For inspection modification or repair contact our sales personnel Do not touch a cooling fan As a cooling fan rotates in high speed do not put your hand close to it Otherwise it may cause injury to persons Never touch a rotating cooling fan Do not place the product on ...

Страница 5: ...ity and surges Improper handling can seriously damage the circuits In addition do not let your clothing come in contact with the circuit boards or components Otherwise the product may be damaged Disclaimer 2 2 This product should be used for simulation of CoaXPress video streams KAYA Instruments assumes no responsibility for any damages resulting from the use of this product for purposes other tha...

Страница 6: ...abnormalities arising from use of this product or damage of this product not due to our responsibility or failure due to modification Repair of this product is carried out by replacing it on a chargeable basis not repairing the faulty devices However non chargeable replacement is offered for initial failure if such notification is received within two weeks after delivery of the product Introductio...

Страница 7: ...m video streams on the CoaXPress links It also provides GPIO for machine control signals such as triggers shaft encoders exposure control and general I O which can be simulated together with the video streams The simulator enables transmitting the video streams from onboard memory as well as run time uploading the streams from computer memory Features 3 2 Video output modes Test patterns BMP RAW T...

Страница 8: ...orting Windows and Linux OS API for developing custom applications Plug ins modules for Matlab Gen i Cam compliant Up to 32Gb image buffer 4 DIN connectors for CoaXPress links PCIe Gen2 x4 Half length PCIe card Data rates up to 6 25Gpbs per link 0 C to 55 C operating environment temperature Product Applications 3 3 CoaXPress vision systems testing and development Vision algorithm development CoaXP...

Страница 9: ...e 8 Related documents and accessories 3 4 Documents Chameleon Camera Simulator User Guide Chameleon App User Manual Chameleon API Reference Book CoaXPress standard 1 0 Accessories CoaXPress cables DIN to DIN CoaXPress cables DIN to BNC Key Features ...

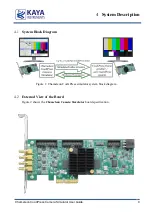
Страница 10: ...a Simulator User Guide 9 System Block Diagram 4 1 Figure 1 Chameleon CoaXPress simulator system block diagram External View of the Board 4 2 Figure 2 shows the Chameleon Camera Simulator board specification System Description 4 ...

Страница 11: ...Chameleon CoaXPress Camera Simulator User Guide 10 System Description Figure 2 Chameleon board external view ...

Страница 12: ...lity with all computers that have the above specifications Please consult KAYA representative for any specific issue Power supplies 5 2 The Chameleon board receives it s power from PCIe connector of the motherboard According to PCIe standard 2 0 the board might consume up to 10W of power while actual power consumption depends on usage mode and interfaces Absolute maximum ratings 5 3 Specification ...

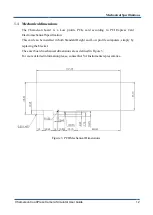
Страница 13: ... Card Electromechanical Specification This card can be installed in both Standard Height and Low profile computers simply by replacing the bracket The exact board mechanical dimensions are as defined in Figure 3 For more detailed information please contact KAYA Instruments representative Figure 3 PCB Mechanical Dimensions Mechanical Specifications ...

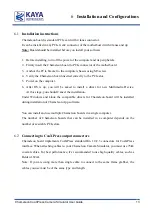
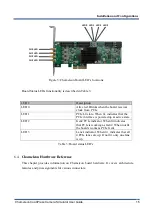
Страница 14: ...imedia Device At this stage you should Cancel the installation Under Windows and Linux the compatible drivers for Chameleon board will be installed during installation of Chameleon App software You can install and use multiple Chameleon boards in a single computer The number of Chameleon boards that can be installed in a computer depends on the number of available PCIe slots Connecting to CoaXPres...

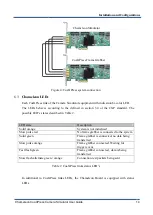
Страница 15: ...ystem is not initialized Slow pulse red No frame grabber is connected to the system Solid green Frame grabber is connected no data being transferred Slow pulse orange Frame grabber connected Waiting for trigger event Fast flash green Frame grabber connected data is being transferred Slow flash alternate green orange Connection test packets being sent Table 2 CoaXPress links status LED s In additio...

Страница 16: ...it indicates that the PCIe interface is powered up at active state LED 2 Gen2 PCIe indicator When lit indicates that PCIe is working as Gen2 When not lit the boards works as PCIe Gen1 LED 3 Lane s indicator When lit indicates that all 4 PCIe lanes are up If not lit only one lane is up Table 3 Board status LED s Chameleon Hardware Reference 6 4 This chapter provides information on Chameleon board h...

Страница 17: ... to 2 GB sec DMA GPIO GPIO GPIO Controller CoaXPress Driver Video stream channel Control channel CoaXPress Driver Video stream channel Control channel CoaXPress Driver Video stream channel Control channel CoaXPress Driver LED LED LED LED DIN 1 0 2 3 DIN 1 0 2 3 DIN 1 0 2 3 DIN 1 0 2 3 Figure 6 Chameleon Board Block Diagram Installation and Configurations ...

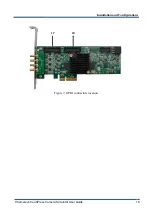
Страница 18: ...nal of Chameleon board can be used to initiate on board events transmitted to other devices or rerouted from other signals such as CoaXPress triggers and GPIO s Additionally these auxiliary signals can be used to emulate complex devices such as encoders and drive controls The GPIOs can be controlled from the Chameleon API and be set as a simulation trigger sources The API enables routing of any in...

Страница 19: ...Chameleon CoaXPress Camera Simulator User Guide 18 J 7 J 9 Figure 7 GPIO connectors location Installation and Configurations ...

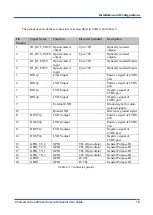
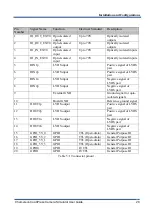
Страница 20: ...gnal of LVDS pair 7 RIN1n LVDS input Negative signal of LVDS pair 8 RIN2p LVDS input Negative signal of LVDS pair 9 External GND Ground signal for opto isolated signals 10 Board GND Reference ground signal 11 DOUT1p LVDS output Positive signal of LVDS pair 12 DOUT2p LVDS output Positive signal of LVDS pair 13 DOUT1n LVDS output Negative signal of LVDS pair 14 DOUT2n LVDS output Negative signal of ...

Страница 21: ...gative signal of LVDS pair 8 RIN2p LVDS input Negative signal of LVDS pair 9 External GND Ground signal for opto isolated signals 10 Board GND Reference ground signal 11 DOUT1p LVDS output Positive signal of LVDS pair 12 DOUT2p LVDS output Positive signal of LVDS pair 13 DOUT1n LVDS output Negative signal of LVDS pair 14 DOUT2n LVDS output Negative signal of LVDS pair 15 GPIO_5V_0 GPIO TTL Open dr...

Страница 22: ...Differential Output Short Circuit Current 4 ENABLED VOD 0 V 5 8 9 0 mA IOFF Power off Leakage VOUT 0 V or 3 6 V VDD 0 V or Open 20 1 20 µA IOZ Output TRI STATE Current EN 0 V and EN VDD VOUT 0 V or VDD 10 1 10 µA Table 6 LVDS Output DC specifications Driver Outputs Symbol Parameter Condition Pin MIN Typ MAX Units VTH Differential Input High Threshold VCM 1 2 V 0 05 V 2 35 V RIN RIN 15 35 mV VTL Di...

Страница 23: ...tput Low Voltage VDD min IOL 2 mA 0 4 V Note Vdd 3 3V unless specified otherwise Table 9 LVTTL output specifications Symbol Parameter Test condition note 1 MIN MAX Units VIH Input High Voltage VOUT VOH min or VOUT VOL max 0 2 5 V VIL Input Low Voltage 0 3 0 8 V IIN Input Current VIN 0 V or VIN VDD 5 µA Note Vdd 5V unless specified otherwise Table 10 TTL input specifications Symbol Parameter Test c...

Страница 24: ...R2M 1 8 2 3 4 6 5 7 MOCD207R2M 1 8 2 3 4 6 5 7 EXT_GND2 IO_OUT_EXT1 IO_OUT_EXT0 IO_OUT_EXT2 IO_OUT_EXT3 MOCD207R2M 1 8 2 3 4 6 5 7 MOCD207R2M 1 8 2 3 4 6 5 7 IO_IN_EXT1 IO_IN_EXT0 IO_IN_EXT3 IO_IN_EXT2 DOUT1n DOUT1p DOUT2p IO_IN3 DOUT2n IO_IN2 IO_IN1 IO_IN0 IO_OUT_EXT1 IO_OUT_EXT0 EXT_GND1 RIN3p RIN3n DOUT4p RIN4n RIN4p DOUT3n DOUT3p RIN2p RIN1p RIN1n RIN2n DOUT4n GPIO_5V_0 GPIO_5V_3 GPIO_5V_2 GPI...

Отзывы: