


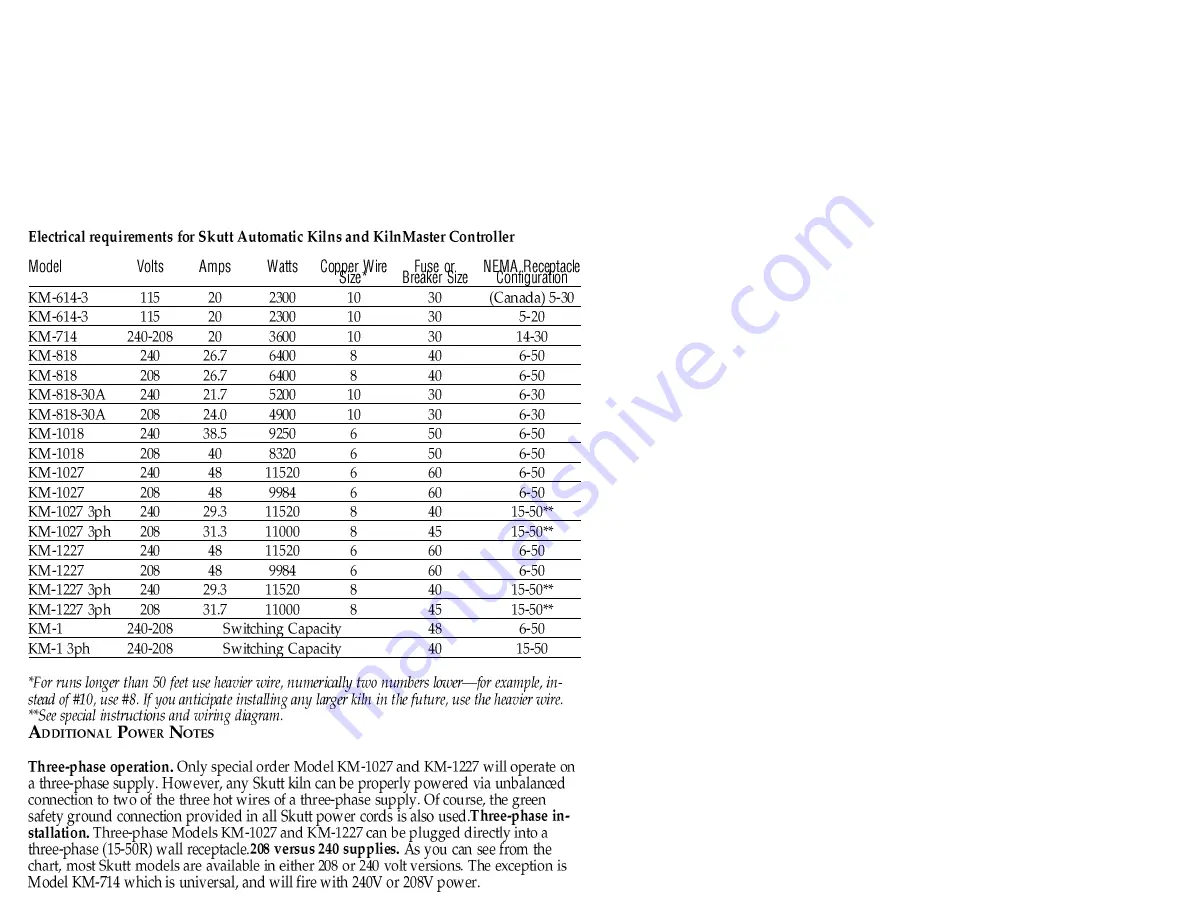
The “120/208V” supply is increasingly en-
countered in schools and newly-built com-
munities, because it’s more efficient for
heavy 120V loads. This affects Models
KM-818, KM-1018, KM-1027 and KM-1227
because their elements receive the full 208
(or 240) applied volts. The 208V versions
should never be fired on a 240V supply
without first installing a full set of 240V el-
ements. Otherwise, all components will be
seriously overtaxed.
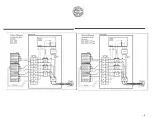
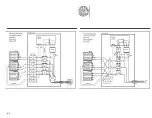
Important! Connecting and testing
Model KM-714.
The wall outlets for
Model KM-714 must be powered by 3-
wire 120/240-208V solid neutral supply—
as for an electric range. Only No. 10 wire is
required (or No. 8 for runs over 50 feet). 30
Amp fuses or circuit breakers only—no
larger or smaller—are recommended. The
U-shaped fourth blade of the 4W30 Amp
grounding plug is for the pure green wire
grounding of the kiln case. The blade op-
posite this U-shaped one takes the white
solid neutral wire. See the photo below
and refer to the wiring diagram in Appen-
dix 5 for the 714 plug diagram.
P
REPARATION
B
EFORE
F
IRING
Remove any brick chips or other foreign
matter from around the elements. Bits of
bisque and glaze will eat through elements
and our warranty cannot cover such acci-
dents. We recommend that you vacuum
the inside of the kiln to remove any dust
that accumulates during shipment.
Wipe all new shelves clean, and brush
coat one side of each with high fire kiln
wash. Apply a thin coating of kiln wash in
one direction, allow to dry and apply an-
other thin coating in the opposite direction
leaving a 1/2” margin from the outside
edge of the shelf.A new coat is seldom
needed—just spot-patch and sand off the
surface evenly with coarse sandpaper
wrapped around a wooden block. A fresh
coat may be needed before a porcelain fir-
ing if glaze has dripped onto the shelf.
Kiln wash the floor of the kiln, being
careful to leave a one inch margin un-
painted all the way around interior edge.
Never kiln wash the walls or lid of your
kiln!
T
HE
I
MPORTANT
F
IRST
T
EST
F
IRING
Now you’re ready to fire. Be sure to re-
view the preceding sections, double check-
ing for safety and correct electrical connec-
tions.
It is important to the life of your kiln that
your first firing be done properly. Before
you start, read this entire manual carefully,
including the preceding sections and load-
ing and firing instructions.
New elements and foreign matter like
dust give off vapors that tend to discolor
glazes. Therefore, your first firing should
be a Cone 04 empty test fire with only your
dry shelves in the kiln, posted as though
ware were on them. The first time the ele-
ments are fired they will give off some
smoke. This is normal and expected. This
is a good time to use Self-Supporting
Cones on the shelves to test the heat accu-
racy from top to bottom.
A Cone 04 (1922½) is recommended for
proper pre-oxidation of a new element.
The steps to accomplish this firing are the
following:
1. Activate the touch pad by turning the
Power
to
On
. Press
Enter
.
2. Press
Cone Fire
mode.
Содержание KILNMASTER AUTOMATIC KILNS
Страница 1: ......
Страница 2: ......
Страница 5: ......
Страница 6: ......
Страница 7: ......
Страница 8: ......
Страница 9: ...el e m ent ...
Страница 10: ......
Страница 11: ......
Страница 12: ......
Страница 13: ...PF Enter Cone Fire 0 4 Enter Medium Enter Enter Hold Start ...
Страница 14: ......
Страница 15: ......
Страница 16: ......
Страница 17: ...STOP Enter Review 15 ...
Страница 18: ......
Страница 19: ......
Страница 20: ... Review View Stop Enter Review ...
Страница 21: ......
Страница 22: ......
Страница 23: ...PF HOLd ConE SPd ...
Страница 24: ...CPLt ON deLA ALAr Cone Fire 0 6 Enter Med Enter 5 Enter Review Delay Alarm Review Start ...
Страница 25: ...Stop ...
Страница 26: ...PF SEGS rA 1 8 F 1 8 HLd 1 8 USEr CPLt ON deLA ALAr ...
Страница 28: ...26 Temperature 1500 F 11000 F 21000 F 23450 F Rate 500 hr 1500 hr 5700 hr 1080 hr 0 Hold 6 00 2 00 0 ...
Страница 30: ...0 F or0 C Enter Delay 0 9 9 9 9 Enter Alarm 0 9 9 9 9 Enter Enter ...
Страница 31: ...Review Cone Table 0 2 2 1 0 View ...
Страница 33: ...0000 Enter Cone Fire Enter Start Enter Stop Start Cone Fire Ramp Hold Enter Start Enter ...
Страница 34: ......
Страница 35: ......
Страница 36: ......
Страница 37: ......
Страница 38: ......
Страница 39: ......
Страница 40: ......
Страница 41: ...Enter Enter Start Enter Temper ature Enter ...
Страница 42: ...1 2 3 4 5 6 7 8 FAIL ErrP ...
Страница 43: ......
Страница 44: ......
Страница 45: ......
Страница 46: ......
Страница 47: ......
Страница 48: ......
Страница 49: ......
Страница 50: ......
Страница 51: ......
Страница 52: ......
Страница 53: ......
Страница 54: ...52 7 8 5 6 4 2 3 Hold Temperature Rate Segment 7 8 5 6 4 1 2 3 7 8 5 6 4 1 2 3 1 Segment Rate Temperature Hold ...


