background image

Document 

NO.:RD-508C-39-001 


Version: 

20170920 

- 6 -


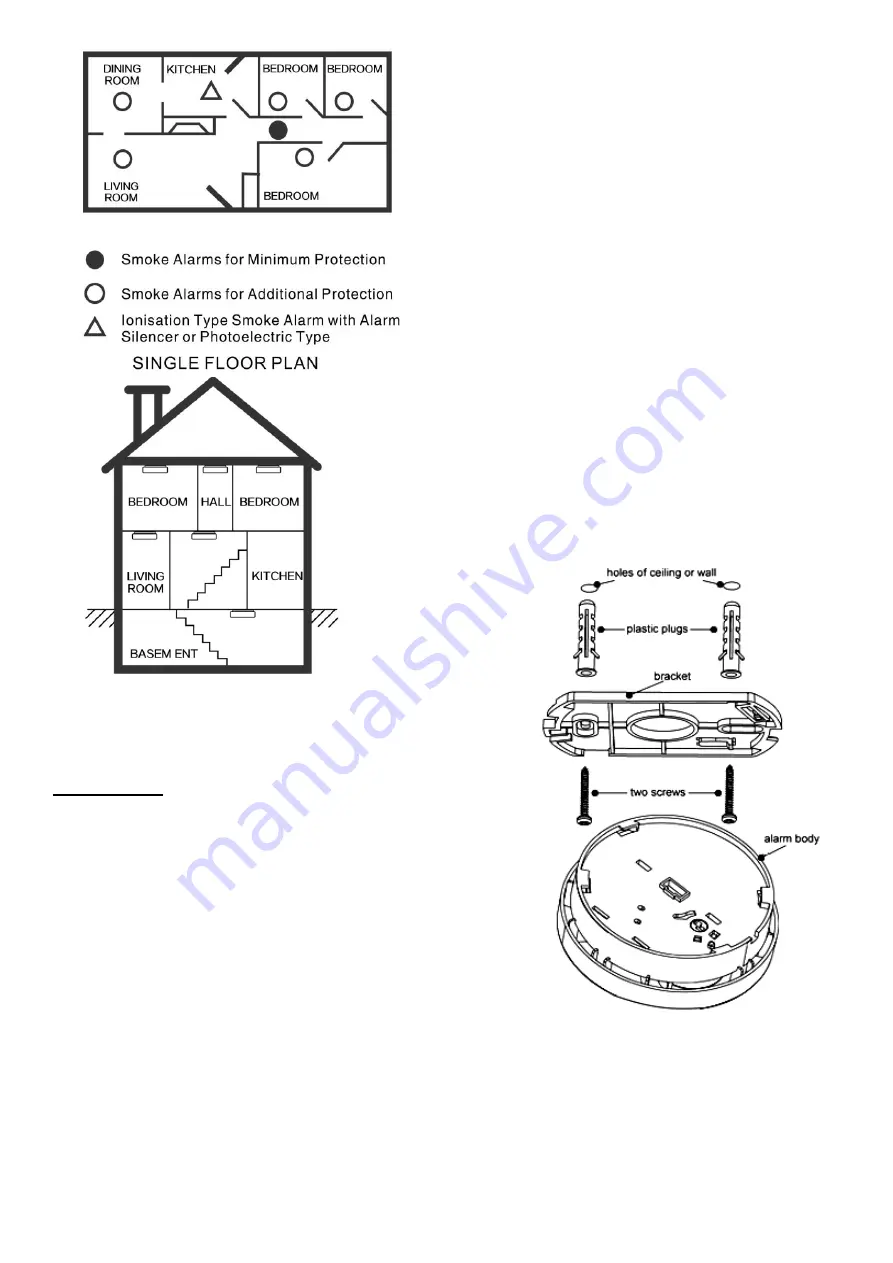
Diagram 4   


MULTIPLE FLOOR PLAN 

Diagram 5 


Installation: 

Activation 

Press test button and hold it for more than 3 seconds 

until LED lights, and release it within 2 seconds, the unit 

will generate a “beep” indicating that it is activated and 

ready to detect status. 

CAUTION:

 this unit must activated prior to installation. 

Failure to perform step will result in a non functioning 

smoke alarm!


Turn the alarm body counterclockwise and take off the 

bracket.


Hold the bracket in the installation position as specified in 

the Recommended Locations, mark installation holes of the 

bracket with pencil. 


Drill the two marked installation holes with a 3/16 inch   


(5mm) drill bit. Tap the two plastic grommets into holes 

with hammer. 


Remove locking plug from the bracket with screwdriver if 

necessary (Refer to Diagram 6). This is an optional 

additional locking in place feature. 


Mount the bracket to the ceiling by inserting and tightening 

the supplied screws into plastic grommets. (Refer to 

Diagram 7). 


Fit the alarm on the bracket and turn the alarm body 

clockwise, until fully inserted on the bracket. 


Optionally insert locking plug into the gap between bracket 

and bottom cover for locking alarm in place (Refer to 

Diagram 8). 


Press the button to test the unit. The alarm should then 

sounds 3 beeps – 1.5 seconds pause, and will repeat    until 

the button is released, if no sound, it indicates a defective 

alarm, refer to the ”Trouble shooting” section for a solution 

or return to your retailer during warranty.     

WARNING:


To prevent injury, this unit must be securely attached to the 

wall or ceiling in accordance with the installation instructions.     


Diagram 7 


Содержание GS508C

Страница 1: ...moke al amily home ndividual livi Do not install larm is not a s nstall a smok he home Smo easons For ex ome on anot ther side of a larm in time will not promp which it is inst moke alarm m me The alarm potential ircumstances larm i e outd lcohol usage his smoke alar nd maintain s must hear the o it to reduce rom fire if a pecial smoke lert occupants moke alarms etect smoke o e than 30 fee re is a...

Страница 2: ...by pressing the test button this will sound the alarm if the electronic circuitry horn and battery are working properly If no alarm sounds the battery may be depleted or another problem refer to Trouble shooting section for a solution DO NOT use an open flame to test your alarm you could damage the alarm or ignite combustible materials and start a structure fire CAUTION Due to the loudness 85 deci...

Страница 3: ...ched a low voltage And this is a non replaceable battery alarm so you need to replace a new smoke alarm within 7 days In order to avoid noise to disturb your sleeping in the night time pressing the test button temporarily silence this warning tone for 10 hours it will again prompt you to replace the alarm after 10 hours Maintenance and Cleaning In addition to weekly testing the alarm requires peri...

Страница 4: ...itchen basement and garage Know how to use a fire extinguisher prior to an emergency Make a floor plan indicating all doors and windows and at least two 2 escape routes from each room Second story windows may need a rope or chain ladder Have a family meeting and discuss your escape plan showing everyone what to do in case of fire Determine a place outside your home where you all can meet if a fire...

Страница 5: ... states A row of alarms shall be spaced and located within 3 ft 0 9m of the peak of the ceiling measured horizontally Refer to Diagram 3 Diagram 2 Diagram 3 MOBILE HOME INSTALLATION Modern mobile homes have been designed and built to be energy efficient Install smoke alarms as recommended above refer to RECOMMENDED LOCATIONS and diagram 2 and 3 In older mobile homes that are not well insulated com...

Страница 6: ...ts into holes with hammer Remove locking plug from the bracket with screwdriver if necessary Refer to Diagram 6 This is an optional additional locking in place feature Mount the bracket to the ceiling by inserting and tightening the supplied screws into plastic grommets Refer to Diagram 7 Fit the alarm on the bracket and turn the alarm body clockwise until fully inserted on the bracket Optionally ...

Страница 7: ...y to fully discharge for at least one day 2 Use this method to scrap the alarm if the is the end of life during out of warranty 3 Please return to retailer and change another alarm during the Warranty 4 Cannot install the smoke alarm again once he battery is discharged Diagram 9 SERVICE AND WARRANTY Company warrants to the original consumer Purchase each new smoke alarm to be free from defects in ...

Отзывы: