båÖäáëÜ
59 38 399 D3352
D3352.076.01.13.02
07.2008
5 – 13
Tab 5
5.1 Selecting the Service menu
5.
1
5.1.2
Selection on the Multipad
(XG 5 / 3 / 3 PPE)
1.
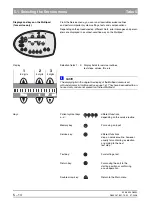
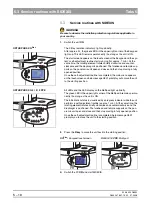
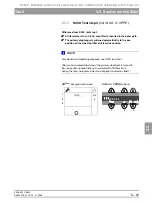
Press the Service key until the LED above the Service key lights up.
After the Service key is released, the LEDs above the patient symbol keys
light up.
2.
Then press the patient symbol keys in the following order within 4 s:
b
–
d
–
a
.
After you have entered the key combination correctly, the Service menu
appears.
NOTE
i
The service mode is signaled by a slow flashing of the Power LED
å
.
Service menu
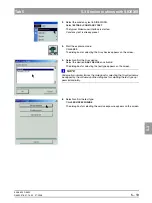
To quit the Service menu and return to the Main menu, press the
up arrow key
above selection field 3 (see section 5.1.2).
(
approx. 2 s
a
b
d
c
(
n
S001____________
1
2
3
(
Содержание ORTHOPHOS XG 3 DS
Страница 4: ......
Страница 9: ...ORTHOPHOS XG 1General information...
Страница 12: ...59 38 399 D3352 1 4 D3352 076 01 13 02 07 2008 Tab1...
Страница 59: ...ORTHOPHOS XG 2 Messages...
Страница 124: ...59 38 399 D3352 2 66 D3352 076 01 13 02 07 2008 2 6 List of available service routines Tab 2...
Страница 125: ...ORTHOPHOS XG 3 Troubleshooting...
Страница 152: ...59 38 399 D3352 3 28 D3352 076 01 13 02 07 2008 3 10 Check data paths Generate test images Tab 3...
Страница 153: ...ORTHOPHOS XG 4 Adjustment...
Страница 268: ...59 38 399 D3352 4 116 D3352 076 01 13 02 07 2008 4 6 Resetting the adjustment XGPlus 5 3 3 PPE Tabs 4...
Страница 269: ...ORTHOPHOS XG 5 Service routines...
Страница 433: ...ORTHOPHOS XG 6 Repair...
Страница 436: ...59 38 399 D3352 6 4 D3352 076 01 13 02 07 2008 Tab6...
Страница 530: ...59 38 399 D3352 6 98 D3352 076 01 13 02 07 2008 6 21 Replacing cables Tabs 6...
Страница 531: ...ORTHOPHOS XG 7 Maintenance...
Страница 575: ...b 59 38 399 D3352 D3352 076 01 13 02 07 2008 7 45 Tab 7 7 14 Checking the device leakage current 7 14...
Страница 577: ...b 59 38 399 D3352 D3352 076 01 13 02 07 2008...

