

Log on
Siqura BL820M1IR Series
Full HD IR bullet IP camera
Quick Start Guide
© Siqura B.V. 2016
Version 2.3 (122707-2.3)
BL820 QSG (MW10)
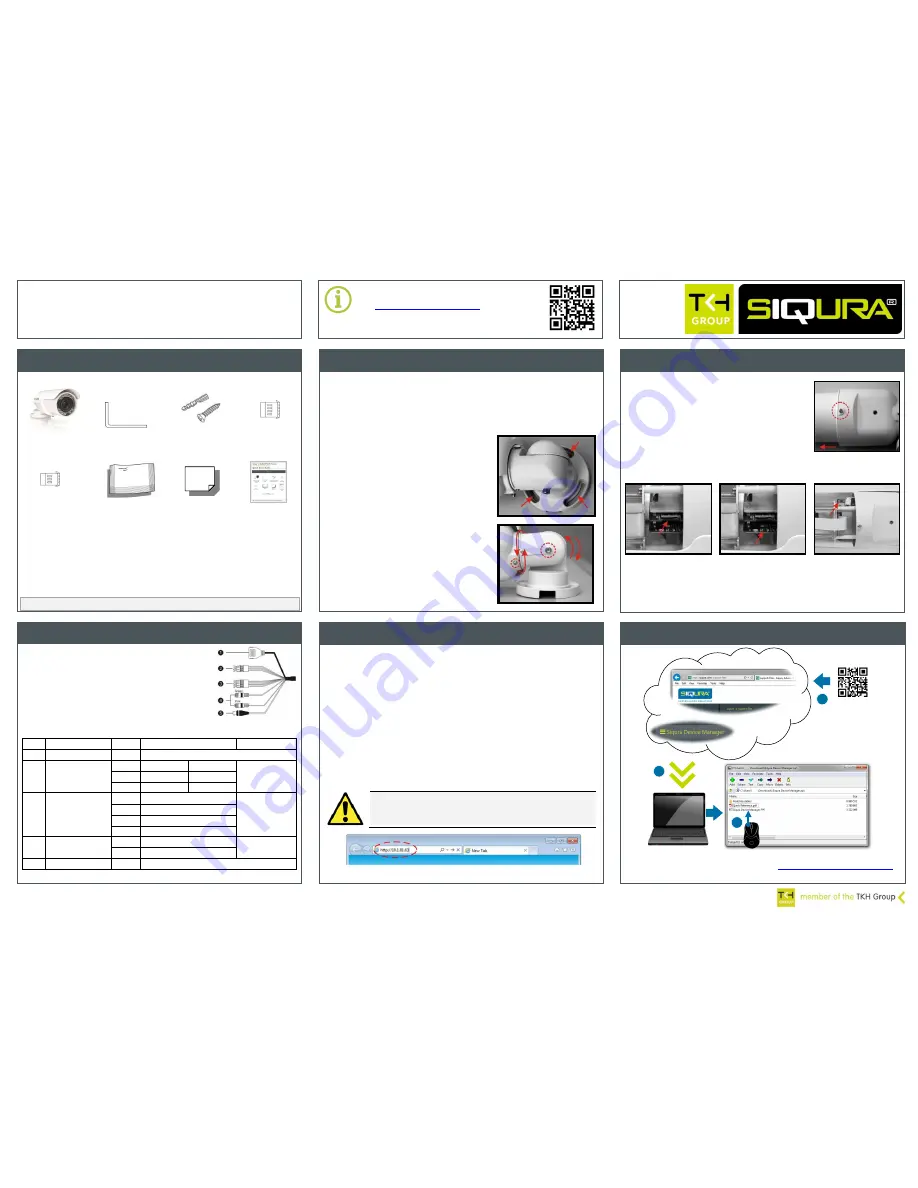
Unpack
Determine installation location
Install Siqura Device Manager (optional)
www.siqura.com
www.tkhsecurity-usa.com
Access microSD card slot and reset button
Figure 1
BL820M1IR package contents
Alarm
terminal block
M4 Self-tapping screws (5x)
and screw anchors (5x)
Quick Start
Guide
Power
terminal block
BL820M1IR camera
(all-in-one cable
included)
M4 Inner hex
wrench
Figure 2 The BL820 mounts onto wall or ceiling
Dessicant
Dessicant
user manual
Determine where you are going to install your BL820.
Make sure that the surface has sufficient strength to support the camera.
If using Power over Ethernet (PoE), check that there is adequate access to an
IEEE 802.3at Power over Ethernet (PoE)-enabled network.
1.
Connect the power/Ethernet/alarm/audio
wires from ceiling or wall to the
corresponding connectors of the camera’s
all-in-one cable.
2.
Fix the camera’s bracket to the ceiling/wall
with the supplied self-tapping screws
3.
Use the supplied inner hex wrench and
cross screwdriver to loosen the hex
bolt/screw on the side of the bracket mount
and the camera housing to adjust the
position of the camera.
To access the BL820’s microSD card slot, reboot
button, and factory default reset button
Unscrew the screw on the camera housing and
then remove the front housing.
Figure 3a
Housing screw
Figure 3b
microSD card slot
Figure 3c
Factory Default button
Figure 3d
Reboot button
Note:
For information on preventing moisture from condensing on the camera’s glass
cover, see the Desiccant user manual.
To power the BL820 with PoE
Attach the RJ-45 connector to an appropriate PoE
network switch. Use Cat 5 Ethernet cable less than
100 m in length. Connect to hub/switch with straight-
through; direct to a PC with crossover.
To power the BL820 with AC 24 V / DC 24 V
Connect to the DC/AC power source as indicated
by the labeling of the terminal block.
No.
Cable
Pin
Definition
Remarks
1
Network (w/PoE)
RJ-45 connector with LED
2
Power (3-pin
terminal block)
1
AC 24 V-1
DC (-)
Power connection
2
GND
Reserved
3
AC 24 V-2
DC (+)
3
Alarm (4-pin
terminal block)
1
ALM_DI
-
Alarm connection
2
ALM_DI
+
3
ALM_DO
-
4
ALM_DO
+
4
Audio I/O
Pink
Line In/ Mic In
Two-way audio
transmission
Green
Line Out
5
BNC
-
Analogue video output
Table 1 BL820 connector assignments
Figure 4 Cable connectors
You can access the settings of the camera via its webpages.
Use Internet Explorer 6.x or higher, Chrome, Firefox or Safari to browse the webpages.
To open communication with the BL820
1.
Make an IP connection between the camera and the PC.
To achieve initial access, the network adapter of the PC must be set to the same
subnet as the camera. The factory-set IP address is printed on a label located
on the bottom of the camera.
2.
Type the IP address of the camera in the address bar of your web browser.
3.
Enter the default user name (Admin) and password (1234).
Note that the user name is case sensitive.
4.
When prompted about an ActiveX control installation, click
Install
.
5.
Enable ActiveX controls.
Figure 5 Enter the IP address of the camera into the address bar of your browser
Connect and power up
To reset the camera to its factory-default settings
With the camera powered up, press and hold the
reset button for 10 seconds.
All settings, including the IP address will be reset.
Note
: Subject to modification. Actual product and accessories may differ in appearance.
CAUTION:
MAKE SURE THAT YOU CHANGE THE DEFAULT ADMIN PASSWORD AT
THE FIRST LOGIN. TO KEEP THE ACCOUNT SAFE, CREATE A STRONG, COMPLEX
PASSWORD. THIS HELPS TO PREVENT UNAUTHORISED ACCESS FROM PEOPLE
WHO TRY TO USE THE DEFAULT ACCOUNT.
Figure 6 Download Siqura Device Manager at
http://www.siqura.com/support-files
Install the software on the browsing PC.
Find additional manuals for this Siqura product
at:
www.siqura.com/support-files
1
2
3