background image

14

27 & 

28 

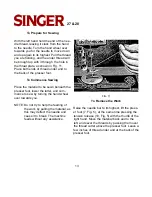
To Regulate the Tensions

Correct Stitch.

For ordinary stitching, the tension on the
upper and under threads should be equal, 
so as to lock both threads in the centre of 
the work, as above.
If either tension is stronger than the other,
imperfect stitching will be the result, thus:

Needle Thread Tension

too weak.

Needle Thread Tension

too strong.

Lower the presser foot and turn the thumb
nut in the direction illustrated by the arrow to
increase the tension or in the opposite direc-
tion to lessen it.

As all machines are correctly adjusted before
leaving the factory, the under tension seldom
requires to be altered, but if this becomes
necessary tighten the screw near the point of
the shuttle (see Fig. 7) to increase the ten-
sion, or loosen it slightly to lessen the ten-
sion.

Always use thread with corresponding size of
needle as per Table on page 3 of cover.

Fine fabrics require a light tension, while
heavy materials want more tension to obtain
a perfect stitch.

The tension on the needle thread should be
regulated only when the presser foot is down.

A correct stitch can usually be obtained by
varying the tension on the needle thread (see
Fig. 12).

FIG. 12

Содержание NO. 28

Страница 1: ...FOR USING SINGER SEWING MACHINE NO 27 28 VIBRATING SHUTTLE FOR FAMILY USE THE SINGER MANUFACTURING CO When requiring Needle Oil Parts or Repairs for your Machine Look for the Red S There are Singer S...

Страница 2: ...th of Stitch To Change the Pressure on Material To Turn a Corner To Sew Flannel or Bias Seams To Oil Machine Hints Needles Breaking Thread Breaking Skipping Stitches Stitches Looping Material Puckerin...

Страница 3: ...Company all of which are duly Registered Trade marks on any machine that has been repaired rebuilt reconditioned or altered in any way whatsoever outside a SINGER facto ry or an authorised SINGER age...

Страница 4: ...4 27 28...
Страница 5: ...ll the small spring stud 2 Fig 1 and turn the handle back until the lever 1 Fig 1 enters the socket 3 Fig 1 also see that the hinged finger 4 Fig 2 is turned back between the spokes of the wheel The m...

Страница 6: ...and turn the stop motion screw over towards you as shown in Fig 3 To Operate the Hand Machine Tighten the hand wheel see Fig 3 and place a piece of material under the presser foot 7 Fig 5 Then lower t...

Страница 7: ...ee dle threaded except when sewing Both slides over the shuttle must be kept closed To Set the Needle See Fig 4 Raise the needle bar to its highest point and loosen the thumb screw A Hold the needle w...

Страница 8: ...5 into the guide 6 and from left to right through the eye of the needle Draw about three inches of thread through the eye of the needle with which to commence sewing To obtain best results it is absol...

Страница 9: ...13 Fig 5 then thread the winder by passing the thread upward through the eyelet 1 and into the notch 2 Draw the knob 3 to the left and place an empty bobbin between the cup at the right 4 and the cent...

Страница 10: ...wn the point of the shuttle with the thumb and lift out Turn the open end of the shuttle downward and the bobbin will drop out NOTE The shuttle should not be lifted out by the spring To Thread the Shu...

Страница 11: ...and on the end of the bobbin and draw the thread down into the slot of the shuttle towards the point as far as it will go see Fig 8 then pull the thread tightly upwards and down again so that it lies...

Страница 12: ...ts point towards you and place it in the shuttle carrier as shown in Fig 10 leaving a loose end of thread about three inches long above the slide Then close the latter NOTE Keep the inside of the shut...

Страница 13: ...ial to be sewn beneath the presser foot lower the latter and com mence to sew by turning the hand wheel over towards you NOTE Do not try to help the feeding of the work by pulling the material as this...

Страница 14: ...direc tion to lessen it As all machines are correctly adjusted before leaving the factory the under tension seldom requires to be altered but if this becomes necessary tighten the screw near the poin...

Страница 15: ...ten the pressure by giving the thumb screw 1 Fig 5 two or three turns upwards To increase the pressure give the thumb screw a few turns downwards To Turn a Corner Stop the machine when the needle is r...

Страница 16: ...lied at the points indicated by arrows in Figs 14 and 15 is sufficient The small plate in front of the machine and the larger plate at the back should both be turned up and oil applied to the parts ex...

Страница 17: ...the oil may reach the bear ings Neglect to oil the machine will shorten its life and cause you trouble and annoyance FIG 15 Always use SINGER oil Inferior oil clogs the bearings prevents efficient wor...

Страница 18: ...rse for the needle see table on inside of back cover The thread take up spring 4 Fig 5 is not broken Should the under thread break loosen the under tension see page 11 and see that the shuttle and und...

Страница 19: ...needle passes through the centre of the needle hole Darning by sewing machine is infinitely neater stronger and more quickly done than by hand A tiresome task becomes a pleasure Read how to do this i...

Страница 20: ...s and setting the blued indicator to the width desired The line F is the point at which to set the blued indicator for facings the line B for binding and the line C for cording or piping Insert the ma...

Страница 21: ...5 16 of an inch wide To Bind with Dress Braid Proceed as when using bias binding but as dress braid and binding purchased already folded are narrower than bias binding they should be inserted in the o...

Страница 22: ...g Various materials and conditions require different adjustments of the Binder to bring the stitch ing close to the edge A wider adjustment of the Binder is necessary when binding curves than when bin...

Страница 23: ...y easily stretched and would be too narrow when it reaches the needle If this occurs the edges will not be turned When binding a curved edge turn the materi al only as fast as the machine sews It is n...

Страница 24: ...ce is necessary on venous materials When binding an inside curve straighten out the edge as it is being fed into the Binder When doing this take care not to stretch the edge of the material If the mat...

Страница 25: ...stitching Slide the wire into its holder on the foot and set it to the width desired then lower the foot on to the material To Quilt For the first row of stitching let the quilter guide follow the edg...

Страница 26: ...er into the mouth of the hemmer easing it along until it fills the curl and reaches the needle Lower the foot and make the first few stitches slowly Guide the material with the thumb and forefinger of...

Страница 27: ...ve the pressure on the hem and pass the end of the lace through the slot in the side of the attachment and over the hem as shown Take care that the hem is not displaced in the hemmer and that the need...

Страница 28: ...be made close but not too near to the edge of the upper piece or the cloth will give way at the seam when a strain is put upon it Raise the hemmer foot and open the work out flat wrong side up so tha...

Страница 29: ...is against the desired width then tighten the screw Insert the edge of the material between the slide and the number gauge and draw it backward and forward until the hem is formed stopping with its e...

Страница 30: ...the screw draw the slide to the right as far as it will go and turn it towards you as in the illustration Fold and crease down a hem of the desired width pass the fold under the extension at the righ...

Страница 31: ...e back slide then the front so that the end of the front slide will enter the turned under part of the attachment and hold it firmly in position The pattern or design to be braided must be stamped or...

Отзывы: