67
CONFECTION DES BOUTONNIÈRES
BOUTONNIÈRE AUTOMATIQUE
UTILISATION DU PIED BOUTONNIÈRE
Votre machine vous offre deux différentes largeurs de brides
de boutonnières avec arrêt, à oeillet et arrondie cousues au
moyen d’un système qui mesure la taille du bouton et qui
calcule la taille de la boutonnière. Tout ceci s’effectue en une
simple étape.
PROCÉDURE
* Utilisez un entoilage dans la partie du vêtement où les
boutonnières doivent être placées.
* Faites une boutonnière d’essai sur un échantillon du tissu
que vous utilisez. Essayez ensuite la boutonnière avec le
bouton choisi.
1. Sélectionnez l’un des motifs de boutonnières.
2. Remplacez le pied presseur par le pied boutonnière.
(Reportez-vous à la section "Remplacement du pied
presseur" à la page 26 - 27.)
3. Introduisez le bouton dans le pied boutonnière.
(Reportezvous à la section "Utilisation du pied boutonnière"
ci-dessus.)
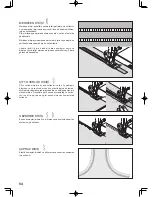
4. Réglez le levier de boutonnière (C) de manière qu’il
s’abaisse verticalement entre les butées (A) et (B).
BUTTONHOLE MAKING
AUTOMATIC BUTTONHOLE
USING BUTTONHOLE FOOT
Your machine offers you two different widths of bartack,
keyhole and round end buttonholes sewn by a system that
measures the size of the button and calculates the size of
buttonhole required. All of this is done in one easy step.
PROCEDURE
* Use an interfacing in the area of the garment where
buttonholes are placed. Stabilizer or regular interfacing can
be used.
* Make a practice buttonhole on a scrap of the actual fabric
from your project. Then try the buttonhole with your button.
1. Select one of buttonhole patterns.
2. Replace the presser foot with the buttonhole foot. (Refer to
“Changing presser foot” on page 26 - 27.)
3. Insert the button into the buttonhole foot. (Refer to “Using
buttonhole foot” above.)
4. Lower the buttonhole lever (C) so that it drops down
vertically between the stoppers (A) and (B).


