From the library of: Superior Sewing Machine & Supply LLC
Страница 1: ...iNSTRUCTIONS FOR USING AND ADJUSTING SINGER SEWING MACHINES I43G2 and I43G3 ZIGZAG LOCK STITCH THE S I N G E R C O M P A N Y From the library of Superior Sewing Machine Supply LLC...
Страница 2: ...sewing machines for stitching fabrics or leather where o thread lubricant Is required TYPE F MOTOR OIL For oil lubricated motors and plain bearings in power tables and transmitters NOTE All of the abo...
Страница 3: ...064 INSTRUCTIONS FOR USING AND ADJUSTING SINGER SEWINe MACHINES I43G2 and 14303 THE SINGER COMPANY A Trademark of THE SINGER COMPANY Printed in Great Britain From the library of Superior Sewing Machin...
Страница 4: ...r Copyright under International Copyright Union From the library of Superior Sewing Machine Supply LLC...
Страница 5: ...de and top facings to the linings and butting canvas or felt toe pieces to the end of the vamp In the manufacture of table covers draperies scarfs etc an ornamental effect can be produced by overseami...
Страница 6: ...ered arrows In Figs 2 to 6 and when in continuous use It should be oiled at least twice a day Fig 2 Front View of Machine Showing Oiling Points Slip the belt off the machine pulley tum the machine bac...
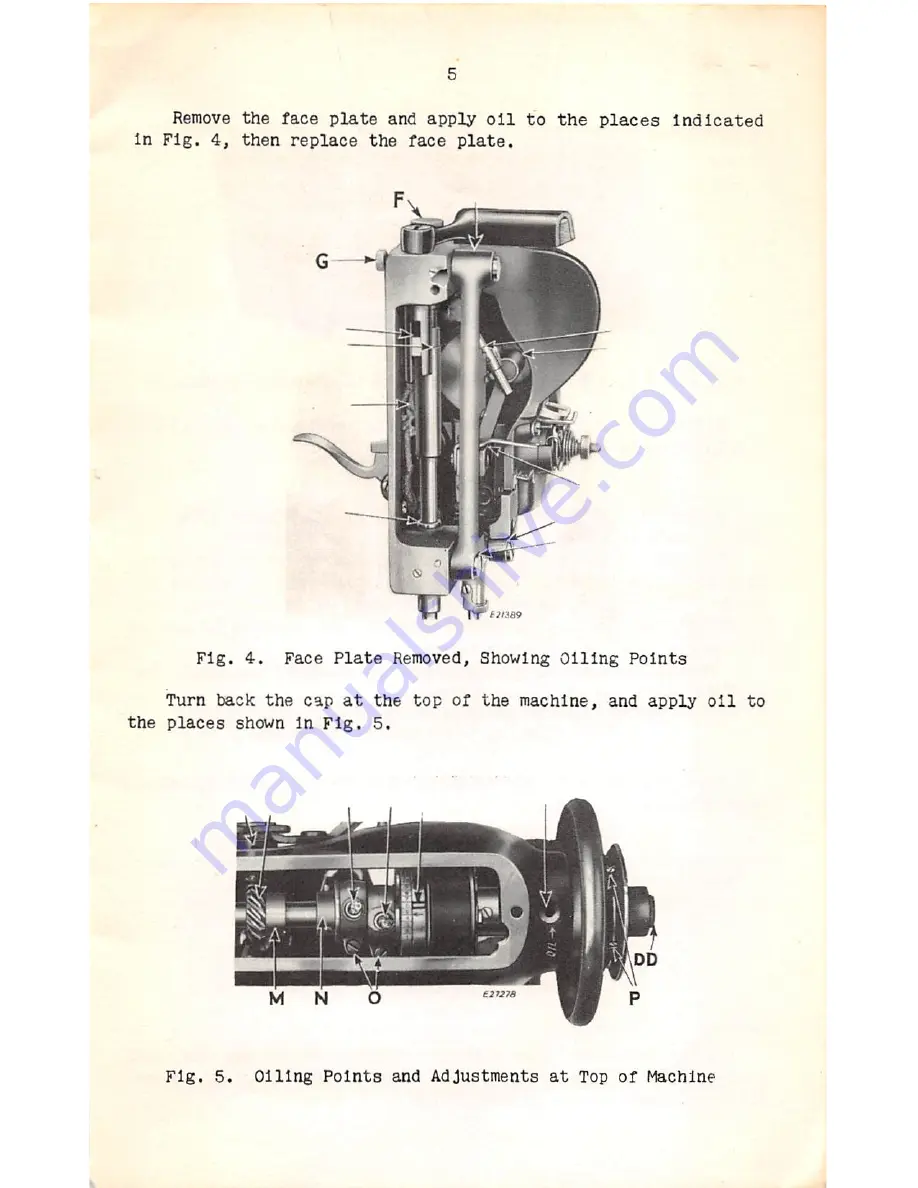
Страница 7: ...hen replace the face plate Fig 4 Face Plate Removed Showing Oiling Points Turn back the cap at the top of the machine and apply oil to the places shown In Fig 5 Fig 5 Oiling Points and Adjustments at...
Страница 8: ...sful use of the machine will be Interfered with Orders for needles must specify the QUAWTITY required the Si 2 and also the Catalogue number The follovflng is an example of an intelligible orderi 100...
Страница 9: ...obbin Either right Fig 7 How to Determine the Twist Hold the thread as shown above Turn the thread over toward you between the thumb and the forefinger of the right hand If left twist the strands will...
Страница 10: ...ad around the bobbin a few times push the bobbin winder pulley over against the machine belt and start the machine When sufficient thread has been wound upon the bobbin the bobbin winder will stop aut...
Страница 11: ...bobbin between the thumb and forefinger of the right hand the thread drawing on the top from the left toward the right as shown In Fig 10 LdbECJ Fig 11 Then pull the thread Into the Blot In the edge...
Страница 12: ...Needle See Fig 13 Turn the machine pulley until the thread take up 10 is at Its highest position Pass the thread from the unwinder from back to front through the lower hole 1 In the pin on top of the...
Страница 13: ...and up again to its highest point thus catching the bobbin thread draw up the needle thread and the bobbin thread will come up with it through the hole in the throat plate Lay both threads back under...
Страница 14: ...raachlne not working properly will usually be found In the tension not being correctly adjusted or Its discs raay be clogged with lint or knots of thread or the thread con troller spring may not have...
Страница 15: ...he Tensions THE TENSICW ON THE NEEDLE THREAD SHOULD ONLY BE REGULATED WHEN THE PRESSER FOOT IS DOVW Having lowered the presser foot tin n the thumb nut S Fig 18 at the front of the tension discs over...
Страница 16: ...e desired length of stitch Is opposite the arrow as shovm in Fig tr then release the lever A To Regulate the Width of Bight The width of bight or zigzag stitch Is regulated by means of the needle vibr...
Страница 17: ...escending Fig 18 For more controller action on the thread loosen the stop screw u Fig 18 and set the stop R lower For less action set the stop higher The position of the controller spring Q shown In F...
Страница 18: ...et screw TO SET A NEEDLE BAR WHICH HAS NO MARK Set the needle bar so that when it rises 3 32 inch from Its lowest position the eye of the needle will be about 1 16 Inch below the point of the hook as...
Страница 19: ...parts be careful that the large washer Cl Flg 20 Is In place between the gear and arm that the posi tion screws are set firmly against the flat spots on the shaft and that the set screws are at the ri...
Страница 20: ...he hook as required Before tighten ing the set screws see that there Is no end play In the shaft CC Fig 21 To Set the Hook To or From the Needle The point of the hook should come as close as possible...
Страница 21: ...ulley and verify the correctness of the timing before commencing to sew Fig 22 Putting Belt on Lower Pulley with Belt Replacer 244005 To facilitate the replacing of the belt on the lower pulley use be...
Страница 22: ...g should stick insert a brass rod through the arm cap hole and drive the bushing out Feed Mechanism To take up lost motion of the feed driving and lifting con nections adjust their pinch screws 0 Flg...
Страница 23: ...e or container 0 on the needle or numbered part Needles in containers marked For Singer Mochlnes are NOT made by SINGER TO ALL WHOM IT A AY CONCERN The improper placing or renewal of the Trademark SIN...
Страница 24: ...From the library of Superior Sewing Machine Supply LLC...