Sinapsi EQUOBOX Скачать руководство пользователя страница 51

  E Q U O B O X   R T U - M o d B u s  

  U s e r   G u i d e   R e v .   2 . 2


S I N A P S I   S . r . l .   |


V i a   d e l l e   Q u e r c e   1 1 / 1 3   -   0 6 0 8 3   B A S T I A   U M B R A   ( P G )  

  I t a l y  

T . + 3 9  

0 7 5   8 0 1 1 6 0 4

  -   F . + 3 9  

0 7 5   8 0 1 4 6 0 2 |


w w w . s i n a p s i t e c h . i t  

-

  i n f o @ s i n a p s i t e c h . i t              


51


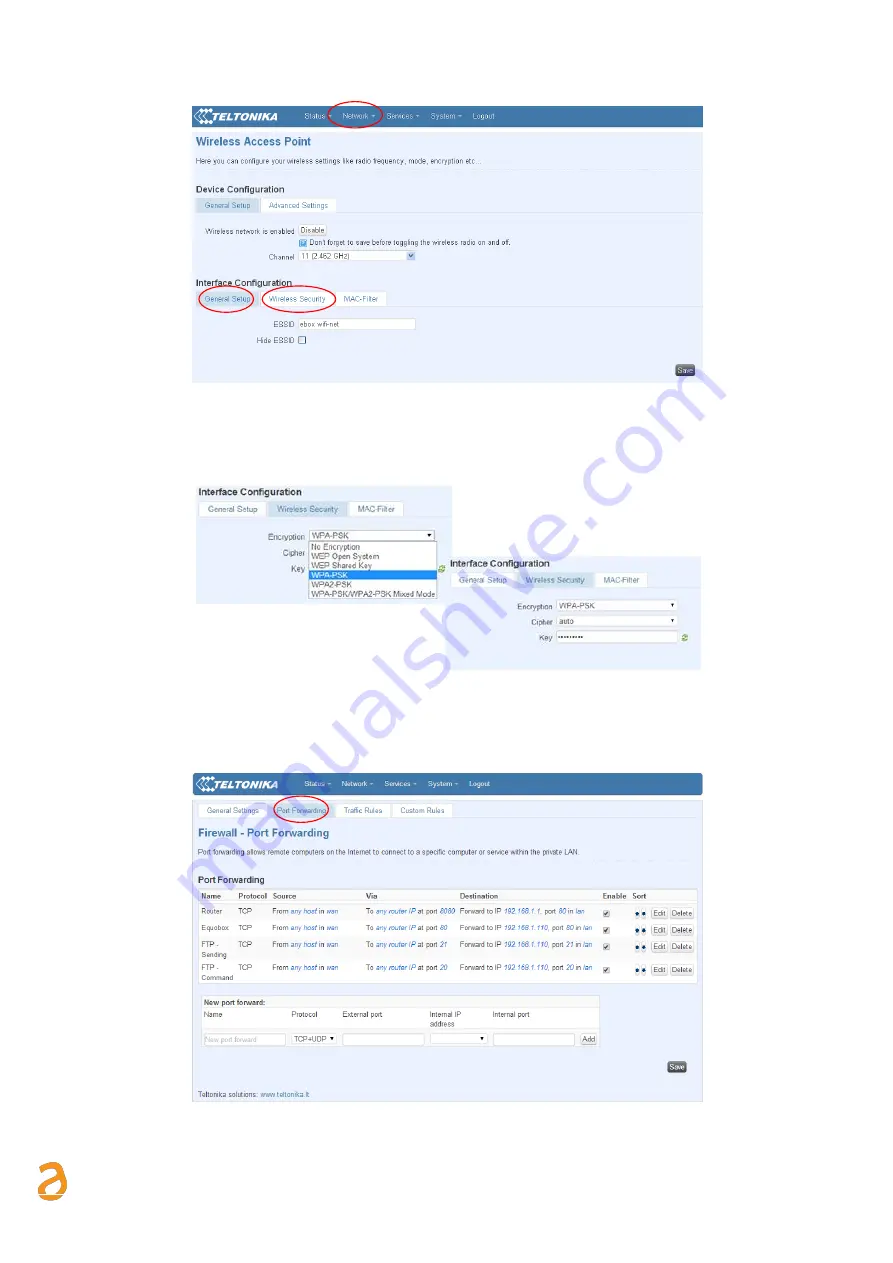
Figure 62 - Wireless Access Point 

For security reasons we always recommend activate the Encryption in the Wireless Security subsection. Select 
the type of key generator to protection and enter a password. Click Save to save the settings. See Figure 63. 


Figure 63 - Security 

To use Port Forwarding rules, press Network from the main menu and then Firewall. From the submenu that 
will be displayed, you can access the Port Forwarding section and set its rules. ( Figure 64)


Figure 64 

 Port Forwarding 

Содержание EQUOBOX

Страница 1: ...U m br a PG Ital y T 39 075 8011604 F 39 075 8014602 www s in aps it ech it info s ina ps it ech it EQUOBOX RTU ModBus Datalogger for ModBus devices User Guide Rev 2 2 This manual refers to the versio...

Страница 2: ...g 7 5 INSTALLATION 8 5 1 Mechanical assembly 8 5 2 Electrical installation 8 5 3 Connection to a local PC via Ethernet LAN 9 5 4 Connection to a GPRS UMTS modem router 10 5 5 Connecting the digital in...

Страница 3: ...Maximum 29 14 4 Summary Data Minimum 29 15 SETTINGS DEVICES 30 15 1 Section 1 31 15 2 Section 2 31 15 3 Section 3 32 16 SETTINGS EVENTS 34 16 1 I O Events 34 16 2 Events 35 16 3 Condition set accordin...

Страница 4: ...m the corporate network For remote access to the machine we recommend the use of secure technologies such as Virtual Private Networks VPNs recognizing VPN in the most secure way to connect to the devi...

Страница 5: ...nagement meter readout report sending alarm management and event management 9 24 Vac Vdc power supply or Power Over Ethernet 3 digital inputs for logic control and remote control 2 relay outputs Max 2...

Страница 6: ...es need to be exchanged and how the errors detected Only the master can start a transaction that can have the question answer format directly to a single slave or broadcast when the message is sent to...

Страница 7: ...s i te c h i t 7 Avoid the creation of star node Respect the distances as shown in the figure below Figure 3 Distance Baudrate Ratio To avoid attenuate any EMI interference present in the field we re...

Страница 8: ...e it is important to wire the terminals disconnected from the device Follow these instructions Remove the terminals from the device pulling outwards Tighten the cables to the removed terminal complyin...

Страница 9: ...ght through or crossover to connect the ETH1 or ETH2 port of the RTU to the Ethernet port of the computer or to an existing LAN socket If you use an existing LAN connect the computer to another LAN so...

Страница 10: ...d as an option of the RTU The default settings of the RTU and SIN ROUTER allow the connection of the two devices without having to change their network parameters The router is configured to use a TIM...

Страница 11: ...c terminal 5 to one of the poles of the contact you want to connect Connect the other pole to the desired digital input 8 for I1 9 for I2 e 10 for I3 5 6 Connecting the digital inputs to positive volt...

Страница 12: ...contact to the common terminal 7 of the device Connect the negative pole of the contact to terminal 8 9 10 for inputs I1 I2 I3 When the voltage at the ends of the connected input for example between 7...

Страница 13: ...with its utility for example Apartment 1 or Apartment 12 See Chapter 15 allocate the name and add the description of the meters 3 Plant Database RECOMMENDED The plant database includes information on...

Страница 14: ...nus Button to cancel field and value changes Button to exit the submenus Left for main menu data cursor Right for main menu data cursor UP To scroll pages up Change add letters from A to Z or numbers...

Страница 15: ...ntent of the single sections we have 1 1 o Serial Number Shows the serial number to be indicated in the event of technical support o Meter DB Ver Shows the version of the meter database installed in t...

Страница 16: ...i n f o s i n a p s i te c h i t 16 8 4 Display SETTINGS The Display Settings section is divided into four subsections General Network Refer to Chapter 8 Buttons and Display and to 11 to consult the...

Страница 17: ...3 Carefully read the following notes In order for the RTU and PC to communicate the two devices must have an IP address within the same subnet The default RTU network settings are IP address 192 168...

Страница 18: ...6 0 4 F 3 9 0 7 5 8 0 1 4 6 0 2 w w w s i n a p s i t e c h i t i n f o s i n a p s i te c h i t 18 10 HOMEPAGE Connect the device as shown in Figure 12 and type in the address 192 168 1 110 in your...

Страница 19: ...n a p s i t e c h i t i n f o s i n a p s i te c h i t 19 The screen is divided into three sections Path of the page being consulted Type of user connected Selected language Italian or English Plant s...

Страница 20: ...Settings o Plant Database o System settings o Maintenance Network o General Setup o Advanced Setup o Email Setup o DynDNS Devices o Meter Setup o Search Setup Events 11 1 Plant Database You can add o...

Страница 21: ...tem Settings screen has two sections 1 Date and Time choose between the manual and automatic setting for the date and time synchronising them with your PC 2 System configuration LCD Password allows ch...

Страница 22: ...ace the name of the update is equobox_rtu bin WE RECOMMEND REFRESHING THE PAGE TO PREVENT ERRORS AFTER AN UPDATE SHOULD THIS NOT BE ENOUGH CLEAR THE BROWSER S CACHE 2 Backup Restore Configuration Syst...

Страница 23: ...ttings Figure 19 Network settings The fields to be filled out are MAC Address shows the RTU s MAC Address Enable DHCP select if you want to use the DHCP protocol IP Address sets the machine s static L...

Страница 24: ...em configuration The parameters shown in Figure 20 should be managed by qualified personnel Figure 20 Advanced network settings The fields to fill out in this section are HTTP Portforward defines the...

Страница 25: ...ion o Port 465 for encrypted communication SMTP Username enter the username to access the SMTP server SMTP password enter the password to access the SMTP server Email Sender enter an email address to...

Страница 26: ...S This section is dedicated to the configuration activation of the DynDNS service Figure 23 DNS service settings Enter Domain Name Enter the domain name provided by the no ip com service Enable Dynami...

Страница 27: ...igure 24 Sampling The samples stored in the RTU according to the sampling frequency are defined as RAW samples RAW samples will always refer to the consulted day and you can store up to 96 samples for...

Страница 28: ...that the variation of the data in during the work change all the historical data yet generated Changing the type of summary data during the work involves the regeneration of all of the historical data...

Страница 29: ...1 4 6 0 2 w w w s i n a p s i t e c h i t i n f o s i n a p s i te c h i t 29 14 3 Summary Data Maximum Summary data related to Maximum provide the maximum value logged during the day Figure 27 Summa...

Страница 30: ...p s i te c h i t 30 15 SETTINGS DEVICES Figura 29 Insert a new ModBus Energy Meter Figure 29 shown the dialog for entering and editing a new ModBus Energy Meter The page is divided into three section...

Страница 31: ...5 minutes 15 minutes 1 hour 6 hours 12 hours 1 day Refer to Chapter 13 Installation date indicates the energy meter data installation This is automatically set upon saving the energy meter as describ...

Страница 32: ...r You can enter up to a maximum of 60 energy meters Figure 32 Not integrated Energy Meter 15 3 Section 3 In Section 3 it is possible to select change the ModBus input registers of integrated devices o...

Страница 33: ...d in the energy meter ModBus protocol Before changing this value always refer to the energy meter ModBus protocol mapping Multiplier bring a multiplicative constant if necessary This parameter is usef...

Страница 34: ...NGS EVENTS 16 1 I O Events This section allows you to set up to four conditions to control the actuators Ref 5 8 With reference to that described in Chapter 5 8 the device is equipped with three digit...

Страница 35: ...n email to the recipients set in section 12 3Errore L origine riferimento non stata trovata Add to Log adds the item to the Log after an event See Chapter 19 2Errore L origine riferimento non stata tr...

Страница 36: ...maximum consumption threshold The next paragraphs will show in detail the parameters to configure the above Figure 39 Selecting an event 16 3 Condition set according to the maximum value acquired Sele...

Страница 37: ...otification in the event of an alarm Ref Chapter 5 3 8 3 Save Press Save to save the configuration 16 4 Condition set according to the minimum value acquired Select Min Value Figure 42 Completing the...

Страница 38: ...Out of range item Figure 44 Completing the creation of an event The cells to be filled out are Event Name enter the name of the event being created Data Type select the type of meter data The data yo...

Страница 39: ...have already been set for every single meter For more information refer to Chapter 15 Consumption threshold insert a consumption threshold beyond which trigger the alert The consumption threshold is...

Страница 40: ...u to process export the data logged in the RTU The data logged in every single meter are defined as shown in Chapter 15 and in Chapters 13 and 14 The items that can be selected are Create Reports Plan...

Страница 41: ...sociated to the meter See Chapter 15 Description 2 Description 2 associated to the meter See Chapter 15 2 Data to be exported you can choose between two types of export a Export daily summary data See...

Страница 42: ...s i te c h i t 42 o Select the day select the day to be exported o Include non displayed data select to export all the saved data o Press Download Data to download the data o Allocate a name to the fi...

Страница 43: ...t e c h i t i n f o s i n a p s i te c h i t 43 17 3 Example of Summary data in xls and csv format Figure 51 Exporting Summary data in XLS and CSV format Note the extracted data from the system provid...

Страница 44: ...ly enables bimonthly planning at midnight of the last day of the two month period Three monthly enables quarterly planning at midnight of the last day of the three month period Four monthly enables fo...

Страница 45: ...tomatically Press YES to open the file 18 ACCOUNT DATA The Account Data section allows you to change the data to access the webserver account You can use two types of account admin and user The user a...

Страница 46: ...ersion shows the firmware version Web Interface Version shows the web interface version Serial number shows the serial number of the machine Internet connection shows the Internet connection status La...

Страница 47: ...2 2 S I N A P S I S r l V i a de l l e Q u e r c e 1 1 1 3 0 6 0 8 3 B A S T I A U M B R A P G I t al y T 3 9 0 7 5 8 0 1 1 6 0 4 F 3 9 0 7 5 8 0 1 4 6 0 2 w w w s i n a p s i t e c h i t i n f o s i...

Страница 48: ...nts processed by the RTU with respect to the configuration described in Chapter 15 Figure 58 Event summary The items that can be selected are Erase Event allows you to permanently delete the events oc...

Страница 49: ...o Username admin o Password admin01 Upon accessing for the first time a configuration wizard will help you to quickly set the basic information to ensure router operation Check the connection status t...

Страница 50: ...not correspond to those listed above please contact the respective customer service to get detailed information the authentication method and any username and password Remember for every operation to...

Страница 51: ...igure 62 Wireless Access Point For security reasons we always recommend activate the Encryption in the Wireless Security subsection Select the type of key generator to protection and enter a password...

Страница 52: ...ccess to the configuration options of the router in which he states that a synchronization between a port on the router and the corresponding internal device Because the router to recognize your compu...

Страница 53: ...lt is active the Ping Reboot System section Ping Reboot The ping reboot is an automatism of the router to restart itself if the same has no answers to ping request in a configurable time interval The...

Страница 54: ...T I A U M B R A P G I t al y T 3 9 0 7 5 8 0 1 1 6 0 4 F 3 9 0 7 5 8 0 1 4 6 0 2 w w w s i n a p s i t e c h i t i n f o s i n a p s i te c h i t 54 Figure 68 Administration properties Figure 69 Backu...

Страница 55: ...om those offered Hostname enter the Hostname of the service Username enter the username for access to desired service Password enter the password for access to desired service IP renew interval min en...

Отзывы: