background image


3.4.9


Solar panel


If you do not operate a machine with a solar panel, please disregard this section. 

The Dumpmaster can be fitted with a solar panel kit for use in off-grid locations. The 80W 
monocrystalline solar panel (dimensions 930x673x35mm) is mounted on an adjustable steel 
bracket at the top of the mast, and charges the battery via a 12V/24V digital regulator. 

As pe

§1.5

, in ideal conditions the solar panel provides enough power to dump about 

3,000kg of material each day, which is equivalent to about 30 full 240-litre wheelie bins. There 
are many factors affecting this figure, including the season, the amount of sunlight available, 
cloud cover, panel alignment and cleanliness, and the condition of the batteries. 


To deliver maximum power the solar panel must be correctly aligned, clean, and 
exposed to direct sunlight throughout the day. 

3.4.9.1


Solar panel alignment 

The solar panel is mounted on an adjustable steel bracket with one axis of movement. To 
deliver maximum power, the panel should be aligned to cast the largest-possible shadow 
when the sun is at its highest point in the sky. However, because the bracket has only one 
axis of movement, the orientation of the machine itself affects the optimum panel alignment. 

Use the following guidelines to align the solar panel: 

1.


Ideally, orient the machine so that adjustment arc of the panel mounting bracket 
runs from North to South. 

2.


If the adjustment arc cannot be oriented North-South, the panel should be angled at 
0° degrees (vertical). While this is suitable close to the equator, it will progressively 
reduce the power output at latitudes beyond 

±20° degrees

3.


With the machine in its long-term location, 

tilt the panel towards the equator

 by the 

same number of degrees as the machine’s geographic latitude.


4.


If required, a further 5-10% increase in output can be achieved by tuning the panel 
alignment for the Summer and Winter months: 

a.


At the beginning of Spring, reduce the angle of the panel so it is equal to the 

machine’s geographic latitude 

less 15° degrees

b.


At the beginning of Autumn (Fall), increase the angle of the panel so it is 

equal to the machine’s geographic latitude 

plus 15° degrees


The panel angles referred to above are measured in degrees of arc from vertical. 


Without correct adjustment the solar panel may deliver as little as 20% of the theoretical 
maximum output. Correctly adjusting the panel when the machine is installed can 
increase this figure to ~70%, and adjustment twice a year can increase output to ~75% of 
the theoretical maximum. 

3.4.9.2


Solar panel cleaning 

The solar panel should be cleaned every six months, using a microfiber cloth or damp rag. 


Use appropriate height-safety equipment when servicing or cleaning the solar panel. 


Complete Kit 0090040077 


Panel 0250050530 


Controller 0250050462 

Содержание DUMPMASTER DM0700

Страница 1: ...User Manual Simpro Dumpmaster Original Instructions English v119 0 October 2022 USER MANUAL...

Страница 2: ...e and international conformity this document uses Syst me International SI units These may be converted to Imperial units as follows 1 kilogram kg 2 2 pounds lb 1 metre m 1000 millimetres mm 39 37 inc...

Страница 3: ...User Manual Simpro Dumpmaster Original Instructions English v119 0 October 2022 Page 2 Generic Dumpmaster layout and dimensions...

Страница 4: ...12 2 2 6 Type D Cradle 12 2 2 7 Type X Custom Cradle 12 2 3 Operation of controls 13 2 3 1 Control Panel identification 13 2 3 2 Standard Control Panel 14 2 3 3 Autocycle Control Panel 14 2 3 4 VSD C...

Страница 5: ...7 5 Maintenance 29 3 7 6 Hydraulic system schematic 29 3 8 Safety door and interlock 30 3 8 1 Side hinge safety door standard 30 3 8 2 Swing up safety door custom 30 3 8 3 Safety door interlock 30 3 9...

Страница 6: ...nd the lip of the skip or hopper being emptied into Benefits of this design include a small footprint and a wide range of tipping heights available from 700mm to more than six metres 2 A standard weig...

Страница 7: ...fied with different Safe Working Loads The rating plate should be the first point of reference to determine SWL on any given machine Never attempt to lift bins that are heavier than the factory specif...

Страница 8: ...ements are taken at a point 1 6 metres above the ground at the operator s working position 1 8 Environmental restrictions The Dumpmaster may be used indoors or outdoors However the following restricti...

Страница 9: ...6 42 EC 3 Operator s must read and understand this manual before using the machine 4 If the machine is to be leased sold or otherwise transferred then this manual shall accompany the machine 5 This is...

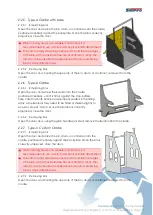
Страница 10: ...n 7 The battery indicator if fitted shows an acceptable level of charge 2 2 Emplacing and removing bins The Dumpmaster cradle is designed to allow bins to be emplaced and removed easily while also hol...

Страница 11: ...radle General waste and recycling applications in North America ANSI Z245 60 Type B Trash Carts 32 gal 48 gal 64 gal 96 gal 2 2 4 Type A with base ANSI bar lift cradle with base Specialised waste and...

Страница 12: ...e spacing as needed 2 2 2 2 Removing bins Open the door and using the grab handle provided remove the wheelie bin from the cradle 2 2 3 Type C Cradle 2 2 3 1 Emplacing bins Open the door and place the...

Страница 13: ...radle positioned centrally until it is firmly against the stop buffers Take care that both trunnions are properly seated in the lifting arms some Eurobins may need to be tilted or shaken slightly to e...

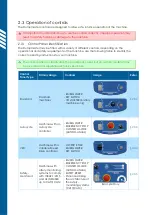
Страница 14: ...normally atop the powerpack cover but on custom models it may be mounted on a separate electronics enclosure Control Panel Type Primary Usage Controls Image Refer Standard Standard machines RAISE LOWE...

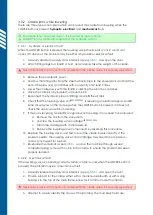
Страница 15: ...rol Panel How to operate the controls of a machine with an autocycle controller allowing bins to be emptied without continuous input Dumpmaster models that are fitted with an autocycle control system...

Страница 16: ...TICK SLIGHTLY BACK so that the material is poured from the bin in a controlled manner as desired Wait for the contents of the bin to empty Release the JOYSTICK to stop the cradle at any time 5 Pull th...

Страница 17: ...n the door If the door is locked press the LOWER button to unlock it 3 Place the full bin onto the cradle taking care that it is properly positioned as per 2 2 then shut the door 4 Turn the mode selec...

Страница 18: ...d dock or platform unless designed for that application Never operate the machine with any covers or guards removed Never attempt to empty the contents of closed top drums unless the machine is secure...

Страница 19: ...es to connect the machine to mains power Do not operate if power lead insulation or power plugs are damaged Do not connect a damp power plug or socket Ensure the power supply socket is fitted with a r...

Страница 20: ...tch 0790050454 Faulty 24VDC motor solenoid or 415VAC motor contactor Solenoid contactor should click when the UP button is pressed if not it may need to be replaced 24VDC Solenoid 0880050015 415VAC Co...

Страница 21: ...ins that are within the machine s Safe Working Load as per 1 4 The pressure relief valve may only be adjusted by a qualified technician with prior authorisation from Simpro 3 3 1 2 Mechanical fault 1...

Страница 22: ...ing an electrical signal An LED lamp should glow on the coil plug when the LOWER button is pressed If it does not check the up down switch and wiring 9 If the coil is receiving an electrical signal bu...

Страница 23: ...axle e The cradle being out of level due to poor adjustment of the lifting chains or a breakage f The roller arm s being pressed too firmly against the tipping track due to the cradle sitting out of...

Страница 24: ...tmeter on the control panel which is used to indicate the level of charge in the batteries When the voltmeter reads less than 24 volts the batteries are flat The machine should not be used and should...

Страница 25: ...The battery charger is in an enclosed plastic case and protected against short circuit current overload over voltage and over temperature conditions 3 4 6 Appliance inlet The Dumpmaster is fitted wit...

Страница 26: ...ly orient the machine so that adjustment arc of the panel mounting bracket runs from North to South 2 If the adjustment arc cannot be oriented North South the panel should be angled at 0 degrees verti...

Страница 27: ...ay be viewed here https www worldstandards eu three phase electric power Connecting the Dumpmaster to a power supply for which it is not designed may damage the motor and other components Consult an e...

Страница 28: ...n lead 3 6 3 Isolator switch The Dumpmaster is fitted with an isolator switch on the forward side of the powerpack cover This isolates the electrical systems from the power supply and should be turned...

Страница 29: ...alve thus regulating the descent speed of the cradle regardless of the weight of the bin 3 7 3 Lift ram The Dumpmaster lift ram is a single action displacement type with a 1 inch chrome bar and a sing...

Страница 30: ...c fluid should be drained and replaced as per specifications in 3 7 4 The intake suction filter and the lowering valve should also be removed and cleaned at this time See 3 10 for other preventative m...

Страница 31: ...1 Lubricate the arm pivot points with silicone spray both ends of all four arms 2 Check the safety door interlocks to ensure they work as intended a Raise the cradle 100mm off the ground and try to op...

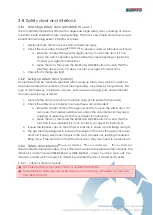
Страница 32: ...chine is completely disabled and the cradle cannot be moved until the door is closed the interlock is re enabled and the system is reset 3 Shut the safety door and raise the cradle to the desired posi...

Страница 33: ...al Instructions English v119 0 October 2022 Page 32 3 8 3 2 Interlock specifications A summary of the interlock specifications is included below The complete Idec user manual can be downloaded from th...

Страница 34: ...the button is released indicating a successful reset If a fault has been detected in any of the safety equipment or connections the machine will not reset and cannot be operated the RESET lamp will c...

Страница 35: ...quire power cycling to recover after the fault is corrected Recoverable faults can be cleared by eliminating the cause of the fault and cycling the inputs associated with the fault The output that is...

Страница 36: ...and protective eyewear 2 Check that there are no ignition sources nearby 3 Lower the cradle and remove bin 4 Turn off the key switch and unplug the charging lead 5 Remove the powerpack cover 6 Clean t...

Страница 37: ...User Manual Simpro Dumpmaster Original Instructions English v119 0 October 2022 Page 36 Date Service Person Location Checks complete Notes on repairs or maintenance required Parts and materials used...

Страница 38: ...d Check that the lead is in good condition Safety systems 5 Door interlock actuator 0250050065 Check that the actuator is securely attached to the door with security screws and enters the interlock fr...

Страница 39: ...User Manual Simpro Dumpmaster Original Instructions English v119 0 October 2022 Page 38 Date Service Person Location Checks complete Notes on repairs or maintenance required Parts and materials used...

Страница 40: ...nterlock freely and smoothly without force Check that the actuator locks the door while the cradle is raised above 100mm 7 Safety labels and markings Check that all warnings labels guides etc are atta...

Страница 41: ...User Manual Simpro Dumpmaster Original Instructions English v119 0 October 2022 Page 40 Date Service Person Location Checks complete Notes on repairs or maintenance required Parts and materials used...

Страница 42: ...ables a directional lock on the castor wheels This can make the machine easier to manoeuvre on sloping ground Extra care should be taken when moving the machine on sloping ground 4 3 Lifting Observe t...

Страница 43: ...to load the pallet onto the deck of the truck 5 Tie the machine into position using marked tie down points and strops rated to at least 1000kg ensuring it is fastened against lateral forces from any...

Страница 44: ...d in the Dumpmaster design is as follows 1 Attempts to use the machine by untrained operators 2 Attempts to empty bins that the cradle is not specifically designed to hold 3 Attempts to bypass the doo...

Страница 45: ...ble Risks evaluated as Very High Extreme or Unacceptable are likely to require additional or uprated safety functions as per 5 4 4 These must be specified at the time of order LO Likelihood of Occurre...

Страница 46: ...when the cradle is on the ground and the cradle cannot be raised unless the door is closed and locked Significant safety margins ensure that the probability of failure of any steel hydraulic or contro...

Страница 47: ...AS60204 1 The charger on battery powered Dumpmasters is double insulated Contamination from tipping toxic powder and liquid Operator LO 2 FE 4 DPH 1 NP 1 Risk Factor 8 Great care should be taken when...

Страница 48: ...Operator LO FE DPH NP Risk Factor Other persons LO FE DPH NP Risk Factor Control measures Comments Site specific hazard Operator LO FE DPH NP Risk Factor Other persons LO FE DPH NP Risk Factor Contro...

Страница 49: ...ular conditions of use The following section is provided to assist potential Dumpmaster operators in determining whether any additional safety features are required for their application ISO 13849 1 2...

Страница 50: ...ludes all hazards intrinsic to the Dumpmaster design other safety functions may be required to address site specific hazards which can be evaluated using the blank spaces provided 5 4 4 Achieving the...

Страница 51: ...placing an order Simpro can then specify and quote additional or uprated safety functions such as CAT3 Kit to achieve PLd safety performance CAT4 Kit to achieve PLe safety performance Additional guar...

Страница 52: ...with adaptor ring spindle DMXXXX B only 1 2015 0880050035 Motor 3 ph 2 Pole 1 1kW 400V 71 Frame DMXXXX 3 only 1 2015 0250050069 Contactor 24VDC coil EBSIC 0016KZ Mini DMXXXX 3 only 1 2020 0250050003...

Страница 53: ...User Manual Simpro Dumpmaster Original Instructions English v119 0 October 2022 Page 52...

Страница 54: ...may be done using the web form here simpro world warranty claim 7 2 Coverage 1 Simpro provides a 24 month Back to Base Warranty on all Standard Products unless alternative terms have been agreed to i...

Страница 55: ...taken It is also important to establish whether there may have been any negligence misuse or an accident that contributed to or caused the fault 3 Parts requiring replacement will be supplied by Simp...

Страница 56: ...rial Number Function Bin Tipper Type Model DM0700 DM1200 DM1500 DM1800 DM2100 DM2400 DM2700 Serial No Standards Used EN 349 1993 EN 574 1996 A1 200 EN 953 1997 EN ISO 4413 2010 EN ISO 12100 2010 EN IS...

Страница 57: ...User Manual Simpro Dumpmaster Original Instructions English v119 0 October 2022 Page 56 9 Notes...

Страница 58: ......

Страница 59: ...User Manual Simpro Dumpmaster Original Instructions English v119 0 October 2022 Page 58...

Страница 60: ...ent Simpro s OEM products are now sold around the world through a distribution network covering most large economies The product range continues to evolve thanks to a policy of continuous R D new idea...

Отзывы: