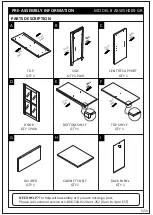
Simpli Home Wyndenhall Brooklyn + Max AXWSH005-GR Скачать руководство пользователя страница 17

17/19

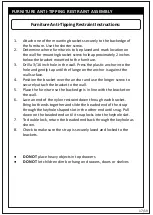
FURNITURE ANTI-TIPPING RESTRAINT ASSEMBLY

1.


Attach one of the mounting brackets securely to the back edge of


the furniture. Use the shorter screw.

2.


Determine where furniture is to be placed and mark location on


the wall for mounting bracket screw hole approximately 2 inches


below the bracket mounted to the furniture.

3.


Drill a 3/16 inch hole in the wall. Press the plastic anchor into the


hole and gently tap until the flange on the anchor is against the


wall surface.

4.


Position the bracket over the anchor and use the longer screw to


securely attach the bracket to the wall.

5.


Place the furniture so the back edge is in line with the bracket on


the wall.

6.


Lace an end of the nylon restraint down through each bracket.


Bring both ends together and slide the beaded end of the strap


through the keyhole shaped slot in the other end until snug. Pull


down on the beaded end until it snap locks into the keyhole slot.
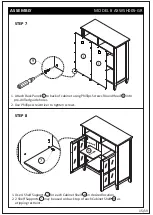
7.


To double lock, return the beaded end back through the keyhole as


shown.

8.


Check to make sure the strap is securely laced and locked to the


brackets.


DO NOT

 place heavy objects in top drawers 


DO NOT

 let children climb or hang on drawers, doors or shelves

Furniture Anti-Tipping Restraint Instructions:

Содержание Wyndenhall Brooklyn + Max AXWSH005-GR

Страница 1: ...WARM SHAKER NORFOLK LEXINGTON MEDIUM STORAGE MEDIA CABINET MODEL GR AXWSH005 1 19 SIMP I I H O M E L I F E B Y D E S I GN...

Страница 2: ...WITH ASSEMBLY PLEASE CONTACT US AT simpli home com customer support PLEASE ENSURE TO HAVE THE MODEL INSTRUCTION BOOKLET FROM THE PACKAGING OR TO RETURN THE PRODUCT PLEASE CONTACT THE RETAILER WHERE TH...

Страница 3: ...ur furniture in your home with a short review to our facebook page for a chance to ENTER TO WIN Win up to 3000 of Simpli Home furniture www facebook com simplihomefurnishings 3 19 SIMP I I H O M E L I...

Страница 4: ...and hardware required Hardware package may have spare parts WARNING This item contains small parts which can be swallowed by children and pets Keep children and pets away during assembly To avoid dang...

Страница 5: ...EMBLY INFORMATION MODEL AXWSH005 GR A PARTS DESCRIPTION 5 19 TOP QTY 1 SIDE QTY 1 PAIR CENTRE SUPPORT QTY 1 DOOR QTY 1 PAIR BOTTOM SHELF QTY 1 TOP SHELF QTY 1 B C D E F G H I DIVIDER QTY 1 BACK PANEL...

Страница 6: ...d 4 5 6 7 8 9 10 11 12 2 3 ALLEN KEY QTY 1 CAM LOCK PIN CAM LOCK QTY 12 SETS ALLEN KEY SCREW M6 X 30 mm QTY 8 a M4 x 25mm QTY 1 b M4 x 15mm QTY 1 c M4 x 25mm QTY 1 PHILLIPS SCREW M4 X 15 mm QTY 24 PHI...

Страница 7: ...COMPONENTS KEY DIAGRAM 7 19 A G I I C B F H E B H D D MODEL AXWSH005 GR...

Страница 8: ...ed holes 2 Attach Cam Lock Pins 2 to Top Shelf F using guide holes 3 Align Cam Lock Pins 2 and insert into pre drilled holes on Centre Support C 4 Insert 2 Cam Locks 2 into pre derilled holes in Centr...

Страница 9: ...r the bottom and 2 for the top 2 Align Cam Lock Pins 2 with pre drilled holes of Bottom Shelf E and Top Shelf F 3 Insert Cam Locks 2 into pre drilled holes of Bottom Shelf E and Top Shelf F 4 Once in...

Страница 10: ...ASSEMBLY STEP 3 10 19 1 To attach opposite Side B to Bottom Shelf E and Top Shelf F repeat steps 1 4 in step 2 B B C E F 2 2 MODEL AXWSH005 GR...

Страница 11: ...h of Dowels should be exposed 4 Align Dowels 11 with pre drilled holes in centre of Top Shelf F and insert firmly 5 Align pre drilled holes on bottom of Top A with Dowels on Sides B and Top Centre G 6...

Страница 12: ...ch Adjustable Hinges 12 to Doors D using Phillips Screws 4 into guide holes on Doors D 2 Attach Adjustable Hinges on Doors D to Sides B using Phillips Screws 4 into guide holes on Sides B 3 Use a Phil...

Страница 13: ...instructions 1 Side adjustment 4 mm To move the door towards the side panel loosen screw I and tighten screw II To move the door away from the side panel loosen screw II and tighten screw I 2 Depth a...

Страница 14: ...to inside corners of Doors D using Phillips Screws 5 into guide holes on Doors D 2 Attach Magnet 6 to inside corner of Bottom Shelf E using Phillips Screws 5 into guide holes on Bottom Shelf E 3 Use a...

Страница 15: ...cation 2 2 Shelf Supports 7 may be used on back top of each Cabinet Shelf H as a tipping restraint 1 Attach Back Panels I to back of cabinet using Phillips Screws Round Head 9 into pre drilled guide h...

Страница 16: ...I TIPPING RESTRAINT ASSEMBLY NOTE Injuries and damage can occur from furniture tip over It is important to use the safety bracket included If the tipping restraint kit is not in the box please contact...

Страница 17: ...chor and use the longer screw to securely attach the bracket to the wall 5 Place the furniture so the back edge is in line with the bracket on the wall 6 Lace an end of the nylon restraint down throug...

Страница 18: ...0 ext 262 from 9 am to 4 pm Monday to Friday Eastern Standard Time or by email at simpli home com customer support We reserve the right to repair or replace the defective product at its discretion Thi...

Страница 19: ...simpli home com customer support or call Customer Support at 1 866 518 0120 ext 262 Monday to Friday between 9 am 4 pm EST For more information visit us on our website www simpli home com Like us on...

Отзывы: