background image

NEED HELP? 

For help with assembly or if you are missing a part,

Please call customer service at 1-866-518-0120 ext. 262 (9 am to 4 pm EST)

PRE

-

ASSEMBLY INFORMATION

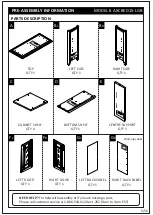
PARTS DESCRIPTION

5/16

A

TOP

QTY 1

LEFT SIDE

QTY 1

B

L

RIGHT SIDE

QTY 1

B

R

CABINET SHELF

QTY 4

C

BOTTOM SHELF

QTY 1

D

CENTRE SUPPORT

QTY 1

E

LEFT DOOR

QTY 1

F

L

RIGHT DOOR

QTY 1

F

R

LEFT BACK PANEL

QTY 1

G

L

G

R

RIGHT BACK PANEL

QTY 1


Front 

/ Ava

nt


Front 

/ Avan

t


Front 

/ Ava

nt


Warning Label


Fro

nt / 

Ava

nt


Front 

/ Avan

t


MODEL


# AXCBED15-LGB   

Содержание WyndenHall Brooklyn + Max AXCBED15-LGB

Страница 1: ...BEDFORD FREEMONT HAMPTON MEDIUM STORAGE CABINET MODEL AXCBED15 LGB 1 16 SIMP I I HOME L I F E B Y D E S I GN ...

Страница 2: ...en 9 am 4 pm EST or go to www simpli home com parts request In order to assist you in a timely manner please have the following information ready Model _______________________ Part Number or Letter_______________________ Purchased at ___________________Date of Purchase ___________________________ If you wish to return the product please contact the retailer where the product was purchased SIMP I I...

Страница 3: ...r service department in order to obtain another kit before using the furniture Identify all the parts and hardware Do not discard of the packaging until you have checked that you have all of the parts and hardware required Hardware package may have spare parts WARNING This item contains small parts which can be swallowed by children and pets Keep children and pets away during assembly To avoid dan...

Страница 4: ...humidistat automatically works to balance the humidity in your home so it is constant Dry indoor air can suck enough moisture from its surroundings to do permanent damage to wood causing it to crack or split Remember that not all woods are created equal Two factors that help determine how rapidly a wood will lose moisture are pore size and surface hardness A piece made from a dense and hard wood w...

Страница 5: ...SEMBLY INFORMATION PARTS DESCRIPTION 5 16 A TOP QTY 1 LEFT SIDE QTY 1 BL RIGHT SIDE QTY 1 BR CABINET SHELF QTY 4 C BOTTOM SHELF QTY 1 D CENTRE SUPPORT QTY 1 E LEFT DOOR QTY 1 FL RIGHT DOOR QTY 1 FR LEFT BACK PANEL QTY 1 GL GR RIGHT BACK PANEL QTY 1 Front Avant Front Avant Front Avant Warning Label Front Avant Front Avant MODEL AXCBED15 LGB ...

Страница 6: ...LIPS SCREW M3 X 12 mm QTY 12 HANDLE M4 X 25 mm QTY 2 SETS WOOD DOWEL Ø8 X 30 mm QTY 4 CAM LOCK PIN CAM LOCK QTY 9 PHILLIPS SCREW M3 X 15 mm QTY 8 MAGNET AND PLATE QTY 2 SETS ALLEN KEY QTY 1 PHILLIPS SCREW ROUND HEAD M4 X 15 mm QTY 20 SHELF SUPPORT QTY 24 6 16 Required Flathead screwdriver Phillips screwdriver Rubber mallet Not Included FURNITURE TIP OVER RESTRAINT QTY 1 SET a M4X25 QTY2 1isextra b...

Страница 7: ...COMPONENTS KEY DIAGRAM 7 16 A FL FR BL BR C C E C D C GR GL Front Avant Front Avant Front Avant Front Avant Front Avant MODEL AXCBED15 LGB ...

Страница 8: ...tom of holes securely 1 2 length of Dowels should be exposed 3 Attach Cam Lock Pins 2 into pre drilled holes on the Sides BL BR 4 Align Cam Lock Pins with guide holes on Bottom Shelf D 5 Insert Cam Locks 2 into guide holes on Bottom Shelf D 6 Once in place tighten Cam Locks 2 using a Phillips screwdriver 10 10 2 2 2 2 BR BL D Front Avant Front Avant Front Avant MODEL AXCBED15 LGB ...

Страница 9: ...ntre Support E to Bottom Shelf D using Allen Key Screws 1 through guide holes 2 Use Allen Key 3 to tighten Do not over tighten D E Front Avant Front Avant Front Avant Front Avant 3 1 Front Avan t Fron t Avan t BR BL MODEL AXCBED15 LGB ...

Страница 10: ...enter Support E 3 Insert 3 Cam Lock 2 into guide holes on Center Support E 4 Using a flathead screwdriver tighten Cam Locks into Pins 5 Attach Top A with Sides BL BR using 6 Allen Key Screws 1 3 Screws on each Side 6 Use Allen Key 3 to tighten Screws Do not over tighten A BL BR E Front Avant Front Avant Front Avant Front Avant Front Avant STEP 3 3 1 2 MODEL AXCBED15 LGB ...

Страница 11: ...0 90 9 0 9 0 90 90 9 0 STEP 5 Note The back of the cabinet frame does not have pre drilled holes to attach the back panels 1 Attach Back Panels GL GR to back of cabinet using Phillips Screws Round Head 6 through guide holes 2 Use Phillips Screwdriver to tighten screws Do not over tighten Warning Label GL GR Front Avant GL GR 6 Triangle ruler MODEL AXCBED15 LGB ...

Страница 12: ...ned straight square with bottom shelf side Using Phillips screwdriver to tighten the rest of screws 4 into pre drill holes top bottom holes on hinges 2 Attach Magnet Plates 8 to bottom corner of Doors FL FR using Phillips Screws 5 into pre drilled holes on Doors FL FR 3 Attach Magnets 8 using Phillips Screws 5 into pre drilled holes on Bottom Shelf D 4 Use Phillips screwdriver to attach Handles 7 ...

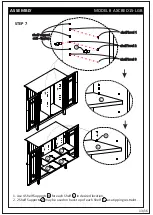
Страница 13: ...B 13 16 shelf level 1 shelf level 2 shelf level 3 shelf support anti tipping 9 9 C C C C C 1 Use 4 Shelf Supports 9 for each Shelf C in desired location 2 2 Shelf Supports 9 may be used on back top of each Shelf C as a tipping restraint ...

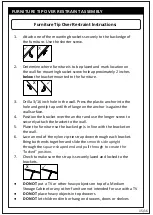
Страница 14: ...NG Serious or fatal crushing injuries can occur from furniture tip over If the furniture tip over restraint kit is not in the box please contact our customer service department in order to obtain another kit before using the furniture FURNITURE TIP OVER RESTRAINT ASSEMBLY 11 11 ...

Страница 15: ...y attach the bracket to the wall 5 Place the furniture so the back edge is in line with the bracket on the wall 6 Lace an end of the nylon zip tie strap down through each bracket Bring both ends together and slide the smooth side upright through the square shaped end and pull through to create the locked position 7 Check to make sure the strap is securely laced and locked to the brackets DO NOT pu...

Страница 16: ...6 518 0120 ext 262 from 9 am to 4 pm Monday to Friday Eastern Standard Time or by email at customerservice simpli home com We reserve the right to repair or replace the defective product at its discretion This product is guaranteed for 12 months if used for normal purposes Any warranty is invalid if the product has been overloaded or subject to neglect improper use or an attempted repair by other ...

Отзывы: