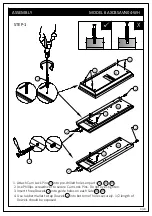
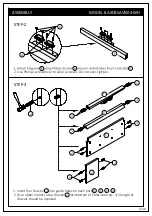
background image

/20

9

STEP-1

ASSEMBLY

MODEL # AXCBSAVN04-WH

X

Front / 

Avant

Front / 

Avant

Front / 

Avant

1

1

1

1

A

BL

BR

1

2

2

2

2

2

1. Attach Cam Lock Pins  1  into pre-drilled holes on parts  A  , BL , BR .

2. Use Phillips screwdriver to secure Cam Lock Pins. Do not over-tighten.

3. Insert three Dowels  2  into guide holes on each Side BL , BR .

4. Use rubber mallet to tap Dowels  2  into bottom of holes securely. 1/2 length of

    Dowels should be exposed.

Содержание WyndenHall brooklin+max AXCBSAVN04-WH

Страница 1: ...AVINGTON MIA HAYES DOUBLE DOOR WALL CABINET MODEL AXCBSAVN04 WH 20 1 TM TM SIMP HOME LIFE BY DESIG N ...

Страница 2: ... 866 518 0120 ext 262 Monday to Friday between 9 am 4 pm EST or go to www simpli home com parts request In order to assist you in a timely manner please have the following information ready Model _________________Part Number or Letter_____________________ Purchased at ____________Date of Purchase _________________________ If you wish to return the product please contact the retailer where the prod...

Страница 3: ...e required Hardware package may have spare parts WARNING This item contains small parts which can be swallowed by children and pets Keep children and pets away during assembly To avoid danger of suffocation always keep plastic bags away from children and pets We recommend that you assemble this unit on a carpeted floor to avoid scratches If using power tools set the tool to low torque to avoid dam...

Страница 4: ...ally works to balance the humidity in your home so it is constant Dry indoor air can suck enough moisture from its surroundings to do permanent damage to wood causing it to crack or split Remember that not all woods are created equal Two factors that help determine how rapidly a wood will lose moisture are pore size and surface hardness A piece made from a dense and hard wood will dry less rapidly...

Страница 5: ...sing a part Please call customer service at 1 866 518 0120 ext 262 9 am to 4 pm EST PART DESCRIPTION C D E F G HL Front Avant TOP QTY 1 LEFT SIDE QTY 1 RIGHT SIDE QTY 1 Front Avant Front Avant BOTTOM SHELF QTY 1 Front Avant DIVIDER QTY 2 MIDDLE SHELF QTY 1 FRONT BAR QTY 1 BACK BAR QTY 1 LEFT BACK PANEL QTY 1 ...

Страница 6: ... For help with assembly or if you are missing a part Please call customer service at 1 866 518 0120 ext 262 9 am to 4 pm EST PART DESCRIPTION J K L RIGHT BACK PANEL QTY 1 LEFT DOOR QTY 1 RIGHT DOOR QTY 1 SHELF QTY 1 JOINING STRIP QTY 1 Warning Label WALL MOUNT BAR QTY 1 ...

Страница 7: ...ARDWARE DESCRIPTION 2 3 Required Flathead screwdriver Phillips screwdriver Rubber mallet Not Included 4 5 6 7 8 9 CAM LOCK PIN CAM LOCK QTY 8 SETS WOOD DOWEL Ø8 X 30mm QTY 26 HINGE QTY 4 MAGNET AND PLATE QTY 2 SETS PHILLIPS SCREW M4 X 50mm QTY 9 PHILLIPS SCREW M3 X 15mm QTY 24 HANDLE M4 X 25 mm QTY 2 SETS SHELF SUPPORT QTY 4 WALL ANCHOR QTY 4 10 PHILLIPS SCREW ROUND HEAD M4 X 15mm QTY 4 ...

Страница 8: ...COMPONENTS KEY DIAGRAM MODEL AXCBSAVN04 WH 20 8 Front Avant Front Avant Front Avant Front Avant IL IR A J G F BL BR HR HL L K E C D D ...

Страница 9: ... 2 2 1 Attach Cam Lock Pins 1 into pre drilled holes on parts A BL BR 2 Use Phillips screwdriver to secure Cam Lock Pins Do not over tighten 3 Insert three Dowels 2 into guide holes on each Side BL BR 4 Use rubber mallet to tap Dowels 2 into bottom of holes securely 1 2 length of Dowels should be exposed ...

Страница 10: ... o p r e d r i l l e d h o l e s F r o n t C r o s s B a rF 2 Use Phillips screwdriver to secure screws Do not over tighten STEP 3 2 2 2 2 2 2 2 2 2 F G E D 1 Insert four Dowels 2 into guide holes on each part D E F G 2 Use rubber mallet to tap Dowels 2 into bottom of holes securely 1 2 length of Dowels should be exposed ...

Страница 11: ...AVN04 WH E F G Front Avant BL BL E F G Front Avant 1 Align Wood Dowels with guide holes and attach parts E F G to Left Side BL 1 2 Insert two Cam Locks 1 into guide holes on Bottom Shelf E 3 Use Phillips screwdriver to secure Cam Locks ...

Страница 12: ... 20 12 STEP 5 ASSEMBLY MODEL AXCBSAVN04 WH 1 Repeat Step 4 for the Right Side BR Front Avant E F G BL Front Avant BR 1 BL F G BR E ...

Страница 13: ... attach Divders D to Middle Shelf E 2 Align Wood Dowels with guide holes and attach Divders D and Sides BL BR to Bottom Shelf C 5 Front Avant Front Avant 3 Use four Phillips Screws 5 to attach Bottom Shelf C through guide holes from Bottom Shelf C to pre drilled holes of Sides BL BR 4 Use Phillips screwdriver to secure Screws Do not over tighten ...

Страница 14: ... s H L H R i n t o t h e s l o t o f J o i n i n g S t r i pL 2 S l i d e B a c k P a n e l s H L H R f i r m l y i n t o s l o t s o n S i d e sB L B R a n d B o t t o m S h e l fC 10 Warning Label 3 Use four Phillips Screws Round Head 10 to attach Back Panels HL HR through guide holes 4 Use Phillips screwdriver to secure Screws Do not over tighten ...

Страница 15: ... Front Avant A BL BR C A BL BR C 1 Align Cam Lock Pin and Wood Dowels with guide holes on Sides BL BR and Top A and attach Top A to Sides BL BR 2 Insert two Cam Locks 1 into guide holes on each Side BL BR 3 Use Phillips screwdriver to secure Cam Locks C C BL BR A A 1 ...

Страница 16: ...sI L I Ru s i n g P h i l l i p s S c r e w s6i n t o p r e d r i l l e d h o l e s o n D o o r sI L I R 2 A t t a c h M a g n e t P l a t e s4t o t o p c o r n e r o f D o o r sI L I Ru s i n g P h i l l i p s S c r e w s6i n t o p r e d r i l l e d h o l e s o n D o o r sI L I R 3 U s e P h i l l i p s s c r e w d r i v e r t o a t t a c h H a n d l e s7t o D o o r sI L I R IL IR 6 3 6 4 6 3 7 ...

Страница 17: ...WH 1 A t t a c h H i n g e o n D o o r sI L I Rt o S i d e sB L B R u s i n g P h i l l i p s S c r e w s6i n t o p r e d r i l l e d h o l e s o n S i d e s B L B R 2 Use Phillips screwdriver to secure screws Do not over tighten 6 IL IR BL BR ...

Страница 18: ...our Wall Anchors 9 to positions a b d e using a Phillips screwdriver Anchors are self tapping and do not need pre drilled holes 4 Use your drill to create 1 hole 0 15 diameter x 2 deep at position c STEP 12 Positioning STEP 13 Attach Wall Mount Bar to Wall 1 S c r e w o n e P h i l l i p S c r e w5t h r o u g h t h e r a i s e d s i d e o f t h e W a l l M o u n t B a rJa tp o s i t i o n c 2 S c ...

Страница 19: ... STEP 14 ASSEMBLY MODEL AXCBSAVN04 WH 1 Align the top of the Wall Mount Bar J with the bottom of the angled bracket on the back of the Cabinet 2 Gently slide the Cabinet down on to the Wall Mount Bar J J J J ...

Страница 20: ... our toll free service line at 1 866 518 0120 ext 262 from 9 am to 4 pm Monday to Friday Eastern Standard Time or by email at customerservice simpli home com We reserve the right to repair or replace the defective product at its discretion This product is guaranteed for 12 months if used for normal purposes Any warranty is invalid if the product has been overloaded or subject to neglect improper u...

Отзывы: