Simpli Home Connaught 3AXCCON-04 Скачать руководство пользователя страница 3

IMPORTANT :

Please read this manual carefully before beginning

assembly of this product Keep this manual for future reference.

.

SAFETY INFORMATION

CARE and MAINTENANCE

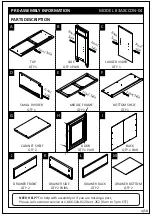
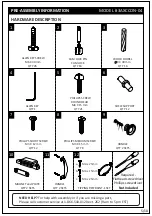
Identify all the parts and hardware. Do not discard of the packaging until you
have checked that you have all of the parts and hardware required. Hardware
package may have spare parts.

This item contains small parts which can be swallowed by children

and pets. Keep children and pets away during assembly. To avoid danger of
suffocation, always keep plastic bags away from children and pets.
We recommend that you assemble this unit on a carpeted floor to avoid
scratches. We do not recommend the use of power tools for assembly as this
could damage the unit. Only use manual tools.
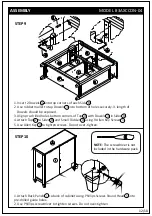
May require 2 people for ease of assembly.

WARNING:

To clean, use a soft or slightly damp cloth, then wipe with a clean, dry cloth.
Dust with soft dry cloth.
Do not use ammonia-based cleaning products, as they will damage the finish.
Do not leave liquids or damp cloths on this furniture.
To avoid dulling of the finish, do not place furniture in direct sunlight.
Please inspect and tighten all screws or bolts on a regular basis to ensure proper
performance and safety of your item.

3/18

Содержание Connaught 3AXCCON-04

Страница 1: ...1 18 CONNAUGHT HAMPSHIRE SOMERSET ENTRYWAY STORAGE CABINET MODEL 3AXCCON 04 ...

Страница 2: ...DO NOT RETURN FOR REPLACEMENT PARTS OR OTHER INQUIRIES PLEASE CONTACT US AT PLEASE ENSURE TO HAVE THE INSTRUCTION BOOKLET simpli home com customer support MODEL FROM THE PACKAGING OR 2 18 ...

Страница 3: ...ep plastic bags away from children and pets We recommend that you assemble this unit on a carpeted floor to avoid scratches We do not recommend the use of power tools for assembly as this could damage the unit Only use manual tools May require 2 people for ease of assembly WARNING To clean use a soft or slightly damp cloth then wipe with a clean dry cloth Dust with soft dry cloth Do not use ammoni...

Страница 4: ...t Please call customer service at 1 866 518 0120 ext 262 9 am to 5 pm EST PRE ASSEMBLY INFORMATION 4 18 CABINET SHELF QTY 2 DOOR QTY 1 PAIR F G H I DRAWER FRONT QTY 2 J DRAWER SIDE QTY 2 PAIRS K DRAWER BACK QTY 2 L DRAWER BOTTOM QTY 2 M BOTTOM SHELF QTY 1 BACK QTY 1 PAIR MODEL 3AXCCON 04 Front Side Back Side Front Side Back Side Front Side Front Side Front Side Front Side ...

Страница 5: ... LOCK PIN CAM LOCK QTY 16 WOOD DOWEL 8 X 30 mm QTY 16 PHILLIPS SCREW MEDIUM M3 X 15 mm QTY 8 HANDLE QTY 2 SETS MAGNET and PLATE QTY 2 SETS PHILLIPS SCREW ROUND HEAD M4 X 15 mm QTY 21 ALLEN KEY QTY 1 PHILLIPS SHORT SCREW M3 X 12 mm QTY 12 SHELF SUPPORT QTY 12 10 11 6 7 8 9 TIPPING RESTRAINT 1 SET 12 HANDLE QTY 2 SETS a M4 x 25mm b M4 x 15mm c M4 x 25mm Required Flathead screwdriver Phillips screwdr...

Страница 6: ...COMPONENTS KEY DIAGRAM 6 18 MODEL 3AXCCON 04 ...

Страница 7: ... Sides K and Drawer Front J MODEL 3AXCCON 04 1 Attach 4 Cam Lock Pins 2 to back of Drawer Front J 2 Align Cam Lock Pins with pre drilled holes and attach Drawer Sides K 3 Insert 2 Cam Locks 2 into pre drilled holes on each Drawer Side K 4 Use flathead screwdriver secure Cam Locks ...

Страница 8: ...the second drawer STEP 4 MODEL 3AXCCON 04 1 Align Drawer Back L with Drawer Bottom M and press firmly into slot 2 Attach back using 2 Allen Key Screws 1 through pre drilled holes on each Side K 3 Use Allen Key 4 to tighten screws Do not over tighten NOTE The screwdriver is not included in the hardware pack ...

Страница 9: ... Lock Pins 2 to Middle Frame E into guide holes 4 Align and insert Cam Lock Pins on Middle Frame E into pre drilled holes on Large Divider C 5 Place 2 Cam Locks 2 into pre drilled holes on Large Divider C 6 Use a flathead screwdriver to tighten Cam Locks into Pins 1 Attach Small Divider D to Middle Frame E using 2 Allen Key Screws 1 2 Use Allen Key 4 to tighten screws Do not over tighten MODEL 3AX...

Страница 10: ...vider C 2 Use rubber mallet to tap Dowels 3 into bottom of holes securely length of Dowels should be 3 Attach to Bottom Shelf F using 3 Allen Key Screws 1 through pre drilled holes 4 Use Allen Key 4 to tighten screws Do not over tighten exposed Large Divider C MODEL 3AXCCON 04 ...

Страница 11: ...ch Side B into guide holes 4 Align and insert Cam Lock Pins on Sides B into pre drilled holes on Bottom Shelf F 5 Place 6 Cam Locks 2 into pre drilled holes on Bottom Shelf F 6 Use a flathead screwdriver to tighten Cam Locks into Pins 7 Attach Middle Frame E to Sides B using 4 Allen Key Screws 1 through pre drilled holes 2 Screws each Side 8 Use Allen Key 4 to tighten screws Do not over tighten MO...

Страница 12: ...A with Dowels 3 in Sides B exposed 4 Attach Top A to Sides B and Small Divider D using 9 Allen Key Screws 1 5 Use Allen Key 4 to tighten screws Do not over tighten 1 Attach Back Panels I to back of cabinet using Phillips Screws Round Head 5 into pre drilled guide holes 2 Use Phillips screwdriver to tighten screws Do not over tighten STEP 10 MODEL 3AXCCON 04 NOTE The screwdriver is not included in ...

Страница 13: ...Magnet Plates 10 to bottom corner of Doors H using Phillips Screws 8 into guide holes on Doors H 3 Attach Magnet 10 to Bottom Shelf F using Phillips Screws 8 into guide holes on Bottom Shelf F 4 Use Phillips screwdriver attach Handles 11 to Doors H MODEL 3AXCCON 04 NOTE The screwdriver is not included in the hardware pack ...

Страница 14: ...lf Supports 6 for each Shelf Cabinet G in desired location 2 2 Shelf Supports 6 may be used on back top of each Shelf Cabinets G as a tipping restraint 3 Insert assembled drawers into drawer glides on assembled cabinet MODEL 3AXCCON 04 ...

Страница 15: ...e Tipping Restraint Carefully follow the instructions on the package STEPS 13 14 1 To attach Tipping Restraint 12 fllow instructions on Tipping Restraint package 15 18 ASSEMBLY STEP 13 STEP 14 MODEL 3AXCCON 04 NOTE The screwdriver is not included in the hardware pack ...

Страница 16: ... to repair or replace the defective product at its discretion This product is guaranteed for 12 months if used for normal purposes Any warranty is invalid if the product has been overloaded or subject to neglect improper use or an attempted repair by other than an authorized agent Heavy duty or daily professional commercial usage are not guaranteed Due to continuous product improvement we reserve ...

Страница 17: ...mer Support at or call Customer Service at 1 866 0518 0120 ext 262 Monday to Friday between 9 am 5 pm EST For more information visit us on our website Like us on facebook simpli home com customer support www simpli home com www facebook com simplihomefurnishings 17 18 ...

Страница 18: ...home with a short review to our facebook page and have a chance to ENTER TO WIN Win your choice of any one of Simpli Home furniture pieces Free www facebook com simplihomefurnishings draws monthly shipping included vanities not included 18 18 ...

Отзывы: