background image

16/21

STEP 9

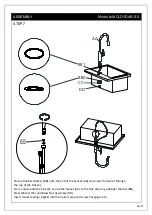
Place the Sink (K) with the attached Faucet (AA) on top of the cabinet.

ASSEMBLY                                                           Model #AXCLDYDAR-SS

AA

K

Содержание Brooklyn+Max Cleo Laundry Cabinet AXCLDYDAR-SS

Страница 1: ...1 21 DARWIN GREGG CLEO DELUXE 28 INCH LAUNDRY CABINET WITH FAUCET AND STAINLESS SINK Model AXCLDYDAR SS ...

Страница 2: ...Customer Service at 1 866 518 0120 ext 262 Monday to Friday between 9 am 4 pm EST or go to www simpli home com parts request In order to assist you in a timely manner please have the following information ready Model Part Number or Letter Purchased at Date of Purchase If you wish to return the product please contact the retailer where the product was purchased ...

Страница 3: ... power tools for assembly as this could damage the unit Only use manual tools Requires 2 people for ease of assembly To clean use a soft or slightly damp cloth then wipe with a clean drycloth Dust with a soft dry cloth Do not use ammonia based cleaning products as they will damage the finish Do not leave liquids or damp cloths on this furniture To avoid dulling of the finish do not place this furn...

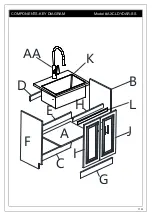
Страница 4: ... help with assembly or if you are missing a part Please call customer service at 1 866 518 0120 ext 262 9 am to 4 pm EST A B C D E F RIGHT SIDE PANEL QTY 1 BACK BOTTOM PANEL QTY 1 B C BACK MIDDLE PANEL QTY 1 E LEFT SIDE PANEL QTY 1 F FRONT TOP PANEL QTY 1 LEFT DOOR QTY 1 G H I J SS SINK QTY 1 K BACK TOP PANEL QTY 1 K L FRONT PANEL QTY 1 ...

Страница 5: ...elp with assembly or if you are missing a part Please call customer service at 1 866 518 0120 ext 262 9 am to 4 pm EST 1 DRAIN BOWL ASSEMBLY QTY 1 2 DRAIN WASHER BLACK QTY 1 3 4 PIPE WASHER QTY 1 5 COUPLING BLACK QTY 1 COUPLING BLACK QTY 2 PIPE WASHER WHITE QTY 1 PIPE COVER BLACK QTY 1 OUTER DRAIN CHANNEL QTY 1 6 7 8 9 10 11 12 DRAIN PLUG ASSEMBLY QTY 1 ...

Страница 6: ...WASHER RUBBER QTY 1 FAUCET WASHER STEEL QTY 1 BRASS NUT ASSEMBLY QTY 1 FAUCET SEALING RING QTY 1 CAM PIN QTY 23 WOOD DOWEL QTY 13 Pan Head Phillips Screw M4x23 QTY 4 HANDLE QTY 2 AA BB CC EE HARDWARE PARTS Ⅰ Ⅱ Ⅲ Ⅳ Ⅴ Ⅵ NEED HELP For help with assembly or if you are missing a part Please call customer service at 1 866 518 0120 ext 262 9 am to 4 pm EST DD FF BB1 BB2 ...

Страница 7: ...7 21 A B F D E C G H I J K AA COMPONENTS KEY DIAGRAM Model AXCLDYDAR SS L ...

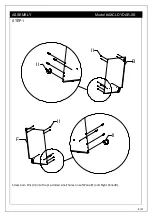
Страница 8: ...8 21 ASSEMBLY Model AXCLDYDAR SS STEP 1 B II II F II II Screw Cam Pins II into the pre drilled small holes on Left Panel F and Right Panel B ...

Страница 9: ...el D Back Middle Panel E and Front Top Panel H InsertCam Locks I into the pre drilled hole of Bottom Panel A Back Bottom Panel C Back Top Panel D Back Middle Panel E and Front Top Panel H Attach Bottom Panel A Back Bottom Panel C Back Top Panel D Back Middle Panel E and Front Top Panel H to Right Side Panel B ASSEMBLY Model AXCLDYDAR SS ...

Страница 10: ...H B Attach the Left Panel F withCam Pins II and Dowels into the pre drilled holes Insert Cam Locks I into the pre drilled hole of Bottom Panel A Back Bottom Panel C Back Top Panel D Back Middle Panel E and Front Top Panel H Tighten with flathead screwdriver ...

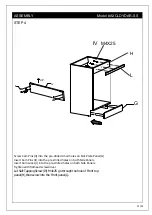
Страница 11: ...am Pins II into the pre drilled holes on both Side Panels Insert Cam Locks I into the pre drilled holes on both Side Panels Tighten with flathead screwdriver ASSEMBLY Model AXCLDYDAR SS L M4X25 IV H Let Self Tapping Screw IV M4x25 go through the hole of Front top panel H then screw into the Front panel L ...

Страница 12: ...DYDAR SS STEP 5 IV M4X16 Use Phillips Screwdriver to attach the Right Door hinges to side B using Self Tapping Screws IV M4x16 Use Phillips Screwdriver to attach the Left Door hinges to side F using Self Tapping Screws IV M4x16 ...

Страница 13: ...13 21 STEP 6 VI V Use Phillips Screwdriver to screw the Handle VI with Pan Head Philips Screws V M4x23 ASSEMBLY Model AXCLDYDAR SS ...

Страница 14: ...to the end of the Faucet AA and insert the faucet through the top of the Sink K From underneath the Sink K secure the Faucet AA to the Sink K using a Rubber Washer BB Steel Washer CC and Brass Nut Assembly DD Insert faucet sealing ring EE into the hole of pipe and screw hosepipe into EE ...

Страница 15: ...15 21 STEP8 FF attach the weight block FF with the pipe and screw down ASSEMBLY Model AXCLDYDAR SS ...

Страница 16: ...16 21 STEP 9 Place the Sink K with the attached Faucet AA on top of the cabinet ASSEMBLY Model AXCLDYDAR SS AA K ...

Страница 17: ... Washer 3 on the top of the drain opening in the Sink K Put the Drain Bowl 2 on the Drain Washer 3 through the drain opening From underneath the sink fasten the Threaded Washer 4 onto the Drain Bowl 2 and tighten Insert the Drain Plug 1 into the Drain Bowl 2 ...

Страница 18: ...faucet body Fasten the nuts of the hoses not included in package to the water outlet o Red striped hose to Hot water supply o Blue striped hose to Cold water supply Ensure to only tighten the nut and not twist the supply hose Leakage may occur if hoses are twisted ASSEMBLY Model AXCLDYDAR SS ...

Страница 19: ...ain Pipe 7 Connect the drain channel 10 to the straight drain pipe 7 and fasten with the coupling 8 On the Drain Channel 10 wrap teflon tape not included around the threaded end that connects to theOuter Drain Channel 12 Connect the Outer Drain Channel 12 to the Drain Channel 10 and fasten with the Coupling 8 Insert the Outer Drain Channel 12 into the Drain Channel 10 and cover with the Pipe Cover...

Страница 20: ...20 21 STEP 13 Use a Phillips screwdriver to re align or adjust the hinges that attach the doors to the cabinet ASSEMBLY Model AXCLDYDAR SS ...

Страница 21: ...e at 1 866 518 0120 ext 262 from 9 am to 4 pm Monday to Friday Eastern Standard Time or by email at customerservice simpli home com We reserve the right to repair or replace the defective product at its discretion This product is guaranteed for 12 months if used for normal purposes Any warranty is invalid if the product has been overloaded or subject to neglect improper use or an attempted repair ...

Отзывы: