background image

PRE-ASSEMBLY INFORMATION
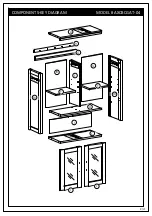
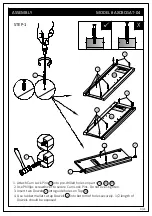
MODEL # AXCBCGAT-04

/21

7

NEED HELP? 

For help with assembly or if you are missing a part,

                    Please call customer service at 1-866-518-0120 ext. 262 (9 am to 4 pm EST)

HARDWARE DESCRIPTION

.

1

.

2

.

3

Required -

Flathead screwdriver

Phillips screwdriver

Rubber mallet

Not Included

.

4

.

5

.

6

.

7

.

8

.

9

CAM LOCK PIN

CAM LOCK

QTY 16 SETS

WOOD DOWEL

 Ø8 X 30mm

QTY 7

HINGE

QTY 4

MAGNET AND PLATE

         QTY 2 SETS

HANDLE

M4 X 25 mm

QTY 2 SETS

SHELF SUPPORT

        QTY 8

WALL ANCHOR

QTY 4

.

10

PHILLIPS SCREW

M4 X 50mm

QTY 7

PHILLIPS SCREW

M3 X 15mm

QTY 24

PHILLIPS SCREW ROUND HEAD

M4 X 15mm

QTY 6

Содержание AXCBCGAT-04

Страница 1: ...GATSBY MARSHAL BROCKTON DOUBLE DOOR WALL CABINET MODEL AXCBCGAT 04 21 1 TM TM SIMP HOME LIFE BY DESIG N...

Страница 2: ...866 518 0120 ext 262 Monday to Friday between 9 am 4 pm EST or go to www simpli home com parts request In order to assist you in a timely manner please have the following information ready Model _____...

Страница 3: ...required Hardware package may have spare parts WARNING This item contains small parts which can be swallowed by children and pets Keep children and pets away during assembly To avoid danger of suffoc...

Страница 4: ...lly works to balance the humidity in your home so it is constant Dry indoor air can suck enough moisture from its surroundings to do permanent damage to wood causing it to crack or split Remember that...

Страница 5: ...a part Please call customer service at 1 866 518 0120 ext 262 9 am to 4 pm EST PART DESCRIPTION TOP QTY 1 LEFT SIDE QTY 1 RIGHT SIDE QTY 1 BOTTOM SHELF QTY 1 MIDDLE SHELF QTY 1 DIVIDER QTY 1 C D E F G...

Страница 6: ...IL IR NEED HELP For help with assembly or if you are missing a part Please call customer service at 1 866 518 0120 ext 262 9 am to 4 pm EST PART DESCRIPTION J BOTTOM BACK PANEL QTY 1 LEFT BACK PANEL...

Страница 7: ...ARE DESCRIPTION 1 2 3 Required Flathead screwdriver Phillips screwdriver Rubber mallet Not Included 4 5 6 7 8 9 CAM LOCK PIN CAM LOCK QTY 16 SETS WOOD DOWEL 8 X 30mm QTY 7 HINGE QTY 4 MAGNET AND PLATE...

Страница 8: ...COMPONENTS KEY DIAGRAM MODEL AXCBCGAT 04 21 8 A BL BR E F F H G IR IL I D C J J Front Avant Front Avant Front Avant Front Avant Front Avant...

Страница 9: ...rts A BL BR 2 Use Phillips screwdriver to secure Cam Lock Pins Do not over tighten 3 Insert two Dowels 2 into guide holes on Top A 4 Use rubber mallet to tap Dowels 2 into bottom of holes securely 1 2...

Страница 10: ...s9i n t o p r e d r i l l e d h o l e s D i v i d e rE 2 Use Phillips screwdriver to secure screws Do not over tighten 3 Insert Dowels 2 into guide holes on each part E G 4 Use rubber mallet to tap Do...

Страница 11: ...Align Wood Dowel with guide holes and attach Divder E to Middle Shelf D 2 Use two Phillips Screws 7 to attach Middle Shelf D through guide holes from Middle Shelf D to pre drilled holes of Divider E 3...

Страница 12: ...04 1 Align Cam Lock Pins with guide holes and attach part A to Divider E 2 Insert two Cam Locks 1 into guide holes on Divider E 3 Use Phillips screwdriver to secure Cam Locks Front Avant Front Avant D...

Страница 13: ...Avant BL 1 1 A l i g n W o o d D o w e l s a n d C a m L o c k P i n s w i t h g u i d e h o l e s a n d a t t a c h p a r t sA Dt o L e f t S i d e B L 2 I n s e r t t w o C a m L o c k s1i n t o g u...

Страница 14: ...e holes and attach part G to Left Side BL 2 Align Cam Lock Pins with guide holes and attach part C to Left Side BL 3 Insert two Cam Locks 1 into guide holes on part C 4 Use Phillips screwdriver to sec...

Страница 15: ...21 15 STEP 7 ASSEMBLY MODEL AXCBCGAT 04 Front Avant C BL A G IR IL I Warning Label 1 Slide Back Panels I IL IR firmly into slots on parts A C and Left Side BL...

Страница 16: ...MODEL AXCBCGAT 04 Front Avant Front Avant Front Avant Front Avant Front Avant C BL A E BR D Front Avant Front Avant Front Avant C BL A E D Front Avant BR Front Avant 1 1 Repeat Step 5 Step 6 and Step...

Страница 17: ...e P h i l l i p s S c r e w s R o u n d H e a d8t o a t t a c h B a c k P a n e l sI I L I R t h r o u g h g u i d e h o l e s 4 U s e P h i l l i p s s c r e w d r i v e r t o s e c u r e S c r e w s...

Страница 18: ...s i n g P h i l l i p s S c r e w s9i n t o p r e d r i l l e d h o l e s o n D o o r sJ 3 U s e P h i l l i p s s c r e w d r i v e r t o a t t a c h H a n d l e5t o D o o r sJ 3 9 9 4 5 5 J STEP 12...

Страница 19: ...Wall Anchors 10 to positions a b d e using a Phillips screwdriver Anchors are self tapping and do not need pre drilled holes 4 Use your drill to create 1 hole 0 15 diameter x 2 deep at position c STEP...

Страница 20: ...STEP 15 ASSEMBLY MODEL AXCBCGAT 04 1 Align the top of the Wall Mount Bar H with the bottom of the angled bracket on the back of the Cabinet 2 Gently slide the Cabinet down on to the Wall Mount Bar H...

Страница 21: ...our toll free service line at 1 866 518 0120 ext 262 from 9 am to 4 pm Monday to Friday Eastern Standard Time or by email at customerservice simpli home com We reserve the right to repair or replace t...

Отзывы: