Simpli Home AXCBC-001-WH Скачать руководство пользователя страница 10


ASSEMBLY


Attaching Back Panel 


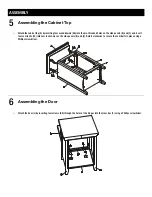
Attach the back panel (G) to the cabinet with 14 screws (DD) using a Phillips screwdriver. 


Attach the bracket (NN) to the cabinet with one screw (OO) using a Phillips screwdriver. 


10 

Assembling to the Wall 


According to the position of the bracket (NN) assembled to the cabinet, drill a hole into the wall. 


Insert one plastic anchor (JJ) into the hole on the wall and attach another bracket (NN) to the plastic anchor (JJ). 


Insert one screw (II) through the bracket (NN) and tighten to the plastic anchor (JJ). 


Place the cabinet against the wall. 


Insert the cable (PP) through the bracket (NN) on the cabinet then through the bracket (NN) on the wall. Fasten the cable (PP) to 
affix two brackets (NN) firmly.  


Содержание AXCBC-001-WH

Страница 1: ...AVINGTON MIA HAYES LAUNDRY HAMPER MODEL AXCBC 001 WH...

Страница 2: ...DO NOT RETURN FOR REPLACEMENT PARTS OR OTHER INQUIRIES PLEASE CONTACT US AT simpli home com customer support PLEASE ENSURE TO HAVE THE MODEL FROM THE PACKAGING OR INSTRUCTION BOOKLET...

Страница 3: ...n and pets We recommend that you assemble this unit on a carpeted floor to avoid scratches We do not recommend the use of power tools for assembly as this could damage the unit Only use manual tools R...

Страница 4: ...er 2 GG Screw 2 HH Handle 1 II Screw 1 JJ Plastic Anchor 1 KK Screw 8 LL Metal Hinge 2 MM Door Hinge 1 NN Bracket 2 OO Screw 1 PP Cable 1 QQ Wood Dowel 8 RR Screw 4 SS Cam Lock 9 TT Door Hinge 1 PRE A...

Страница 5: ...nt Molding 1 E Bottom Panel 1 F Cross Bar 1 G Back Panel 1 H Inside Back Panel 1 I Inside Left Panel 1 J Inside Right Panel 1 K Inside Bottom Panel 1 L Door 1 PRE ASSEMBLY NEED HELP For help with asse...

Страница 6: ...Insert two washers FF and two screws EE through the holes on the door hinges and tighten using a Phillips screwdriver 2 Assembling Front Molding and Bottom Panel Lay down the cross bar F and attach tw...

Страница 7: ...f this assembly 4 Assembling Side Panels Attach the front molding D and bottom panel E to the right side panel C by inserting six wood dowels AA and two cam locks SS into the bottom panel E Rotate clo...

Страница 8: ...he side panels B and C and insert four cam locks CC into cam locks holes on the side panels B and C Rotate clockwise to secure the cam bolts in place using a Phillips screwdriver 6 Assembling the Door...

Страница 9: ...ng Inside Cabinet Attach the inside cabinet to the door by inserting four wood dowels QQ into the door L Insert two cam locks SS to the inside left panel I and insert two cam locks SS to the inside ri...

Страница 10: ...tion of the bracket NN assembled to the cabinet drill a hole into the wall Insert one plastic anchor JJ into the hole on the wall and attach another bracket NN to the plastic anchor JJ Insert one scre...

Страница 11: ...e line at 1 866 518 0120 ext 262 from 9 am to 5 pm Monday to Friday Eastern Standard Time or by email at simpli home com customer support We reserve the right to repair or replace the defective produc...

Страница 12: ...tomer Support at simpli home com customer support or call Customer Service at 1 866 0518 0120 ext 262 Monday to Friday between 9 am 5 pm EST For more information visit us on our website www simpli hom...

Страница 13: ...niture in your home with a short review to our facebook page and have a chance to Win your choice of any one of Simpli Home furniture pieces Free www facebook com simplihomefurnishings draws monthly s...

Отзывы: