Simpli Home Amherst AXCRAMH16-HIC Скачать руководство пользователя страница 7

This TV Stand does not come with legible instructions pertaining to the risk of fire 
and electric shock that is associated with the use of electrical components such as 
operation, user-maintenance, loading, storage and as applicable electrical issues 
including grounding or double-insulation.
Any use of this item other than that recommended by the manufacturer in this 
manual may cause fire, burns, electric shock and/or serious injuries or death.

WARNING

 Do not place toys, food, etc. on the top shelves or upper drawers. 

Serious injury or death may occur when children climb on furniture. A remote 
control or items placed on the furniture may encourage a child to climb on the 
furniture and as a result make it top-heavy and cause it to tip over on the child.
 

WARNING

 Do not place a TV that exceeds the weight limits or size guidelines 

shown in the instructions specified for the furniture. Do not overload shelves or 
place heavy items on top shelves or drawers.
Improper use of furniture to support TVs may result in serious injury or death.
 

WARNING

 Do not relocate audio and/or video equipment to furniture not 

specifically designed to support audio and/or video equipment. Do not move 
furniture without shelves or drawers unloaded. Furniture can collapse or tip over 
onto a child and cause physical injury or death.

WARNING

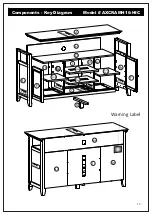
The maximum diagonal CRT television screen size is 25 inch to 27 inch (63.50 cm to 68.58 
cm). For use with televisions weighing 200 lbs or less. Using larger or heavier televisions may 
cause instability or tip over which can lead to serious injury or even death.

The recommended maximum width of the television intended for use is 60 inch (152.4 cm).

MAXIMUM LOAD 25 LBS

MAXIMUM LOAD 200 LBS

7

Содержание Amherst AXCRAMH16-HIC

Страница 1: ...Amherst Halifax Washington TV Media Stand Model AXCRAMH16 HIC 1...

Страница 2: ...ica s top brand for high value furniture It s time to register your product warranty It s quick and easy And you ll be happy you did Ac vate your 1 year warranty Automa c entry to win a 500 gi cer cat...

Страница 3: ...ew and get instant rewards simpli home com product review Review your product and collect rewards Send us images or share them on social and qualify for instant rewards You may even receive store cred...

Страница 4: ...com Call Us 1 866 518 0120 Monday to Friday 9am to 5pm EST Email Us customerservice simpli home com Other ways to contact us 1 Open your phone s camera 2 Point your phone s camera at the QR code to sc...

Страница 5: ...raint provided with the product Consult our assembly instructions for help If the Furniture Anti Tipping Restraint kit is not in the box please contact our WARNING This item contains small parts which...

Страница 6: ...oblems for furniture To counteract their effect you can either modify the RH by keeping furniture containing spaces cooler in the winter or most importantly have a good working humidifier for your hom...

Страница 7: ...d WARNING Do not place a TV that exceeds the weight limits or size guidelines shown in the instructions specified for the furniture Do not overload shelves or place heavy items on top shelves or drawe...

Страница 8: ...OR L R Same QTY 2 G1 SHELF QTY 2 G2 SHELF QTY 2 H TOP BACK PANEL QTY 1 BOTTOM BACK PANEL QTY 1 I JL LEFT BOTTOM BACK PANEL QTY 1 JR RIGHT BOTTOM BACK PANEL QTY 1 Front Avant Front Avant Front Avant Fr...

Страница 9: ...STABLE HINGE QTY 4 MAGNET AND PLATE QTY 2 SETS SHELF SUPPORT QTY 24 PHILLIPS SCREW M3x15 mm QTY 8 PHILLIPS SCREW M4x15 mm QTY 24 FURNITURE TIP OVER RESTRAINT QTY 1 SET a M4 X 25 QTY 2 1 is extra b M4...

Страница 10: ...Label H JR JL I Front Avant Front Avant A BL G2 G2 G1 G1 H D I JR JL C BR EL ER F EL F Front Avant Front Avant Front Avant Front Avant Front Avant Front Avant K 10 Components Key Diagram Model AXCRAM...

Страница 11: ...ock Pins with guide holes and attach Dividers EL ER 4 Insert Cam Locks 2 into guide holes of EL ER 5 Use a flathead screwdriver to tighten Cam Locks into Pins Do not over tighten guide holes from Bott...

Страница 12: ...mallet to tap Wood dowels 5 into bottom of holes securely 1 2 length of 3 Attach 6 Cam Lock Pins 2 into pre drilled holes on each Side BL BR Attach Shelves C D 1 Insert 4 Wood dowels 5 into guide hole...

Страница 13: ...Attach Bottom Support Leg K to Bottom Shelf C using 4 Phillips Screws 12 2 Use Phillips screwdriver to tighten screws Do not over tighten Front Avant Front Avant C BL BR K K 12 Assembly Model AXCRAMH1...

Страница 14: ...using Allen Key Screws 1 through guide holes 2 Use Allen Key 3 to tighten Screws Do not over tighten 1 3 1 Front Avant Front Avant Front Avant Front Avant A BL BR Front Avant Front Avant Front Avant A...

Страница 15: ...JL JR H to back of cabinet using Phillips Screws Round Head 6 through guide holes 2 Use Phillips screwdriver to tighten screws Do not over tighten A H JL I JR 6 Warning Label Front Avant Front Avant A...

Страница 16: ...s 11 into pre drilled holes on Doors F 2 Attach Adjustable Hinges on Doors F to Sides BL BR using Phillips Screws 11 into pre drilled holes on Sides BL BR 3 Use a Phillips screwdriver to tighten screw...

Страница 17: ...w I Loosen screw II just one turn adjust door to desired position re tighten screw Loosen screw 11 adjust door to desired position re tighten screw 1 Side adjustment 4 mm Tighten the Screw marked II t...

Страница 18: ...s Screws 10 3 Use a Phillips screwdriver to attach Handles 4 to Doors F into pre drilled holes on Doors F 2 Attach Magnets 8 using Phillips Screws 10 into pre drilled holes on Bottom Shelf C A BL BR F...

Страница 19: ...lf level 1 shelf level 2 shelf level 3 9 G2 G1 G1 9 2 2 Shelf Supports 9 may be used on back top of each Shelf G1 G2 as a 1 Use 4 Shelf Supports 9 for each Shelf G1 G2 in desired location tipping rest...

Страница 20: ...NG Serious or fatal crushing injuries can occur from furniture tip over If the furniture tip over restraint kit is not in the box please contact our customer service department in order to obtain anot...

Страница 21: ...location on the wall for mounting bracket screw hole approximately 2 inches hole and gently tap until the flange on the anchor is against the wall surface 4 Position the bracket over the anchor and us...

Отзывы: