background image

21/22

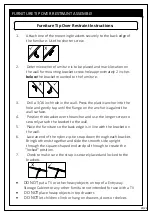
Furniture Tip Over Restraint Instructions:

1.

Attach one of the mounting brackets securely to the back edge of

           the furniture. Use the shorter screw.

2.

Determine where furniture is to be placed and mark location on

           the wall for mounting bracket screw hole approximately 2 inches
           

below

 the bracket mounted to the furniture.

3.

Drill a 3/16 inch hole in the wall. Press the plastic anchor into the

           hole and gently tap until the flange on the anchor is against the
           wall surface.

4.

Position the bracket over the anchor and use the longer screw to

           securely attach the bracket to the wall.

5.

Place the furniture so the back edge is in line with the bracket on

           the wall.

6.

Lace an end of the nylon zip-tie strap down through each bracket.

           Bring both ends together and slide the smooth side upright
           through the square-shaped end and pull through to create the

7.

Check to make sure the strap is securely laced and locked to the

           brackets.

DO NOT

 put a TV or other heavy objects on top of a Entryway

        Storage Cabinet or


any other furniture not intended for use with a TV

DO NOT

 place heavy objects in top drawers

DO NOT

 let children climb or hang on drawers, doors or shelves

FURNITURE TIP OVER RESTRAINT ASSEMBLY

Содержание acadian

Страница 1: ...ACADIAN NORMANDY BRUNSWICK ENTRYWAY STORAGE CABINET 1 22 MODEL AXCRACA47 BRU...

Страница 2: ...1 866 518 0120 ext 262 or go to www simpli home com parts request In order to assist you in a timely manner please have the following information ready Model _________________Part Number or Letter___...

Страница 3: ...3 22 IMPORTANT Please read this manual carefully before beginning assembly of this product Keep this manual for future reference SAFETY INFORMATION...

Страница 4: ...4 22 CARE and MAINTENANCE IMPORTANT Please read this manual carefully before beginning assembly of this product Keep this manual for future reference...

Страница 5: ...Please call customer service at 1 866 518 0120 ext 262 9 am to 4 pm EST 5 22 TOP QTY 1 BOTTOM SHELF QTY 1 CABINET SHELF QTY 2 LEFT SIDE QTY 1 LARGE DIVIDER QTY 1 MIDDLE FRAME QTY 1 SMALL DIVIDER QTY 1...

Страница 6: ...customer service at 1 866 518 0120 ext 262 9 am to 4 pm EST 6 22 LEFT BACK PANEL QTY 1 RIGHT DOOR QTY 1 DRAWER FRONT QTY 2 LEFT DRAWER SIDE QTY 2 DRAWER BACK QTY 2 DRAWER BOTTOM QTY 2 RIGHT DRAWER SI...

Страница 7: ...CAM LOCK PIN CAM LOCK QTY 14 SETS WOOD DOWEL M8 X 30mm QTY 10 PHILLIPS SCREW M3 X 12mm QTY 12 HARDWARE DESCRIPTION NEED HELP For help with assembly or if you are missing a part Please call customer s...

Страница 8: ...8 22 COMPONENTS KEY DIAGRAM MODEL AXCRACA47 BRU...

Страница 9: ...r Front J 1 Attach 4 Cam Lock Pins 2 to pre drilled holes at back of Drawer Front J 2 Align Cam Lock Pins with guide holes and attach Drawer Sides KL KR 3 Insert 2 Cam Locks 2 into guide holes on each...

Страница 10: ...2 Attach Drawer Back L using 2 Allen Key Screws 1 through guide holes on each Side KL KR 3 Use Allen Key 4 to tighten screws Do not over tighten 1 Use Phillips screwdriver to attach Handle 7 to Drawe...

Страница 11: ...Divider C 2 Use rubber mallet to tap Dowels 3 into bottom of holes securely 1 2 length of Dowels should be exposed 3 Attach Bottom Shelf E to Large Divider C using 2 Allen Key Screws 1 4 Use Allen Key...

Страница 12: ...STEP 6 12 22 1 Attach Middle Frame F to Large Divider C using 2 Allen Key Screws 1 2 Use Allen Key 4 to tighten Screws Do not over tighten ASSEMBLY MODEL AXCRACA47 BRU...

Страница 13: ...nto pre drilled holes at the top of Middle Frame F 2 Align Cam Lock Pins with guide holes on Small Divider D 3 Insert 2 Cam Locks 2 into guide holes on Small Divider D 4 Use flathead screwdriver secur...

Страница 14: ...er mallet to tap Dowels 3 into bottom of holes securely 1 2 length of Dowels should be exposed 4 Attach 2 Cam Lock Pins 2 into pre drilled holes on each Side BL BR 5 Align Cam Lock Pins with guide hol...

Страница 15: ...15 22 1 Attach Top A to Sides BL BR and Small Divider D using 6 Allen Key Screws 1 2 screws on each Side and Small Divider 2 Use Allen Key 4 to tighten Screws Do not over tighten ASSEMBLY MODEL AXCRAC...

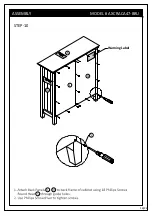
Страница 16: ...STEP 10 16 22 Warning Label ASSEMBLY MODEL AXCRACA47 BRU...

Страница 17: ...STEP 11 17 22 First Step Last Step after adjust the door ASSEMBLY MODEL AXCRACA47 BRU...

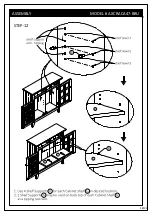
Страница 18: ...STEP 12 18 22 ASSEMBLY MODEL AXCRACA47 BRU...

Страница 19: ...STEP 13 19 22 ASSEMBLY MODEL AXCRACA47 BRU...

Страница 20: ...g injuries can occur from furniture tip over If the furniture tip over restraint kit is not in the box please contact our customer service department in order to obtain another kit before using the fu...

Страница 21: ...ver the anchor and use the longer screw to securely attach the bracket to the wall 5 Place the furniture so the back edge is in line with the bracket on the wall 6 Lace an end of the nylon zip tie str...

Страница 22: ...0120 ext 262 from 9 am to 4 pm Monday to Friday Eastern Standard Time or by email at customerservice simpli home com We reserve the right to repair or replace the defective product at its discretion...

Отзывы: