6/7
B
B
ASSEMBLY INSTRUCTIONS / INSTRUCTIONS D’ASSEMBLAGE
NOTICE / AVIS
A
Please use a screwdriver for the screws. The screwdriver is not included in the pack.
SVP utilisez un tournevis pour les vis. Le tournevis n’est pas fourni avec le produit.
Please use a screwdriver for the screws. The screwdriver is not included in the pack.
SVP utilisez un tournevis pour les vis. Le tournevis n’est pas fourni avec le produit.
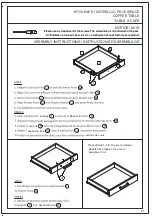
1. Insert 2 Dowels 5 into Divider E .
2. Align Wood dowel 5 on Divider E with pre-drilled holes on Back panel C .
3. Using Allen Key Screw 1 attach Front bar F to Divider E .
4. Use Allen key 3 to tighten Allenkey Screw . Do not over-tighten .
5. Use a Phillips screwdriver to attach 2 Handles 4 to Back panel C .
1. Insérer deux 2 goujons 5 dans les
E .
2. Aligner goujons 5 au
les trous prépercés inférieur au
.
3. Utiliser des Vis allen 1 pour attacher le Barre avant F aux
E .
4. Utiliser la Clef allen 3 pour Vis allen . Ne pas trop serrer.
5. Utiliser un tournevis à tête étoilé pour fixer les 2 Poignées 4 aux
.
Séparateur
Séparateur E
Panneau Arrière C
Séparateur
Panneau Arrière C
STEP 6
ÉTAPE 6
KITCHENER
/ WATERLOO / PROVIDENCE
COFFEE TABLE
TABLE À CAFÉ


