


HomePlug AV Ethernet Adapter User’s Manual
3
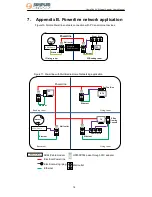
2.3 Push Button/Reset hole
The right-hand side on the device contains the push button and reset hole for the easy data
encryption/synchronization and reset to the default factory’ settings: .
NMK
(Network Membership Key) button
Implements the one-button security configuration and synchronization
please see “2.5 Forming a HomePlug AV Logical Network” for further information.
Reset:
(Reset hole for restore the factory default settings)
The Reset button restores the factory default settings in the adapter. You can use a small
paper clip to insert into the rest hole and hold for more than 3 seconds to active the reset
behavior.
2.4 Installing your HomePlug AV Ethernet Adapters
1.
Connect the one end of the Ethernet cable provided in the package to the first PLC
adapter’s Ethernet port.
2.
Connect the other end of the Ethernet cable to PC’s Ethernet port.
3.
Plug the adapter’s power plug into your power socket.
4.
Repeat the step1 for the second PLC adapter and connect the other end of Ethernet
cable to the LAN port of your ADSL router/Cable modem and repeat the step 3..
You can see the Figure 10 in Chapter 7 for this connection reference
NMK
RESET
We strongly recommend you directly plug this device into standalone power
outlet, avoid connecting this device to an uninterruptible power supply (UPS),
or connecting same power strip with other AC adapter/Power charger etc
because of this device transferring data using existing electrical wiring in your
home and the data transmission throughput performance probably be affected
by electrical noises, although this HomePlug AV Powerline adapter can
overcome/reduce the noise interference. These electrical noises equipments
are most like: Battery Charger / Hair Dryers / Halogen light.


