Simaudio MOON 330A Скачать руководство пользователя страница 11

09

Rear Panel Layout

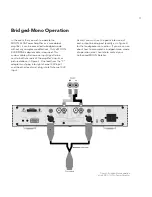
Figure 1: 330A Backpanel

When you’re using the balanced XLR inputs, you 
must first remove the factory installed “dummy” 
XLR jumpers (see figure 2 below) from the back 
panel XLR connectors and store them in a safe 
place. This jumper is required ONLY when using 
the single-ended RCA inputs. When you decide 
to switch to single-ended input mode, you must 
reinstall the XLR jumpers (between pins 1 and 3) 
exactly as shown below:

The left side of the rear panel has a pair of 12 
Volt triggers, each on a 1/8” mini-jack; one input 
and one output, the latter for use if you need to 
“daisy chain” a second power amplifier on the 
same trigger circuit. Immediately to the right of 
these 12V triggers is an RS-232 input on a DB9 
connector.

In the middle of the rear panel you will find a 
two (2) pairs of heavy duty gold-plated speaker 
binding posts – one pair each for the left and 
right channels.

On the far right side, you will find (from top 
to bottom); The power “main switch”; The 
“AC Fuse” socket cover and the “AC in” IEC 
receptacle for the power cord.

The rear panel will look similar to Figure 1 (above). Each channel has one balanced (differential) input on an 
XLR connector and one unbalanced (single-ended) input on a RCA connector. There is no switch to toggle 
from balanced mode to single-ended mode. You may operate the amplifier in either mode, but only one mode 
at one time.

Figure 2: XLR connector without

and with jumper accessory

Содержание MOON 330A

Страница 1: ...The performance of a lifetime Owner s Manual MOON 330A Power Amplifier...

Страница 2: ...d 1345 Newton Road Boucherville Qu bec J4B 5H2 CANADA Date Code 20182106 WARNING To prevent the risk of equipment damage or personal harm use only Class 2 rated loudspeaker wire properly terminated an...

Страница 3: ...S 02 INTRODUCTION 04 DESIGN FEATURES 06 UNPACKING 08 INSTALLATION PLACEMENT 08 REAR PANEL LAYOUT 09 CONNECTING THE UNIT 10 BALANCED OPERATION 10 BRIDGED MONO OPERATION 11 OPERATING THE UNIT 12 REMOTE...

Страница 4: ...the apparatus or the apparatus has been exposed to rain or moisture does not operate normally or has been dropped 15 No naked flame sources such as candles should be placed on the apparatus WARNING TO...

Страница 5: ...with any liquid If a liquid substance does enter your unit immediately disconnect it from the AC mains and take it to your MOON dealer for a complete check up 7 NEVER spill or pour liquids directly on...

Страница 6: ...the first 300 hours of listening This is the result of a break in period required for the numerous high quality electronic parts used throughout this amplifier Before setting up your new MOON 330A we...

Страница 7: ...05...

Страница 8: ...nsistors with unprecedented gain linearity resulting in improved bass response and even more accurate sonic reproduction Class A output to 5 watts for greater efficiency An exceptionally short signal...

Страница 9: ...07...

Страница 10: ...0A Power Amplifier requires reasonable ventilation to maintain an optimum and consistent operating temperature especially since it will radiate heat when driven hard Consequently it should be placed i...

Страница 11: ...amplifier on the same trigger circuit Immediately to the right of these 12V triggers is an RS 232 input on a DB9 connector In the middle of the rear panel you will find a two 2 pairs of heavy duty go...

Страница 12: ...our system 3 Connect the supplied AC power cable to the IEC receptacle located on the amplifier s rear panel Ensure that the AC wall outlet you use has a functioning ground For the best sonic performa...

Страница 13: ...nnels of the amplifier s inputs as pictured above in Figure 3 One lead from the Y adapter must plug into right channel XLR input and the other lead must plug into left channel XLR input As well you mu...

Страница 14: ...ys power up your preamplifier prior to powering up your 330A As well always power down your 330A prior to powering down your preamplifier TROUBLESHOOTING Your MOON 330A Power Amplifier is equipped wit...

Страница 15: ...together via their respective 12V triggers The 12V trigger output on the 390 is connected to the 12V trigger input on the 330A using a 1 8 mini jack cable When you turn on the 390 via remote control...

Страница 16: ...W Frequency Response 10Hz 125kHz 0 3 0dB Gain 31dB Signal to noise Ratio 100dB full power Intermodulation Distortion 0 02 Total Harmonic Distorition 20Hz 20kHz 1W 0 02 Total Harmonic Distorition 20Hz...

Страница 17: ...15 If you require the IR or RS 232 codes for the MOON 330A please visit the Contact Us section in the support page on our website at www simaudio com...

Страница 18: ...Simaudio Ltd 1345 Newton Rd Boucherville Quebec J4B 5H2 CANADA T 450 449 2212...

Отзывы: