


SFX-10 Video Mixer
Basic Operations
15
B
ASIC
O
PERATION
Hook up
– First connect the 120V AC power cord to the 18V power supply. Plug the power supply into the SFX-10 and
into a 120V AC outlet. Connect the SFX-10 to video and audio sources as desired. This video mixer can accept 2
composite video input sources and 2 S-video sources. It can also accept up to 4 audio input sources including a
microphone and an auxiliary source. (See rear panel diagram - page 6 and typical hook-up - page 7.) Be sure to hook
up a video monitor to view your editing.
Power up
– The power switch for the SFX-10 is found on the rear panel of the unit. Turn on the SFX-10. With power
on, the power indicator light on the front panel and several red LED lights located on control buttons will light up.
Editing
– After mastering the basics of source selection, applying effects and using wipe, key, PIP and background color
functions, you will be able to create professional looking tapes for your enjoyment. The next several pages
demonstrate basic editing procedures. Make sure all connections are correct and all equipment (VCRs, TVs, tape
players etc...) is powered on. By using the SFX-10 repeatedly and experimenting with the controls, you will become
familiar with it.
To Try a Typical A
/
B Wipe
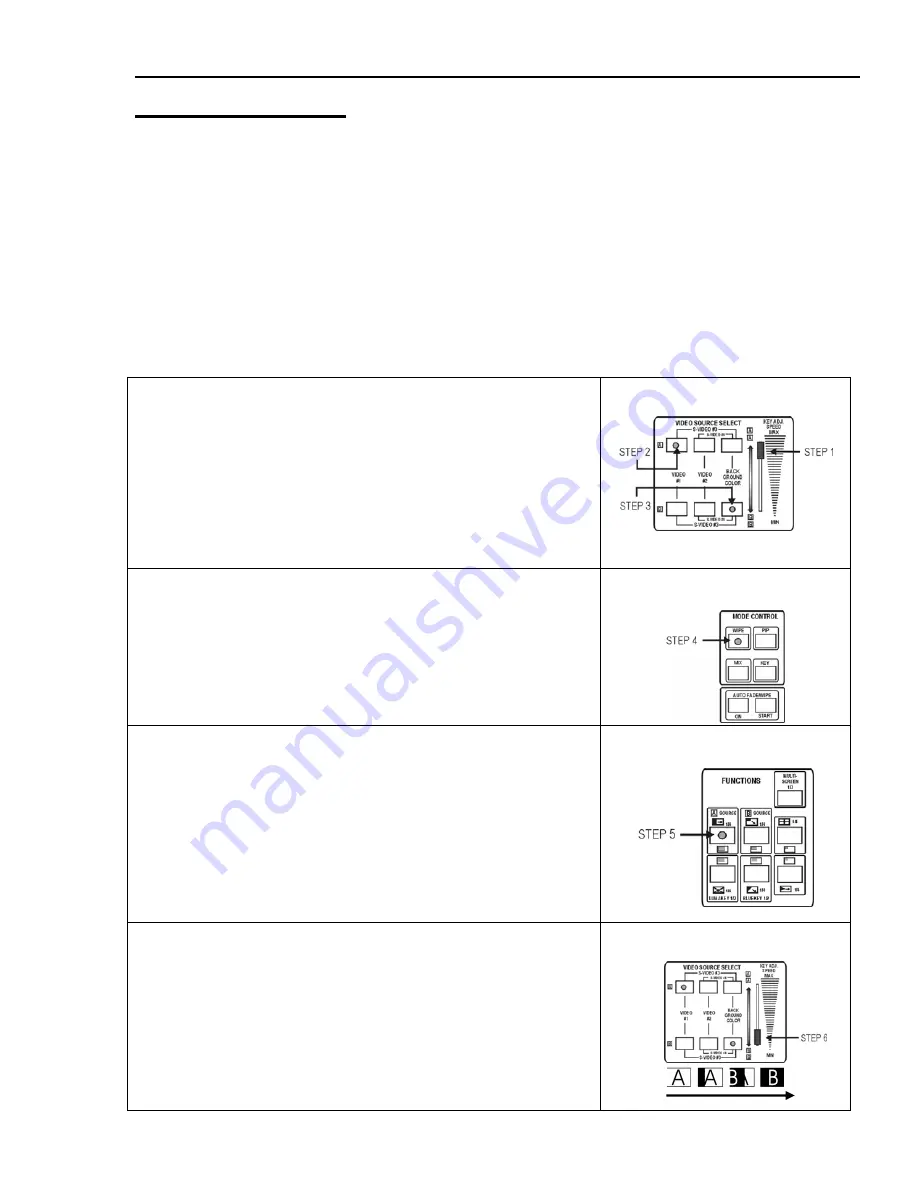
Step 1
Push the slide on Video Source Select to the top “A” position.
Step 2
Select any video input to be Source A by pushing the
appropriate button(s).
Note
: To select S-Video #3 press both end buttons at the same time. To
select S-Video #4 press the middle and far right button at the same
time. Red LED lights indicate which input is selected. (Video #1 is
selected in the example at right.)
Step 3
Select any video input to be Source B by pushing the
appropriate button(s).
(Background color is selected as Source B
in the example at right.) Move the slide control between the “A”
and “B” positions to view the two source images.
Source Selection
Step 4
Press the WIPE button (purple) in the MODE CONTROL box.
TIP:
MODE controls determine the type of transition you want to make
between Source A and Source B. The wipe selection lets you
replace one SOURCE with another by “wiping” images across in
the screen in various patterns. Wipe patterns are selected by
pressing buttons in the FUNCTIONS control panel.
Mode Selection
Step 5
Press the upper left hand button marked “A Source” in the
FUNCTIONS control panel.
This is a four-step button (1/4)
which gives you a different wipe pattern each time you press the
button. The 4 patterns available with this button are: R to L, Top
to Bottom, L to R, or Bottom to Top.
TIP:
Icons in the purple color-coded area indicate the choice of wipe
patterns. Each button in the FUNCTION control panel provides a
choice of 4 wipe patterns except the Multi-Screen button. The
Multi-Screen button works in combination with the other wipe
patterns providing 3 multi-screen patterns and an “Off” position.
The red LED lights indicate which wipe pattern is selected.
Wipe Type Selection
Step 6
Move the slide control from “Source A” to “Source B” to make
the transition.
The example (bottom right) shows a L to R wipe
pattern. Your wipe pattern will depend on the setting of the four-
step button selected in Step 5.
TIP:
After completing the wipe, press the four-step button again to
change the pattern. Now move the slide from the “Source B” to the
“Source A” position. Experiment with all the different four-step
buttons and the Multi-screen button, changing wipe patterns until
you are comfortable with them.
Wipe
B
A


