Sim2 Teatro SVD 500 PLUS Скачать руководство пользователя страница 31

SVP 450 PLUS - SVD 500 PLUS

30

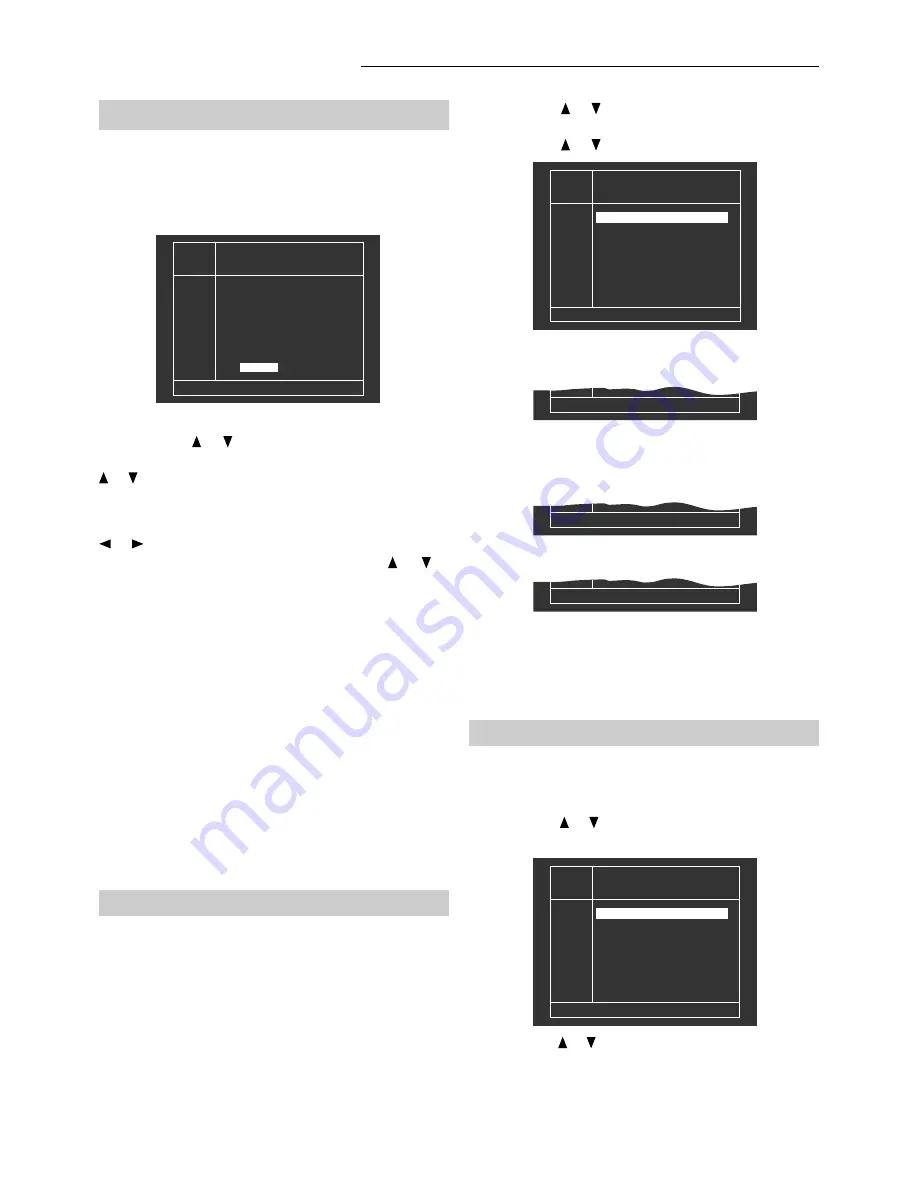
5.8.5 How to store a new input signal

To store a new input signal in a memory bank press 

MEMO

and you will enter the MEMORY MANAGER mode.

The following menu will appear:

MEMORY MANAGER

Copy from    ?

LOAD

COPY

BN

NAME

F HOR VER

01 Pal Upc

.  .  .  .  .
Pup 16/9
Nstc.....
NstcUpc
Vga   2
Vga   3

N

31.2

50

02

- --.- ---

03

W 31.2

50

04

N

15.7

60

05

N

31.4

60

06

N

35.1

56

07

N

37.6

68

WORK

08

MOVE

DEL

MEMORY MANAGER

Mem adjusted value to bank

LOAD

COPY

BN

NAME

F HOR VER

04 Pal Upc

Vga   3
Pup 16/9
Nstc.....
NstcUpc
Vga   2

NTSCR

N

31.2

50

05

W 31.2

50

06

W 31.2

50

07

N

15.7

60

08

N

31.4

60

09

N

35.1

56

10

N

37.6

68

WORK

10

MOVE

DEL

MEMORY MANAGER

Load bank ?

LOAD

COPY

BN

NAME

F HOR VER

01 Pal Upc

.  .  .  .  .
Pup 16/9
Nstc.....
NstcUpc
Vga   2
Vga   3

N

31.2

50

02

- --.- ---

03

W 31.2

50

04

N

15.7

60

05

N

31.4

60

06

N

35.1

56

07

N

37.6

68

WORK

08

MOVE

DEL

Use the arrow   or   and the left arrow to select 

LOAD

.

Press 

ENTER 

to confirm, the following menu will appear:

Use the arrow   or   to select un memory bank from 01

to 25 and press 

ENTER

. The following message will

appear under the table:

The name of the first bank available will be highlighted.
Use the arrow   or   to write a mnemonic name. Press
the right arrow to select the aspect ratio and use the arrow

 or   to select the desired one. Finally, press 

ENTER 

to

store the new entry.
Should there be no signal, one having the following
features will be stored: 31.25 KHz, 50 Hz. Press the arrow

 or   to select field 

F

 and press 

ENTER 

to confirm the

you wish to change the field. Use the arrow   or   to
change the aspect ratio.
Press 

ENTER 

to confirm the selection or 

EXIT 

to exit.

Select the desired memory bank by means of the up or
down arrows. Press 

EXIT 

to exit.

Press 

ENTER 

to confirm and store the data.

Use the left or right arrow to select only the name of the
bank. Press 

ENTER 

to enter in the writing mode and

change the letters by means of the up or down arrow.
Press 

ENTER 

to confirm the name or 

EXIT 

to exit the

menu.
Use the up or down arrows to select one of the following
functions: Loading, Copy, Move, Delete and press 

ENTER

to confirm.
Use the button to go from the right side of the menu to the
left one and go back by means of the 

EXIT 

button.

To exit this menu, press 

EXIT

. The projector will indicate

the previous menu. Press 

ESC

 to exit.

5.8.6 Load

This item on the MEMORY MANAGER menu allows
the user to load and change a memory bank
containing all the projector adjustments.

This is possible only if there is a match between the input
frequencies and the frequencies stored in the memory
bank.

Load bank 01 ?

Press 

ENTER 

to confirm or 

EXIT 

to exit.

If the input signal frequencies (horizontal and vertical) do
not match the selected memory bank, the following
message will appear under the table.

Done

If they do, the following message will appear:

Not permitted

Upon pressing 

ENTER

, the memory bank number will

appear under the label 

WORK

.

Press 

EXIT 

to exit this menu. The video projector will take

you back to the previous menu.
Press 

ESC 

to enter the menu again.

5.8.7 Copy

This function allows you to copy a memory location
containing settings in another location.

Use the arrow   or   to select 

COPY 

and press 

ENTER

,

the following message will appear:

Use the arrow   or   to select a memory bank (from 01 to
25) to be copied and press 

ENTER

.

Содержание Teatro SVD 500 PLUS

Страница 1: ...VIDEO PROJECTOR USER AND INSTALLATION MANUAL MANUALE D USO E INSTALLAZIONE SVD 500 PLUS SVP 450 PLUS SVP 420 HB...

Страница 2: ...ing 12 3 16 White menu 12 3 17 UPC converter 13 3 18 Storing 13 3 19 Installation menu 14 3 20 How to enter the INSTALLATION MODE 14 4 INSTALLATION 15 4 1 Installation procedure 15 4 2 Removing the co...

Страница 3: ...input signal 30 5 8 6 Load 30 5 8 7 Copy 30 5 8 8 Move 31 5 8 9 Delete 31 5 9 Installation types 32 5 10 Options menu 32 5 11 Fine picture adjustments 33 5 12 Deflection 33 5 12 1Deflection centre 33...

Страница 4: ...ment does cause harmful interference to radio or television reception which can be determined by turning the equipment off and on the user is encouraged to try to correct the interference by one or mo...

Страница 5: ...ide the projector unplug it immediately and call for the assistance of qualified personnel Fig 1 MAINS POWER Mains power 120 240Vac 50 60Hz 6 10 Max absorbed current 2 5 ARMS 1 1 Safety and Regulation...

Страница 6: ...he power socket is not equipped with an earth pin call your electrician who will install it and ensure its efficiency To disconnect the cable pull it out with the plug Do not pull the cable itself If...

Страница 7: ...tside of the lenses with a soft cloth to avoid scratching them Don t forget to cover the lenses when the projector is not going to be used for a long time 2 6 Packing the Projector For the best protec...

Страница 8: ...s input DB 15 connector 19 Rear panel buttons Picture adjustment Each time you press a button you select one of the follow controls Contrast Brightness Colour Hue Peaking Use the and buttons to modify...

Страница 9: ...hange the contrast brightness peaking hue and colour saturation values To store the contrast brightness peaking hue and colour saturation values To recall NORMALISED values of brightness contrast peak...

Страница 10: ...of time remove the batteries Do not use new and old batteries together or batteries of a different voltage or type Do not drop or mishandle the remote control Use the remote control within its operat...

Страница 11: ...nly by selecting the SMALL format ratio format will you get 12V on the rear panel connector marked by used to control the screen 3 8 VCR button Sync filter To select the appropriate sync filter Press...

Страница 12: ...3 58 NSTC 4 43 VIDEO MENU NOISE RED STD SELECTION BLANKING WHITE BALANCE UPC MENU TLV SYNC VIDEO MENU NOISE RED OFF VIDEO MENU NOISE RED STD SELEC BLANKING WHITE BALANCE UPC MENU TLV SYNC Press Select...

Страница 13: ...is that of allowing a perfect qsquaring of the picture screen by cutting out any disturbances such as vertical and horizontal scanning consequencies or disturbances deriving from VCR activity 3 16 Whi...

Страница 14: ...it switches the converter off To change the conversion mode follow the procedure press for at least 2 seconds the screen displays the first menu switched on The current conversion mode is shown by an...

Страница 15: ...arrows to select MENU INSTALL Press the button EXIT seven times until the following menu is displayed Increase or decrease the value by means of the arrows until the desired value is reached To store...

Страница 16: ...ector and to ensure best performances Note The projector is factory set for front ceiling projection with a 90 screen 4 3 format and a projector screen distance of 265 cm 1 Choose the installation typ...

Страница 17: ...at When installing the projector it is recommended to increase by 5 cm the distance from the screen as indicated in the table The picture adjustment can be carried out later through the deflection men...

Страница 18: ...screen size refers to the useful area 4 3 format 4 3 4 Ceiling front projection The use of the correct spacers as shown in the spacers table is mandatory for a perfect focus uniformity Use the ceilin...

Страница 19: ...rs for the Scheimpflug correction of the lenses angle so as to achieve a perfect focusing uniformity over the entire screen surface The projector is factory set with spacers for a ceiling front instal...

Страница 20: ...le the others are inside the pack Note The angle between the base of the projector and the axis of the tubes is mechanically fixed at 12 so if the projector is installed on a perfectly horizontal tabl...

Страница 21: ...3 0 5 0 2 0 5 0 2 0 2 0 3 0 0 0 3 0 2 0 2 0 3 0 0 1 0 5 0 3 1 0 5 0 3 0 5 0 2 0 5 0 2 0 3 0 2 250 GREEN BLUE RED 0 3 0 2 0 2 0 5 0 3 0 5 0 5 0 5 0 3 0 2 0 3 0 0 0 3 0 2 0 2 1 0 2 1 0 3 0 3 1 1 1 1 0 2...

Страница 22: ...switch on the left of the rear panel the red pilot light indicates the stand by state If the projector remains in stand by press the button on the remote control or the or arrow buttons on the rear pa...

Страница 23: ...ion DO NOT move the electrostatic focus adjustment potentiometers They were factory set and should only be adjusted by qualified personnel C D B A Physically move the tube until the blue cross is perf...

Страница 24: ...urn on the projector 7 Select the type of installation by means of the remote control RC 3000 8 Use the menu DEF CENT H and V by means of the remote control RC 3000 to shift the picture on the screen...

Страница 25: ...Left arrow Down arrow Still frame FREEZE Adjusts contrast Enters the options menu Exits any menu Adjusts brightness Turns the video projector on off Turns the UPC converter on off Switches the picture...

Страница 26: ...e icons of the RC3100 perform the same function so the description is not repeated The following paragraphs describe the functions of the RC3000 remote control 5 4 Video setup 5 4 1 To change the Y C...

Страница 27: ...ent allows to make the best grey scale linearity as the tubes have a different output level at different input levels Press EXIT to return to the video setup menu 5 4 4 To switch on off the DYNAMIC BL...

Страница 28: ...H H H H H H 5 5 Picture adjustment To change the values of contrast brightness colour hue peaking directly you can use the following buttons Press CONTRAST select the contrast adjustment Press or to c...

Страница 29: ...confirm the following menu will appear The arrow on the left of the window indicates the current setup Use the arrow or to select a setting and press ENTER to confirm The SET TO USER is an optional se...

Страница 30: ...ncies do not match those stored in the bank BN Bank number NAME Mnemonic bank name Label F Flag With this function you can change the aspect ratio Small Normal Wide Cinema Large HOR Horizontal frequen...

Страница 31: ...io Press ENTER to confirm the selection or EXIT to exit Select the desired memory bank by means of the up or down arrows Press EXIT to exit Press ENTER to confirm and store the data Use the left or ri...

Страница 32: ...w or to change the cursor position Repeat the procedure until the name is complete then press ENTER The following message will appear Press EXIT to return to the previous menu Press ESC to display the...

Страница 33: ...Use the arrow or to select the type of installation Press the button ENTER to confirm The arrow on the left indicates the current type of installation Press EXIT to return to the previous menu 5 10 O...

Страница 34: ...er test patterns This function allows to centre the output signal image as to the raster you gain access to this menu by means of the DEF button Use the arrow or to select VCR STABILITY the following...

Страница 35: ...eflection pincushion top This funtion allows to change top and horizontal pincushion Use the arrow or so that the top horizontal lines are straight Use the arrow or so that the vertical image borders...

Страница 36: ...RT RGB ADJ R H 80 V 50 Use the R G B buttons to switch on or off the tubes The CRT message RGB indicates which tubes are switched on Use the Rsel Gsel Bsel buttons to select on which tube you wish to...

Страница 37: ...s ENTER or EXIT to change adjustment Press ESC to exit 5 13 8 Convergence borders This function allows to adjust the image zones indicated by the crosses H 50 V 60 BORDER CRT RGB ADJ R H 50 V 60 BORDE...

Страница 38: ...ameters and the zone ones for the selected tube only are reset While in the zone setup by pressing the RESET button the zone parameters are reset only for the selected tube The following table shows w...

Страница 39: ...us a memory adjustable at will The colour temperature can be selected and adjusted by means of the remote control The video projector is set at factory for a 6500 K colour temperature 6 8 Automatic cu...

Страница 40: ...projector status info Video input selections Reset picture adjustment installation mode Back illumination by pressing a dedicated key Without pressing any other key the back illumination lasts about 2...

Страница 41: ...dard can be forced by means of the remote control C T I always active Noise reduction on off Peaking control Comb filter on off Luma chroma delay adjustment NTSC hue control 7 10 PC control Through th...

Страница 42: ...message Convergence Overload Switch Off in xxx seconds appears on the screen During normal operation the projector switches off CAUSES The ON push button has not been pressed The power cable is discon...

Страница 43: ...eser Anweisung und der anderen die in dieser Bedienungsanletung enthalten sind entstehen k nnen 13 1Hinweis gem beh rdlicher Vorschriften Die in diesem Ger t entstehende R ntgenstrahlung ist ausreiche...

Страница 44: ...61 http www sim2 it e mail info sim2 it cod 46 9220 302 Due to the constant product development specifications and design might be subject to change without notice A causa dello sviluppo continuo del...

Отзывы: