


6
GB
5. Before using for the
first time
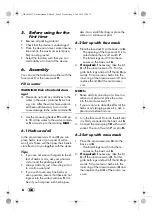
• Remove all packing material.
• Check that the device is undamaged.
• Place the device on level, water insensi-
tive and (to the maximum extent possi-
ble) non-slip ground.
• Select the location such that you can
comfortably sit in front of the device.
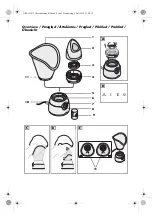
6. Assembly
You can use the facial sauna either with the
face mask
1
or the nose mask
2
.
Fill in water
WARNING! Risk of material dam-
age!
~
Please do not add any additives to the
water in the water container
5
such as
e.g. oils. After the water has evaporat-
ed these additives may burn in and
cause damage to the water container
5
.
• Use the measuring beaker
9
to add up
to 50 ml tap water to the water contain-
er
5
; at most up to the marking
MAX.
6.1 Herbs and oil
In the aroma reservoirs
1
and
4
you can
place herbs, teas or (on a pad of cotton
wool) oils. These will then pass their benefi-
cial effect on to you together with the steam.
Tips
• If you are not sure with regard to the ef-
fect of herbs or oils, ask your pharma-
cist or read the package leaflet.
• Always add only just a few drops of oil
to a cotton wool pad.
• If you wish to use very fine herbs or
even powders, ensure that these do not
ingress into the water container
5
. It is
best if you first place such herbs/pow-
ders into a small filter bag or place the
same on a cotton wool pad.
6.2 Set-up with face mask
1. Place the face mask
1
on the basic unit
6
.
- The opening of the face mask
1
is lo-
cated above the on/off switch
7
.
- The lateral lugs must fit into the re-
cesses on the basic unit
6
.
2.
If required:
If necessary, take the lid
3
off the aroma reservoir
1
. For this,
grab both lugs and pull off the lid
3
up-
wards. Fill some tea or herbs into the
inner ring of the aroma reservoir
1
and
replace the lid
3
of the aroma reser-
voir.
NOTES:
• Please add oils one drop at a time to a
cotton wool pad and place the same
into the aroma reservoir
1
.
• If you are not sure about the effect of the
herbs or oils (stinging eyes etc.), ask a
pharmacist before first use.
3. Turn the face mask
1
a bit to the left until
it is firmly connected to the basic unit
6
.
4. Connect the mains plug
10
with a wall
socket. The on/off switch
7
is set to
0.
6.3 Set-up with nose mask
1. Place the aroma reservoir
4
onto the
basic unit
6
.
- The lateral lugs must fit into the re-
cesses on the basic unit
6
.
2.
If required:
If necessary, take the lid
3
off the aroma reservoir
4
. For this,
grab both lugs and pull off the lid
3
up-
wards. Fill some tea or herbs into the
inner ring of the aroma reservoir
4
and
then replace the lid
3
of the aroma res-
ervoir.
BB*5$B*HVLFKWVVDXQDB%ERRN6HLWH'RQQHUVWDJ-XOL
Содержание SGS 100 A1
Страница 25: ...23 PL BB 5 B HVLFKWVVDXQDB ERRN 6HLWH RQQHUVWDJ XOL ...
Страница 36: ...34 HU BB 5 B HVLFKWVVDXQDB ERRN 6HLWH RQQHUVWDJ XOL ...
Страница 47: ...45 SI BB 5 B HVLFKWVVDXQDB ERRN 6HLWH RQQHUVWDJ XOL ...
Страница 69: ...67 SK BB 5 B HVLFKWVVDXQDB ERRN 6HLWH RQQHUVWDJ XOL ...
Страница 81: ...79 DE BB 5 B HVLFKWVVDXQDB ERRN 6HLWH RQQHUVWDJ XOL ...