background image

SilverCrest SCW 5 A1 

Deutsch - 215 


Legen Sie rechts und links zwischen Camcorder und wasserdichtem 
Gehäuse jeweils ein Antibeschlagpad. Dies verhindert, dass das 
wasserdichte Gehäuse zum Beispiel bei der Verwendung unter Wasser 
beschlägt. 
Die Antibeschlagpads sind bis zu 4-mal wiederverwendbar. Sie können 
bereits verwendete Antibeschlagpads trocknen, indem Sie diese für 5 
Minuten bei 150 °C in den Backofen legen. Bewahren Sie die Anti-
beschlagpads bei Nichtverwendung in einem luftdichten Behältnis auf. 


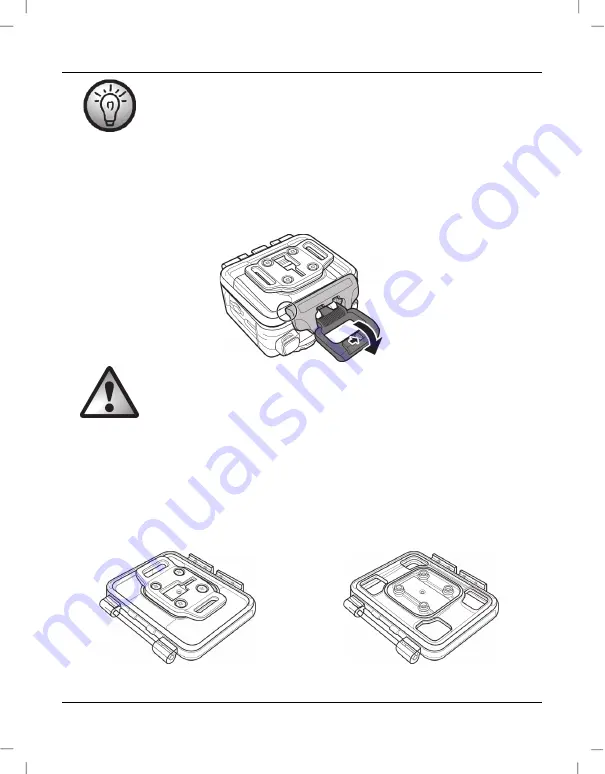
Schließen Sie das wasserdichte Gehäuse, den Verschluss und dann die Verriegelung. 


Bitte beachten Sie die folgenden Punkte, wenn Sie den Camcorder unter 
Wasser oder beim Wassersport nutzen: 


Stellen Sie sicher, dass das wasserdichte Gehäuse keine Beschädigungen aufweist. 


Überprüfen Sie, dass der Verschluss des wasserdichten Gehäuses richtig verschlossen 
ist und sich kein Schmutz oder Sand zwischen der Gummidichtung und dem Gehäuse 
befindet. Die Verriegelung muss fest einrasten, nur so ist das Gehäuse richtig 
verschlossen. 


Überprüfen Sie, ob die wasserdichte Rückwand verwendet wird, die offene Rückwand 
ist nicht wasserdicht! Zum Austauschen der Rückwand beachten Sie bitte das nächste 
Kapitel „Rückwand austauschen“. 

wasserdichte Rückwand (inkl. Adapter)

(orange Dichtung) 

offene Rückwand

(gelbe Dichtung) 

Содержание SCW 5 A1

Страница 1: ......

Страница 2: ......

Страница 3: ...V 1 33 English 2 Magyar 77 Deutsch 153 ...

Страница 4: ...ety instructions 12 Copyright 16 Overview 17 Before you start 18 Inserting removing a memory card 18 Inserting the battery pack 19 Buttons 21 LEDs 21 Charging the Battery 22 Setting the date and time 23 Getting started 25 Powering the camcorder on off 25 The display 25 Selecting the operating mode 27 Recording 27 Recording videos 27 ...

Страница 5: ...otating the recording by 180 35 Toggling the loop recording mode on off 36 Toggling the diving mode on off 37 Deleting recordings formatting the memory card 38 Rotating the display image by 180 40 Toggling the status LEDs on off 41 Customising the display brightness 42 Customising the beeper volume 43 Customising the auto power off delay 44 Setting the date and time 45 Connecting a remote control ...

Страница 6: ...3 Software 54 System Requirements 54 Installing the software 54 Uninstalling the software 54 The main screen 55 Setting the storage location Selecting the language 55 Editing recordings 56 Viewing recordings 56 Selecting navigation view 57 Preview window 57 Toolbar 58 Importing recordings 58 Merge videos 59 Creating an AVCHD Disk 59 Cutting video clips 60 Upload to YouTube 60 Upload to Facebook 60...

Страница 7: ...ng the back cover 65 Removing fixing the adapter 66 Velcro 67 Swivel holder 68 Replacing the adhesive pad 69 Bike holder 70 Adapter for other mounting systems 71 Troubleshooting 71 Maintenance cleaning 73 Servicing 73 Cleaning 73 Environmental regulations and disposal information 73 Conformity notes 74 Warranty and Service Information 74 ...

Страница 8: ...order The action camcorder is the ideal companion for your sports activities Its extensive accessories allow you to use the action camcorder for the most different scenarios It allows you to capture wonderful memories at any time Intended use Your camcorder is a Consumer Electronics device and is designed exclusively for recording movies and pictures Any use other than that mentioned above does no...

Страница 9: ...SilverCrest SCW 5 A1 English 7 Package contents SilverCrest SCW 5 A1 action camcorder FJ SLB 10A battery 4 GB microSD card incl SD card adapter USB cable HDMI cable Water resistant case incl adapter ...

Страница 10: ...est SCW 5 A1 8 English Lens cover Water resistant back cover incl adapter mounted on the water resistant case orange seal Open back cover yellow seal Bike holder Swivel holder Adapter for other mounting systems ...

Страница 11: ...atch Velcro without latch 3 x adhesive pads for replacement 6 x anti mist pads CD ROM with software lineart illustration User manual lineart illustration There is a separate GNU General Public License flyer included with the product You can also download this flyer at www lidl service com ...

Страница 12: ...080 30 fps 960p 1280 x 960 30 fps 720p 1280 x 720 60 fps Photo Format JPEG Resolution 5 megapixel Power supply 5V 0 5A for power supply via PC USB port 5V 1 0A for power supply via external power adapter Battery charging time approx 3 0 hours for power supply via PC USB port approx 2 5 hours for power supply via external power adapter Runtime with fully charged battery approx 1 5 to 2 0 hours Batt...

Страница 13: ...t released from the camcorder operation also heats up the battery When not using the camcorder you should store the battery in your pocket for example The technical specifications and design can be changed without prior notice Built in wireless receiver Modulation GFSK Frequency 2403MHz to 2477MHz Data transfer speed 250kbps 1Mbps 2Mbps Number of channels 75 WiFi standards 802 11 b 802 11 g 802 11...

Страница 14: ...ortant information for the safe operation of the product and user safety This symbol denotes further information on the topic To power the camcorder use the supplied battery pack only manufacturer FUJI ELECTRONICS SHENZHEN CO LTD model FJ SLB 10A Always make sure that the device is not exposed to direct heat sources e g radiators no direct sunlight or bright artificial light reaches the device the...

Страница 15: ...If you find any component damaged it must not be used Never open the camcorder housing and have all repairs performed by qualified technical staff only Failure to heed the warnings above may result in damage to the device or injury Recordings photo video of persons and the right on the own image Please note that when recording any persons whether portraits or groups of persons every person has the...

Страница 16: ...dren and persons with disabilities There is a risk of suffocation Battery Always insert the battery pack with the correct polarity The correct polarity is labelled on the battery and inside the battery compartment Never throw a battery into fire Remove the battery pack if you do not plan to use the camcorder for a while Improper use could cause explosions or leaks Batteries must never be opened or...

Страница 17: ...s below deck on a boat fuel line or tank areas environments where the air contains inflammable substances e g cereals dust or metal powder and any areas where you should normally switch off your car engine Respect the environment Old batteries must not be disposed of with domestic waste They must be handed in at a collection point for waste batteries Cables Always hold cables by the plug and never...

Страница 18: ...er in public swimming pools Liquids of this kind must be wiped off the water resistant case immediately Only use the water resistant case in water of temperatures between 0 C and 35 C Avoid excessive vibration or shaking under water Otherwise there is a risk that the water resistant case opens This can damage the camcorder and any recordings Copyright All the contents of this user manual are prote...

Страница 19: ...ual You can keep this page folded out whilst reading the different chapters of this user manual This allows you to refer to the relevant controls at any time 1 Display 2 On Off Mode button 3 Status LED 4 Speaker 5 Lens 6 Status LED 7 microSD card slot 8 HDMI output 9 Record button 10 Battery compartment 11 Status LED 12 Microphone 13 USB charging connector 14 Microphone connector 15 Status LED ...

Страница 20: ...cordings Proceed as follows Power the camcorder off before you insert or remove a memory card Insert the memory card with the contacts facing towards the front of the device towards the lens 5 into the microSD card slot 7 until it clicks in place To remove the memory card gently press on the inserted card The memory card will protrude a little so that you can get a hold of it and remove it Only us...

Страница 21: ...arrow until the closed arrow on the cover and the opened arrow on the camera housing are aligned Next lift the battery compartment cover to remove it Align the contacts of the battery pack with the contacts in the battery compartment 10 Make sure that the and contact markings on the battery and in the compartment 10 match Next fully insert the battery pack into the battery compartment 10 Make sure...

Страница 22: ...bed area of the battery compartment cover and slide it into the direction of the arrow until the closed arrow on the cover and the closed arrow on the camera housing are aligned To remove the battery pack open the battery compartment 10 as described above Pull the strip to remove the battery ...

Страница 23: ...to take a picture Press this button while the menu is shown to select a menu item LEDs The status LEDs can be found on the top bottom front and back panels of the camcorder They allow you to monitor the camcorder status under the most different mounting scenarios LED Colour Description Status LED 3 Green Operation Powering on or photo capture Slowly flashing green Operation WiFi is enabled Fast fl...

Страница 24: ...nsert the small plug of the supplied USB cable into the USB charge port of your camcorder 13 and the large plug into a USB port on your computer You can keep the camcorder powered off while charging Press and hold the On Off Mode button 2 for three seconds to switch the camcorder off The status LED 6 flashes orange during charging When the charging process is complete the status LED 6 goes out Som...

Страница 25: ...dapter it must be connected to an easily accessible wall outlet in order to be able to disconnect it quickly in case of an emergency Setting the date and time To set the date and time Press and hold the On Off Mode button 2 for at least 3 seconds to switch the camcorder on The camcorder initialises in Video mode automatically To open the menu press the On Off Mode button 2 six times If the display...

Страница 26: ... set the year month day hours and minutes in sequence Select the variable that you want to set by pressing the On Off Mode button 2 Press the record button 9 to increase the value stepwise After all settings have been entered press the On Off Mode button 2 to select OK Press the record button 9 to confirm To exit the MORE menu press the On Off Mode button 2 multiple times until the EXIT item is hi...

Страница 27: ...wing information 23 25 21 22 24 No Icon Description 21 Number of recordings saved 22 Battery capacity 23 Alternates between the following Displays the field of view of the camera WIDE or ULTRA Shows the remaining storage space in percentage 24 Displays the option that is executed when pressing the record button 9 When this icon is shown pressing the record button 9 starts a video recording When th...

Страница 28: ...ing mode you can enable or disable the WiFi function While WiFi is enabled you can control the camcorder from the SilverCrest Action Camcorder App Burst mode Use this mode to take a series of 10 pictures Time lapse mode Use this mode for time lapse picture or video recording This icon also resumes the current settings Self timer Use this mode for self timer shots Setup Use this mode to customise t...

Страница 29: ...t corner of the display 1 The modes are cycled as follows Video mode Photo mode WiFi Mode Burst mode Setup Self timer Time lapse mode If the display is in dimmed power saving mode press the On Off Mode button 2 once to toggle to active mode Recording Recording videos Press and hold the On Off Mode button 2 for at least 3 seconds to switch the camcorder on The camcorder initialises in Video mode au...

Страница 30: ... mode Press and hold the On Off Mode button 2 for at least 3 seconds to switch the camcorder on The camcorder initialises in Video mode automatically To switch to Burst mode BURST press the On Off Mode button 2 three times Press the record button 9 to take a series of 10 pictures While saving the status LED 3 goes green Time lapse mode Press and hold the On Off Mode button 2 for at least 3 seconds...

Страница 31: ...phone or tablet PC Proceed as follows First install the SilverCrest Action Camcorder app on your smartphone or tablet PC You can download the app from the Apple App Store and from the Google Play Store Enable the action camcorder WiFi mode o Press and hold the On Off Mode button 2 for at least 3 seconds to switch the camcorder on The camcorder initialises in Video mode automatically o To switch to...

Страница 32: ...hone or tablet PC and use it to control the action camcorder The menu The menu lets you customise the camcorder settings and record parameters Press and hold the On Off Mode button 2 for at least 3 seconds to switch the camcorder on The camcorder initialises in Video mode automatically To open the menu press the On Off Mode button 2 six times Press the record button 9 to open the menu The followin...

Страница 33: ...mode on off To delete recordings format the memory card To exit the menu Customise camcorder settings To rotate the display image by 180 To toggle the status LEDs on off To customise the display brightness To customise the beeper volume To customise the auto power off delay To set the date and time To connect a remote control not included in the package To reset to factory defaults To exit the men...

Страница 34: ... the SETUP menu and then press the record button 9 to confirm The VIDEO menu will be highlighted Press the record button 9 to open the VIDEO menu Press the On Off Mode button 2 to select an option The following settings are available 1080p 1920 x 1080 30 fps 960p 1280 x 960 30 fps 720p 1280 x 720 60 fps Press the record button 9 to confirm your selection To exit the SETUP menu press the On Off Mod...

Страница 35: ...he record button 9 to open the FOV menu Press the On Off Mode button 2 to select an option The following settings are available Ultra wide angle lens Wide angle lens Press the record button 9 to confirm your selection To exit the SETUP menu press the On Off Mode button 2 multiple times until the EXIT item is highlighted and then press the record button 9 to confirm The Ultra and Wide settings only...

Страница 36: ...2 to select the desired option and then press the record button 9 to confirm The following options are available Use this menu to select to save the time lapse recording as a video or select to save it as a pictures series Use this menu to select the recording interval The following settings are available 1 SEC not for picture series 3 SEC 5 SEC 10 SEC 30 SEC and 60 SEC Select this option to exit ...

Страница 37: ...ton 2 multiple times until the UP DOWN menu is highlighted Press the record button 9 to open the UP DOWN menu Press the On Off Mode button 2 to select an option The following settings are available ON and OFF Select ON to have your recording rotated by 180 Select OFF if you don t want to rotate the recordings Press the record button 9 to confirm your selection To exit the SETUP menu press the On O...

Страница 38: ...P menu is highlighted Press the record button 9 to open the LOOP menu Press the On Off Mode button 2 to select an option The following settings are available ON and OFF Select ON to enable the loop recording mode or select OFF to disable it Press the record button 9 to confirm your selection As soon as loop recording has been enabled you can press the recording button 9 to start or stop recording ...

Страница 39: ... Press the record button 9 to open the DIVING menu Press the On Off Mode button 2 to select an option The following settings are available ON and OFF Select ON to enable the diving mode or select OFF to disable it Press the record button 9 to confirm your selection Once you have enabled the diving mode only video and photo recording is available To be able to select a different recording mode you ...

Страница 40: ... the memory card if one is inserted This menu lets you delete any recordings or format the memory card or internal memory Proceed as follows Press the On Off Mode button 2 multiple times to select the SETUP menu and then press the record button 9 to confirm Press the On Off Mode button 2 multiple times until the DELETE menu is highlighted Press the record button 9 to open the DELETE menu Press the...

Страница 41: ...button 2 to select an option The following options are available Confirm DELETE or FORMAT Cancel EXIT Press the record button 9 to confirm your selection To exit the DELETE menu press the On Off Mode button 2 multiple times until the EXIT item is highlighted and then press the record button 9 to confirm To exit the SETUP menu press the On Off Mode button 2 multiple times until the EXIT item is hig...

Страница 42: ...UP DOWN menu will be highlighted Press the record button 9 to open the UP DOWN menu Press the On Off Mode button 2 to select an option The following settings are available and Select to restore the default value Use the setting to rotate the display image by 180 Press the record button 9 to confirm your selection To exit the MORE menu press the On Off Mode button 2 multiple times until the EXIT it...

Страница 43: ...hted Press the record button 9 to open the LED menu Press the On Off Mode button 2 to select an option The following settings are available ON and OFF Selecting ON will enable the camcorder s status LEDs and selecting OFF will disable them Press the record button 9 to confirm your selection To exit the MORE menu press the On Off Mode button 2 multiple times until the EXIT item is highlighted and t...

Страница 44: ...ton 2 multiple times until the BRIGHT menu is highlighted Press the record button 9 to open the BRIGHT menu Press the On Off Mode button 2 to select an option The following settings are available 100 60 and 30 You can adjust the display brightness in three levels 100 bright to 30 dark Press the record button 9 to confirm your selection To exit the MORE menu press the On Off Mode button 2 multiple ...

Страница 45: ...ple times until the BEEP menu is highlighted Press the record button 9 to open the BEEP menu Press the On Off Mode button 2 to select an option The following settings are available Sets the beeper volume to the highest value Sets the beeper volume to a middle value Disables the beeper Press the record button 9 to confirm your selection To exit the MORE menu press the On Off Mode button 2 multiple ...

Страница 46: ...ord button 9 to confirm Press the On Off Mode button 2 multiple times until the AUTO OFF menu is highlighted Press the record button 9 to open the AUTO OFF menu Press the On Off Mode button 2 to select an option The following settings are available 1 MIN 3 MIN 5 MIN 10 MIN 30 MIN 60 MIN and OFF Select a delay time after which the camcorder powers off automatically if no operation has been made in ...

Страница 47: ...ighlighted Press the record button 9 to open the TIME menu Next you can set the year month day hours and minutes in sequence Press the record button 9 to increase the value stepwise Press the On Off Mode button 2 to confirm each entry After all settings have been entered press the On Off Mode button 2 to select OK Press the record button 9 to confirm To exit the MORE menu press the On Off Mode but...

Страница 48: ... control and consumables like adhesive pads from our hotline or by e mail see page 76 To connect the remote control to the camcorder proceed as follows Press the On Off Mode button 2 multiple times to select the MORE menu and then press the record button 9 to confirm Press the On Off Mode button 2 multiple times until the BINDING menu is highlighted Press the record button 9 to open the BINDING me...

Страница 49: ...ography via the remote control you first have to set the camcorder to the desired mode Photo Burst Time lapse or Self timer To use the remote control to record videos set the camcorder to Video mode In Video mode you can even take picture by pressing the camera icon button on the remote control The remote control is water resistant up to a depth of 60 m To guarantee its water resistance do not use...

Страница 50: ...times until the DEFAULT menu is highlighted Press the record button 9 to open the DEFAULT menu You ll have to confirm the factory reset If you want you can also cancel this process Press the On Off Mode button 2 to select an option The following options are available Confirm reset to factory defaults Cancel EXIT Press the record button 9 to confirm your selection To exit the MORE menu press the On...

Страница 51: ...w your recordings on a television The television needs to have an HDMI connector Use the HDMI cable to connect the camcorder to an available HDMI port on a TV Insert the small plug of the supplied HDMI cable into the HDMI port 8 of your camcorder and the large plug into a HDMI port on your TV Power on your TV and select the HDMI input where your camcorder is connected to Press and hold the On Off ...

Страница 52: ...pacity Memory card Type of recording Recordings thumbnail view Mode Shows the current operating mode Shows the recordings in thumbnail view Plays back the recording photo or video Battery capacity Shows the remaining battery level of your camcorder ...

Страница 53: ... 9 to select a recording type Recordings thumbnail view This displays the recordings in thumbnail view Press the On Off Mode button 2 to highlight a recording The highlighted recording appears with a frame in thumbnail view If you have highlighted a video its resolution will also be indicated on the left Press the record button 9 to show the highlighted video or picture in full screen mode Press t...

Страница 54: ...o the computer you can rename or edit them on the computer Connecting the camcorder to a computer Use the USB cable to connect the camcorder to an available USB port on a computer Insert the small plug of the supplied USB cable into the USB charge port of your camcorder 13 and the large plug into a USB port on your computer Switch the camcorder on if it is powered off The computer will now setup r...

Страница 55: ...der in My Computer Open My Computer on your PC and double click on the drive representing the card reader All recorded files can be found in a subfolder of the folder DCIM on this drive Now you can copy the recorded files from the camcorder into a folder of your choice on the computer s hard disk Write protecting the SD card adapter The SD card adapter comes with a write protection tab When write ...

Страница 56: ...ree hard disk space Installing the software The software provided is on the CD ROM supplied To install the software you first need to connect the camcorder to the computer using the USB cable Use the USB cable to connect the camcorder to your computer Then switch the camcorder on Insert the CD ROM supplied into the CD or DVD drive of your computer The CD will launch automatically Then follow the o...

Страница 57: ...ting the language You can set the storage location for pictures and videos and change the software language at any time From the main dialog click Options Preferences The first field allows you to set the storage location for pictures and videos Click OK to confirm or Select the language you want from the list and click OK to confirm A message appears that a program restart is required Click OK to...

Страница 58: ... the current recording Click on the info icon to show further information on the current recording Here you can insert a comment that can further be used for keyword searches Video recordings show a play and a cut icon in the preview window To display a recording in a new window double click on it In the display window click the arrow icons or use the up and down arrow keys on your keyboard to dis...

Страница 59: ...th Click the Up arrow to return to the previous level Use the left and right arrows to navigate through the months and years To open My Computer click the button Here you can find all the drives installed on your computer For example this allows you to access any recordings stored on a CD ROM Preview window The preview window gives you various options for filtering and editing your recordings Show...

Страница 60: ...links to an Asian video portal and is not suitable for use in European countries Importing recordings You can use the Import function to archive your recordings The recordings are copied to your computer Once you have imported your recordings you do not need to connect the camcorder to view them Select all recordings that you want to import from the drive selected and click Import on the bottom to...

Страница 61: ...eos that have already placed on the timeline Creating an AVCHD Disk AVCHD Advanced Video Codec High Definition is an innovative digital standard with high resolution and brilliant picture and sound quality This format allows you to record onto writeable DVD disks and play back on suitable DVD players It is a good addition to an HDTV television set Not all players support playback from self recorde...

Страница 62: ...o cut Then click It is possible to define mutiple cutting areas in the same clip Start cutting by clicking the confirmation icon The section is cut and a new clip is created without the selection The new clip will be saved to the My Creations folder Upload to YouTube Click on the YouTube upload icon Drag the video recording you want onto the timeline at the bottom of the window Click Next Enter yo...

Страница 63: ... Click Next The programme ArcSoft Print Creations launches automatically Choose a category and then a template from the application To do this double click on the template you want Album page This option allows you to create an album page consisting of one or more photos There are also several templates that you can use Click the Album page icon Drag the pictures you want onto the bar at the botto...

Страница 64: ... the camcorder under water or when practicing sports activities related to water You can operate the camcorder buttons as usual when it is installed in the water resistant case Remove the lens cover from the water resistant case before recording Insert the camcorder as follows into the water resistant case Open the lock and then open the holding mechanism Open the water resistant case and insert t...

Страница 65: ...sm and the lock Please note the following when using the camcorder under water or when practicing sports related to water Make sure that the water resistant case shows no signs of damage Make sure that the holding mechanism of the water resistant case is firmly closed and that no dust or sand is found between the rubber seal and the case The lock mechanism needs to click in place otherwise the cas...

Страница 66: ...immediately Avoid excessive vibration or shaking under water Otherwise there is a risk that the water resistant case opens Cleaning after using under water Clean the water resistant case after every time it is used under water Make sure that the water resistant case shows no signs of damage After using the water resistant case under water clean it with tap water To do this submerge in tap water fo...

Страница 67: ...g the device under water or when practicing water related sports The open back over may be used only if you want to record videos with audio Please note that the case is not water resistant when the open cover is mounted Water resistant back cover incl adapter Open back cover To replace the back cover proceed as follows Open the lock and then open the holding mechanism ...

Страница 68: ...By default an adapter is fixed to the water resistant case and another adapter to the water resistant back cover These adapters allow mounting the water resistant case and the other accessories If you need to mount the adapter on the open back cover you can remove it and fix it at the desired position Proceed as follows Remove the desired adapter by untightening the four screws ...

Страница 69: ... on uneven surfaces for example The camcorder is supplied with one Velcro with and one Velcro without latch For instance you can mount the Velcro with latch as follows Pass the Velcro through the guiding slots of the adapter Make sure to place the smooth side of the Velcro inside Then pass the Velcro through the latch and fix its end as shown in the following figure If the Velcro with latch is not...

Страница 70: ...catch with the fixing screw The unlock catch avoids an accidental separation from the water resistant case Then you can fix the swivel holder with an adhesive socket To do this insert the swivel holder into the adhesive socket until the swivel holder clicks into place To fix the adhesive socket on a surface remove the red film Next stick the adhesive socket onto the previously cleaned surface The ...

Страница 71: ...r to remove the swivel holder from the water resistant case To guarantee a good adhesive fixation the cleaned mounting surface must be free of dust oil and grease Replacing the adhesive pad The camcorder is supplied with three spare adhesive pads If the adhesive strength of one adhesive socket weakens you can replace the adhesive pad Proceed as follows Fully remove the adhesive pad from the adhesi...

Страница 72: ...as necessary to be able to remove the screw located on the side of the clip on the bottom piece Rotate the bottom piece aside Place the upper piece on a tube and replace the bottom piece Reinsert the screw into the bottom piece To fix the holder on the tube tighten the screws Next you can fix the camcorder together with its water resistant case and the swivel holder on the bike holder Please see t...

Страница 73: ...solve most common problems yourself using the table below If the problem persists after checking the suggested solutions please contact our Service Hotline see page 76 Do not attempt to repair the product yourself Do not open the housing of the camcorder as it contains no serviceable parts Error Solution Unable to power the camcorder on The battery pack is empty Recharge the battery The camcorder ...

Страница 74: ...irst make sure if the open back cover yellow seal is suitable for the activity you want to perform The sound of the video recording is too low You are using an external microphone Orientate the external microphone properly The video recording has distorted picture and or sound You are using a memory card that is too slow Only use Speed Class 4 or faster memory cards ...

Страница 75: ...ree cloth for cleaning Do not use any cleaners detergents or solvents as these may enter the housing and cause permanent damage to the product Please read the notes on Cleaning after using under water on page 64 Environmental regulations and disposal information Devices marked with this symbol are subject to the European Directive 2012 19 EU All electrical and electronic devices must be disposed o...

Страница 76: ... approved for compliance with the basic and other relevant requirements of the EMC Directive 2004 108 EC the R TTE Directive 1999 5 EC the Low voltage Directive 2006 95 EC and the RoHS Directive 2011 65 EU The corresponding Declaration of Conformity can be found at the end of this User Manual Warranty and Service Information Warranty of TARGA GmbH Dear Customer This device is sold with three years...

Страница 77: ...ct always comply fully with all instructions contained in the user manual The warnings and recommendations in the user manual regarding correct and incorrect use and handling of the product must always be observed and complied with The product is solely designed for private use and is not suitable for commercial applications The warranty is rendered void in the event of incorrect handling and misu...

Страница 78: ...E Mail service IE targa online com Phone 800 62 175 E Mail service MT targa online com Phone 800 92 496 E Mail service CY targa online com IAN 101051 Manufacturer Please note that the following address is not a service address First contact the service point stated above TARGA GmbH Coesterweg 45 59494 SOEST GERMANY ...

Страница 79: ...sok 87 Szerzői jog 91 Áttekintés 92 Mielőtt belekezdene 93 Memóriakártya behelyezése eltávolítása 93 Az elemcsomag behelyezése 94 Gombok 96 LED ek 96 Az akkumulátor töltése 97 A dátum és az idő beállítása 98 Bevezetés a készülék használatába 100 A kamera be és kikapcsolása 100 A kijelző 100 Az üzemmód kiválasztása 102 Felvétel 102 Videofelvételek készítése 102 ...

Страница 80: ...lvétel mód ki bekapcsolásának váltása 111 A búvár mód ki bekapcsolásának váltása 112 A felvétel törlése a memóriakártya formázása 113 A kijelző képének 180 kal való elforgatása 115 Az állapotkijelző LED ek ki bekapcsolásának váltása 116 A kijelző fényerejének testreszabása 117 A hangjelzés testreszabása 118 Az automatikus kikapcsolás késleltetésének testreszabása 119 A dátum és az idő beállítása 1...

Страница 81: ...övetelmények 129 A szoftver telepítése 129 A szoftver törlése 129 A Főképernyő 130 A tárolás helyének beállítása A nyelv kiválasztása 130 Felvételek szerkesztése 131 Felvételek megtekintése 131 A navigációs nézet kiválasztása 132 Előnézet ablak 132 Eszköztár 133 Felvételek importálása 133 Videók egyesítése 134 Egy AVCHD lemez létrehozása 134 Videoklipek vágása 136 Feltöltés a YouTube ra 136 Feltöl...

Страница 82: ...41 Az adapter eltávolítása rögzítése 142 Velcro 143 Forgó foglalat 144 A ragadó párna cseréje 145 Kerékpáros foglalat 146 Adapter más rögzítési rendszerekhez 147 Hibaelhárítás 147 Karbantartás tisztítás 149 Szervizelés 149 Tisztítás 149 Környezetvédelmi szabályok és hulladékkezelési információk 149 Megfelelőségi nyilatkozat 150 Garanciális és szerviz tájékoztatás 150 ...

Страница 83: ...gek során Széleskörű kiegészítői lehetővé teszik hogy az akció kamerát a legkülönfélébb helyzetekben is használni tudja Lehetővé teszi hogy bármikor megörökítse csodálatos élményeit Rendeltetésszerű használat Az Ön kamerája egy fogyasztói elektronikus eszköz melyet kifejezetten videók és képek rögzítésére fejlesztettek ki A fentiektől eltérő bármilyen más használat nem felel meg a rendeltetésszerű...

Страница 84: ...SilverCrest SCW 5 A1 82 Magyar A csomag tartalma SilverCrest SCW 5 A1 akció kamera FJ SLB 10A elem 4 GB microSD kártya SD kártya adapterrel együtt USB kábel HDMI kábel Vízálló ház adapterrel együtt ...

Страница 85: ...ar 83 Lencse burkolat Vízálló hátulsó burkolat adapterrel együtt a vízálló burkolatra szerelve narancs szigetelés Nyitott hátulsó burkolat sárga szigetelés Kerékpáros foglalat Forgó foglalat Adapter más rögzítési rendszerekhez ...

Страница 86: ...cro csat nélkül 3 x ragadós párna a cseréhez 6 x pára elleni párna CD ROM szoftverrel vonalrajzzal ábrázolva Használati utasítás vonalrajzzal ábrázolva A termékhez tartozik egy különálló GNU Általános Nyilvános Licenc szórólap Ezt a szórólapot letöltheti a következő címről is www lidl service com ...

Страница 87: ...264 MP4 Felbontás 1080p 1920 x 1080 30 fps 960p 1280 x 960 30 fps 720p 1280 x 720 60 fps Fotó Formátum JPEG Felbontás 5 megapixel Tápfeszültség 5V 0 5A a számítógép USB portján keresztül 5V 1 0A külső tápadapteren keresztül Elem töltésidő Kb 3 óra a számítógép USB portján keresztüli táppal Kb 2 5 óra külső tápadapteren keresztüli táppal Üzemidő teljesen feltöltött elemmel kb 1 5 2 óra Elem Li Ion ...

Страница 88: ...egíti az elemet Amikor nem használja a kamerát akkor például tarthatja az elemet a zsebében A műszaki adatok és tervezés változtatása előzetes bejelentés nélkül is megtörténhet Mikrofon beépített Beépített vezeték nélküli vevő Moduláció GFSK Frekvencia 2403MHz 2477MHz Adatátviteli sebesség 250kbps 1Mbps 2Mbps Csatornák száma 75 WiFi szabványok 802 11 b 802 11 g 802 11 n Üzemelési hőmérséklet 0 C 3...

Страница 89: ... termék biztonságos használatára és a felhasználó biztonságára vonatkozó fontos tájékoztatásra figyelmeztet Ez a szimbólum a témakörre vonatkozó fontos információt jelöl A kamera áramellátásához csak a hozzá kapott elemcsomagot használja gyártó FUJI ELECTRONICS SHENZHEN CO LTD modell FJ SLB 10A Mindig tartsa be a következőket ne tegye ki a készüléket közvetlen hőforrásnak pl radiátor ne érje közve...

Страница 90: ... fel a kamera házát és kizárólag képzett szakemberrel végeztesse annak javítását A fenti figyelmeztetések be nem tartása az eszköz vagy emberi sérülését okozhat Személyekről készített elvételek fénykép video és a saját képhez való jog Kérjük ne felejtse el hogy bármilyen személyről készült felvétel akár portré akár csoportkép esetén mindenkinek joga van a saját magáról készült képhez vagy felvétel...

Страница 91: ...lást tartsa távol gyermekektől és csökkent képességű személyektől Fulladásveszély Elem Mindig a helyes polaritással helyezze be az elemet A helyes polaritást feltüntetik az elemen és az elemtartó belsejében Soha ne dobja tűzbe az elemet Távolítsa el az elem csomagot ha úgy tervezi hogy nem használja azt egy ideig A nem megfelelő használat robbanáshoz vagy folyáshoz vezethet Az elemeket soha nem sz...

Страница 92: ...etek mint egy hajó fedélzete alatti hely üzemanyag vezeték és tartály területei éghető anyagokat pl gabonalisztet fémport tartalmazó levegőjű környezetek továbbá olyan területek ahol általában kikapcsolja a gépjármű motorját Tartsa tiszteletben a környezetet Az elöregedett elemeket nem szabad a háztartási szemétbe dobni Ezeket a használt elemek gyűjtőhelyére kell elvinni Kábelek Kizárólag a csatla...

Страница 93: ...ú folyadékokat azonnal le kell törölni a vízálló burkolatról Csak 0 C és 35 C közötti hőmérsékletű vízben használja a vízálló burkolatot Kerülje a víz alatti erős vibrációt vagy rázkódást Másképpen fennáll a vízálló burkolat kinyílásának lehetősége Ez tönkreteheti a kamerát és a felvételeket Szerzői jog Jelen használati utasítást szerzői jog védi és az olvasónak csak információul szolgál Szigorúan...

Страница 94: ...thatja ezt az oldalt a felhasználói kézikönyv különböző fejezeteinek olvasásakor Ez lehetővé teszi Önnek hogy a releváns vezérlésnek bármikor utánanézzen 1 Kijelző 2 On Off Mode be ki üzemmód gomb 3 Állapot LED 4 Hangszóró 5 Objektív 6 Állapot LED 7 microSD kártyafoglalat 8 HDMI kimenet 9 Felvétel gomb 10 Elemtartó rekesz 11 Állapot LED 12 Mikrofon 13 USB töltő csatlakozó 14 Mikrofon csatlakozó 15...

Страница 95: ...Végezze a következőket Kapcsolja ki a kamerát a memóriakártya behelyezése vagy eltávolítása előtt A memóriakártyát az érintkezőivel lefelé helyezze be az eszköz elejébe a lencse irányában 5 a microSD kártyafoglalatba 7 míg az a helyére nem pattan A memóriakártya eltávolításához enyhén nyomja meg a behelyezett kártyát A memóriakártya egy kicsit kiugrik így megfoghatja és kiveheti azt Csak 4 es vagy...

Страница 96: ...g a fedélen látható zárt nyíl és a nyitott nyíl a házon egy vonalba nem kerül Ezután emelje meg az elemtartó rekesz fedelét annak leemeléséhez Igazítsa össze az elemcsomagot annak érintkezőivel az elemtartó rekeszben 10 győződjön meg arról hogy az elem és érintkezőn található jelzései egyeznek a tartón 10 találhatóakkal Ezután teljesen helyezze vissza az elemcsomagot az elemtartó rekeszbe 10 Győző...

Страница 97: ...rületet az elemtartó rekesz fedelén és csúsztassa azt a nyíllal jelölt irányba míg a fedélen látható zárt nyíl és a zárt nyíl a házon egy vonalba nem kerül Az elemcsomag eltávolításához nyissa meg az elemtartó rekeszt 10 a fentiekben leírt módon Az elem eltávolításához húzza meg a szalagot ...

Страница 98: ...ja meg ezt a gombot amikor a menü látszik hogy válasszon a menü elemei között LED ek Az állapotjelző LED eket a kamera tetején alján az elülső és a hátulsó paneleken találja Ezek lehetővé teszik Önnek hogy a kamera állapotát a különböző beszerelési helyzetekben követhesse LED Szín Leírás Állapotjelző LED 3 Zöld Üzemi A bekapcsolás vagy a fényképfelvétel Lassan villogó zöld Üzemi A WiFi be van kapc...

Страница 99: ...hozzá kapott USB kábel kis csatlakozóját a kamerájának USB töltő portjába 13 nagy csatlakozót a számítógépe USB portjába Töltés közben kikapcsolva lehet a kamera Tartsa lenyomva a főkapcsoló On Off Mode gombot 2 három másodpercig a kamera kikapcsolásához Az állapotkijelző LED 6 narancs színnel villog a töltés közben Amikor a töltési folyamat befejeződött az állapotjelző LED 6 kikapcsol Néhány szám...

Страница 100: ...óba kell csatlakoztatni annak érdekében hogy veszély esetén azt gyorsan kihúzhassa A dátum és az idő beállítása A dátum és az idő beállításához Tartsa lenyomva a főkapcsoló On Off Mode gombot 2 legalább 3 másodpercig a kamera bekapcsolásához A kamera automatikusan Video módban inicializálódik A menü megnyitásához nyomja meg hatszor a főkapcsoló On Off Mode gombot 2 Amennyiben a kijelző energiataka...

Страница 101: ... hónapot a napot az órát és a percet Válassza ki azt a változót melyet be szeretne állítani a főkapcsoló On Off Mode gomb 2 segítségével Nyomja meg a felvétel gombot 9 az érték léptetéséhez Az összes beállítás elvégeztével nyomja meg a főkapcsoló On Off Mode gombot 2 az OK kiválasztásához A megerősítéshez nyomja meg a felvétel gombot 9 Kilépéshez a MORE továbbiak menüből nyomja meg többször a főka...

Страница 102: ...ező információ jelenik meg 23 25 21 22 24 Szám Ikon Leírás 21 Az elmentett felvételek száma 22 Elemkapacitás 23 A következők között változik Megjelenítik a kamera látószögét WIDE széles vagy ULTRA Megjeleníti a fennmaradó tárhelyet százalékosan 24 Megjeleníti azt az opciót melyet a felvétel gomb megnyomásával végrehajt 9 Amikor ez az ikon megjelenik a felvétel gomb megnyomásával 9 elindítja a vide...

Страница 103: ...i vagy letilthatja a WiFi funkciót Mialatt a WiFi be van kapcsolva a SilverCrest akció kamera alkalmazásból vezérelheti a kamerát Sorozat mód Használja ezt a módot hogy egy 10 képből álló sorozatot készítsen Időköz mód Használja ezt a módot az időkép kép vagy a videofelvétel készítéséhez Ez az ikon folytatja a jelenlegi beállításokat Önkioldó Használja ezt a módot az önkioldós fényképezéshez Beáll...

Страница 104: ...mmódok a következők szerint követik egymást Video mód Fénykép mód WiFi mód Sorozat mód Beállítás Önkioldó Időköz mód Amennyiben a kijelző energiatakarékos módba halványodott nyomja meg egyszer a főkapcsoló On Off Mode gombot 2 hogy aktív módba váltson Felvétel Videofelvételek készítése Tartsa lenyomva a főkapcsoló On Off Mode gombot 2 legalább 3 másodpercig a kamera bekapcsolásához A kamera automa...

Страница 105: ...d Tartsa lenyomva a főkapcsoló On Off Mode gombot 2 legalább 3 másodpercig a kamera bekapcsolásához A kamera automatikusan Video módban inicializálódik A Sorozat módra BURST való átkapcsoláshoz nyomja meg háromszor a főkapcsoló On Off Mode gombot 2 Egy 10 képes sorozatfelvétel készítéséhez nyomja le a felvétel gombot 9 Az energiakímélő üzemmód során az állapotkijelző LED 3 zöldre vált Időköz mód T...

Страница 106: ...SilverCrest Action Camcorder alkalmazás lehetővé teszi hogy kameráját az alkalmazásból vezérelje az okostelefonja vagy tabletje segítségével Végezze a következőket Először telepítse a SilverCrest Action Camcorder alkalmazást a okostelefonjára vagy tabletjére Az alkalmazást letöltheti az Apple App Store ból vagy a Google Play Store ból Engedélyezze az akció kamera WiFi módját o Tartsa lenyomva a fő...

Страница 107: ...234567890 és hozza létre a kapcsolatot Ezután elindíthatja a SilverCrest Action Camcorder alkalmazást az okostelefonján vagy tabletjén és használja azt a kamerájának vezérlésére A menü A menü lehetővé teszi hogy testreszabja a kamera beállításait és a felvétel paramétereit Tartsa lenyomva a főkapcsoló On Off Mode gombot 2 legalább 3 másodpercig a kamera bekapcsolásához A kamera automatikusan Video...

Страница 108: ... memóriakártya formázásához A menüből való kilépéshez A kamera beállítások testreszabása A kijelző képének 180 kal való elforgatásához Az állapotkijelző LED ek ki bekapcsolásának váltásához A kijelző fényerejének testreszabásához A hangjelzés testreszabásához Az automatikus kikapcsolás késleltetésének testreszabásához A dátum és az idő beállításához A távkezelő csatlakoztatásához nem tartozéka a c...

Страница 109: ...ja meg a felvétel gombot 9 a megerősítéshez A VIDEO menü lesz kiemelve Nyomja meg a következő gombot 9 a VIDEO menü megnyitásához Egy lehetőség kijelöléséhez nyomja meg a Főkapcsoló On Off Mode gombot 2 A következő beállítások állnak rendelkezésre 1080p 1920 x 1080 30 fps 960p 1280 x 960 30 fps 720p 1280 x 720 60 fps A kijelölés megerősítéséhez nyomja meg a felvétel gombot 9 Kilépéshez a SETUP beá...

Страница 110: ...egnyitásához Egy lehetőség kijelöléséhez nyomja meg a Főkapcsoló On Off Mode gombot 2 A következő beállítások állnak rendelkezésre Ultra széles látószögű lencse Széles látószögű lencse A kijelölés megerősítéséhez nyomja meg a felvétel gombot 9 Kilépéshez a SETUP beállítások menüből nyomja meg többször a főkapcsoló On Off Mode gombot 2 amíg az EXIT kilépés elem ki nincs választva majd nyomja meg a ...

Страница 111: ...ajd nyomja meg a felvétel gombot 9 a megerősítéshez A következők beállítások állnak rendelkezésre Ennek a menünek a használatával válassza ki a következőt az időköz felvétel videóként való rögzítéséhez válassza a következőt annak képsorozatként való elmentéséhez Ezt a menüt használja a felvétel időtartamának beállításához A következő beállítások állnak rendelkezésre 1 SEC nem a képsorozatokhoz 3 S...

Страница 112: ...ki nincs emelve Nyomja meg a következő gombot 9 az UP DOWN menü megnyitásához Egy lehetőség kijelöléséhez nyomja meg a Főkapcsoló On Off Mode gombot 2 A következő beállítások állnak rendelkezésre ON be és OFF ki Válassza ki az ON be lehetőséget a felvétel 180 kal való elforgatásához Válassza ki az OFF ki lehetőséget ha nem akarja elforgatni a felvételt A kijelölés megerősítéséhez nyomja meg a felv...

Страница 113: ...Nyomja meg a következő gombot 9 a LOOP menü megnyitásához Egy lehetőség kijelöléséhez nyomja meg a Főkapcsoló On Off Mode gombot 2 A következő beállítások állnak rendelkezésre ON be és OFF ki A végtelenített rögzítés engedélyezéséhez jelölje ki a ON be letiltásához a OFF ki lehetőséget A kijelölés megerősítéséhez nyomja meg a felvétel gombot 9 Ahogy a végtelenített felvétel engedélyezve lett megny...

Страница 114: ...9 a DIVING búvár menü megnyitásához Egy lehetőség kijelöléséhez nyomja meg a Főkapcsoló On Off Mode gombot 2 A következő beállítások állnak rendelkezésre ON be és OFF ki A búvár mód engedélyezéséhez jelölje ki az ON be letiltásához az OFF ki lehetőséget A kijelölés megerősítéséhez nyomja meg a felvétel gombot 9 Csak ha már engedélyezte a búvár módot akkor csak a videó és a fénykép rögzítése lehets...

Страница 115: ...i lehetővé bármilyen felvétel törlését vagy a memóriakártya vagy belső memória formázását Végezze a következőket Nyomja meg többször a főkapcsoló On Off Mode gombot 2 a SETUP beállítások menü kiválasztásához majd nyomja meg a felvétel gombot 9 a megerősítéshez Nyomja meg többször a főkapcsoló On Off Mode gombot 2 míg a DELETE törlés menü ki nincs emelve Nyomja meg a következő gombot 9 a DELETE men...

Страница 116: ...ok állnak rendelkezésre Megerősítés DELETE vagy FORMAT törlés vagy formázás Törlés EXIT A kijelölés megerősítéséhez nyomja meg a felvétel gombot 9 Kilépéshez a DELETE törlés menüből nyomja meg többször a főkapcsoló On Off Mode gombot 2 amíg az EXIT kilépés elem ki nincs választva majd nyomja meg a felvétel gombot 9 a megerősítéshez Kilépéshez a SETUP beállítások menüből nyomja meg többször a főkap...

Страница 117: ...g a következő gombot 9 az UP DOWN menü megnyitásához Egy lehetőség kijelöléséhez nyomja meg a Főkapcsoló On Off Mode gombot 2 A következő beállítások állnak rendelkezésre és Az alapértelmezett érték visszaállításához válassza a következő lehetőséget Használja a menüt hogy a kijelzőn megjelenő képet 180 kal elforgassa A kijelölés megerősítéséhez nyomja meg a felvétel gombot 9 Kilépéshez a MORE tová...

Страница 118: ...gombot 9 a LED menü megnyitásához Egy lehetőség kijelöléséhez nyomja meg a Főkapcsoló On Off Mode gombot 2 A következő beállítások állnak rendelkezésre ON be és OFF ki Az ON be kiválasztása engedélyezi a kamera állapotkijelző LED eket és az OFF ki választása letiltja azokat A kijelölés megerősítéséhez nyomja meg a felvétel gombot 9 Kilépéshez a MORE továbbiak menüből nyomja meg többször a főkapcso...

Страница 119: ... míg a BRIGHT fényerő menü ki nincs emelve Nyomja meg a következő gombot 9 a BRIGHT menü megnyitásához Egy lehetőség kijelöléséhez nyomja meg a Főkapcsoló On Off Mode gombot 2 A következő beállítások állnak rendelkezésre 100 60 és 30 A kijelző fényerejét három szintre állíthatja be 100 fényestől 30 sötétig A kijelölés megerősítéséhez nyomja meg a felvétel gombot 9 Kilépéshez a MORE továbbiak menüb...

Страница 120: ... nincs emelve Nyomja meg a következő gombot 9 a BEEP menü megnyitásához Egy lehetőség kijelöléséhez nyomja meg a Főkapcsoló On Off Mode gombot 2 A következő beállítások állnak rendelkezésre A hangjelzés erejét a legmagasabb lehetőségre állítja be A hangjelzés erejét a középső lehetőségre állítja be Kikapcsolja a hangjelzést A kijelölés megerősítéséhez nyomja meg a felvétel gombot 9 Kilépéshez a MO...

Страница 121: ...ítéshez Nyomja meg többször a főkapcsoló On Off Mode gombot 2 míg a AUTO OFF automatikus kikapcsolás menü ki nincs emelve Nyomja meg a következő gombot 9 az AUTO OFF menü megnyitásához Egy lehetőség kijelöléséhez nyomja meg a Főkapcsoló On Off Mode gombot 2 A következő beállítások állnak rendelkezésre 1 MIN 3 MIN 5 MIN 10 MIN 30 MIN 60 MIN és OFF Válassza ki a késleltetés időtartamát ami után a ka...

Страница 122: ...gombot 9 a TIME idő menü megnyitásához Ezek után egymás után beállíthatja az évet a hónapot a napot az órát és a percet Nyomja meg a felvétel gombot 9 az érték léptetéséhez Az egyes változtatások megerősítéséhez nyomja meg a Főkapcsoló On Off Mode gombot 2 Az összes beállítás elvégeztével nyomja meg a főkapcsoló On Off Mode gombot 2 az OK kiválasztásához A megerősítéshez nyomja meg a felvétel gomb...

Страница 123: ...egrendelheti a forródróton vagy emailen keresztül lásd 152 oldal A távkezelő kamerához való csatlakoztatásához járjon el a következők szerint Nyomja meg többször a főkapcsoló On Off Mode gombot 2 a MORE továbbiak menü kiválasztásához majd nyomja meg a felvétel gombot 9 a megerősítéshez Nyomja meg többször a főkapcsoló On Off Mode gombot 2 míg a BINDING összekötés menü ki nincs emelve Nyomja meg a ...

Страница 124: ... tevékenységét A fényképezés távkezelőn keresztüli vezérléséhez először be kell állítania a kamerát a kívánt módba fénykép sorozat időkép vagy önkioldó A távkezelő videofelvételek készítéséhez való használatához állítsa be a kamerát videó módba Videó módban még fényképeket is készíthet ha megnyomja a kamera ikon gombot a távkezelőn A távkezelő 60 m ig vízálló A vízállóság garantálása érdekében ne ...

Страница 125: ...mezés menü ki nincs emelve Nyomja meg a következő gombot 9 a DEFAULT alapértelmezés menü megnyitásához Meg kell erősítenie a gyári visszaállítást Ha szeretné törölheti is ezt a folyamatot Egy lehetőség kijelöléséhez nyomja meg a Főkapcsoló On Off Mode gombot 2 A következők beállítások állnak rendelkezésre Megerősítés gyári beállítások visszaállítása Törlés EXIT A kijelölés megerősítéséhez nyomja m...

Страница 126: ...vételeit egy TV n A TV nek HDMI csatlakozóval kell rendelkeznie A TV HDMI portjához való csatlakoztatásához használja a HDMI kábelt Illessze be az hozzá kapott HDMI kábel kis csatlakozóját a kamerájának HDMI portjába 8 nagy csatlakozót a TV HDMI portjába Kapcsolja be a TV t és válassza ki a HDMI bemenetet ahová a kamerát csatlakoztatta Tartsa lenyomva a főkapcsoló On Off Mode gombot 2 legalább 3 m...

Страница 127: ...Memóriakártya Felvétel típusa A felvételek bélyegnézete Üzemmód Megmutatja a jelenlegi működési módot Megmutatja a felvételeket bélyegnézetben Visszajátssza a felvételt fénykép vagy videó Elemkapacitás Megmutatja a kamera elemének megmaradt töltésszintjét ...

Страница 128: ... le a felvétel gombot 9 A felvételek bélyegnézete Ez mutatja meg a felvételeket bélyegnézetben Egy felvétel kijelöléséhez nyomja meg a Főkapcsoló On Off Mode gombot 2 A kijelölt felvétel egy keretben jelenik meg bélyegnézetben Ha kijelölt egy videót annak felbontása is megjelenik a baloldalon A kijelölt videó vagy kép teljes képernyős megjelenítéséhez nyomja meg a 9 felvétel gombot A felvételek te...

Страница 129: ...lta ott már átnevezheti vagy szerkesztheti azokat Kamera számítógéphez csatlakoztatása A számítógépének USB portjához való csatlakoztatásához használja az USB kábelt Illessze be az hozzá kapott USB kábel kis csatlakozóját a kamerájának USB töltő portjába 13 nagy csatlakozót a számítógépe USB portjába kapcsolja be a kamerát ha az ki van kapcsolva A számítógép eltávolítható maghajtókat állít be vagy...

Страница 130: ...alatt Nyissa ki a számítógép Sajátgép mappáját és kattintson duplán a kártyaolvasót képviselő meghajtóra Az összes rögzített fájl megtalálható ennek a meghajtónak a DCIM almappájában Most már átmásolhatja a kameráról a rögzített fájlokat a számítógép merevlemezének tetszés szerinti mappájába Az SD kártya adapter írásvédelme Az SD kártya adapter egy írásvédelemre szolgáló füllel rendelkezik Amikor ...

Страница 131: ... Memória 2GB szabad lemezterület A szoftver telepítése A tartozék CD ROM on található a szoftver A szoftver telepítéséhez először csatlakoztatnia kell a kamerát a számítógéphez az USB kábel segítségével Használja az USB kábelt a kamera számítógéphez való csatlakoztatásához Ezután kapcsolja be a kamerát Helyezze számítógépe CD vagy DVD meghajtójába a készletezett CD ROM ot A CD automatikusan indul ...

Страница 132: ...a a képek és videók tárolásának helyét valamint megváltoztathatja a szoftver nyelvét A fő párbeszédpanelben kattintson a következőkre Beállítások Személyes beállítások Az első mezőben állíthatja be a képeinek és videóinak tárolási helyét Kattintson az OK gombra a megerősítéshez vagy Válassza ki a kívánt nyelvet a listából majd kattintson az OK ra a megerősítéshez Megjelenik egy üzenet hogy a progr...

Страница 133: ...jeleníteni Kattintson az ötcsillagos ikonra az elem tetején film szalag a jelenlegi felvétel értékeléséhez kattintson az infó ikonra a felvétellel kapcsolatos további információk megjelenítéséhez Itt megjegyzéseket adhat hozzá melyeket később a kulcsszavas kereséshez használhat A videofelvételek egy lejátszás és egy vágás ikont jelenítenek meg az előnézeti ablakban A felvétel egy új ablakban való ...

Страница 134: ...t kattintson a naptár ikonra Megjelennek a különböző évek mappái Ha duplán rákattint egy mappára havi nézet jelenik meg Arra duplán kattintva megjelenik az aktuális hónap naponkénti nézete Kattintson a Fel nyílra és egy szinttel feljebb jut használja a balra és jobbra nyilakat hogy a hónapok és az évek között navigáljon A Sajátgép megnyitásához kattintson a gombra Itt találja a számítógépére telep...

Страница 135: ...fel a YouTube fiókjába Feltöltés a Facebook ra Videókat tölt fel a Facebook fiókjába Fényképalbum Fényképalbumot hoz létre a képeiből Album oldal Létrehoz egy oldalt pl meghívó kártyát a képeiből A YouKu nevű ikon egy olyan ázsiai videoportálhoz csatlakozik ami az európai országoknak nem megfelelő Felvételek importálása használhatja az Importálás funkciót a felvételeinek archiválására A felvételek...

Страница 136: ... olyan videók egyesítése lehetséges amelyek felbontása és bitsebessége megegyezik Kattintson a videók egyesítése ikonra a videoszerkesztő idővonal megjelenítéséhez Húzza a videókat kedve szerint az idővonalra az ablak alján A folyamat elindításához kattintson a Next következő gombra Adja meg a tárolási útvonalat a számítógépén majd kattintson a Save mentés lehetőségre A már az idővonalra helyezett...

Страница 137: ...sához Húzza a videókat kedve szerint az idővonalra az ablak alján A folyamat elindításához kattintson a Next következő gombra Válassza ki a meghajtót és a mappát a merevlemezén majd kattintson az OK lehetőségre Ennek a funkciónak a használatához számítógépének rendelkeznie kell egy DVD meghajtóra mely a következő adathordozófajták valamelyikének írására képes DVD R DVD R DL DVD RW vagy DVD RAM ...

Страница 138: ...ehetséges több kivágási terület kijelölése is A kivágás megkezdéséhez kattintson a megerősítés ikonra A részt kivágja és létrehoz egy új videót a kivágás nélkül Az új videót a My Creations saját műveim mappába menti el Feltöltés a YouTube ra Kattintson a YouTube feltöltés ikonra Húzza a videofelvételeket kedve szerint az idővonalra az ablak alján Kattintson a Next gombra Adja meg felhasználói nevé...

Страница 139: ...nt Creations ArcSoft nyomat létrehozás program automatikusan elindul Válasszon ki az alkalmazásból egy kategóriát majd egy sablont Ehhez kattintson duplán a kiválasztott sablonra Album oldal Ez a lehetőség teszi lehetővé Önnek hogy egy album oldalt hozzon létre egy vagy több fényképből Számos sablon áll rendelkezésre melyet használhat Kattintson az album oldal ikonra Húzza a fényképeket kedve szer...

Страница 140: ...erát víz alatt vagy vízzel kapcsolatos sportok közben használhassa Szokásos módon üzemeltetheti a kamera gombjait akkor is amikor az a vízálló házba van illesztve Távolítsa el a lencsevédő burkolatot a vízálló burkolatról a felvétel készítés előtt Illessze a kamerát a következő módon a vízálló burkolathoz Nyissa ki a zárat és nyissa fel a tartószerkezetet Nyissa ki a vízálló burkolatot és helyezze...

Страница 141: ...el használni a vízálló burkolatot amikor a kamerát víz alatt vagy vízzel kapcsolatos sportok közben használja Győződjön meg róla hogy a vízálló burkolaton nincsen sérülésnek nyoma Győződjön meg arról hogy a vízálló burkolat zárószerkezete szorosan zárjon és hogy nem található por vagy homok a burkolat gumitömítésén A zárószerkezetnek a helyére kell pattannia máskülönben a burkolat nincs megfelelőe...

Страница 142: ...agy rázkódást Másképpen fennáll a vízálló burkolat kinyílásának lehetősége A víz alatti használatot követő tisztítás A vízálló burkolatot tisztítsa meg minden alkalommal amikor azt a víz alatt használta Győződjön meg róla hogy a vízálló burkolaton nincsen sérülésnek nyoma Mindig tisztítsa meg a vízálló burkolatot csapvízzel azután hogy azt víz alatt használta Ehhez merítse azt 10 percre csapvízbe ...

Страница 143: ...nálja vagy amikor vízzel kapcsolatos sportokat űz A nyitott hátulsó fedelet csak akkor használja amikor hangot is szeretne felvenni a videóhoz Ne feledje hogy a burkolat nem vízálló amikor nyitott burkolat van felszerelve Vízálló hátsó burkolat adapterrel együtt Nyitott hátulsó burkolat A hátulsó fedél cseréjéhez járjon el a következők szerint Nyissa ki a zárat és nyissa fel a tartószerkezetet ...

Страница 144: ...ése Alapértelmezettként egy adapter van a vízálló burkolatra szerelve és egy másik adapter pedig a vízálló hátulsó burkolatra Ezek az adapterek teszik lehetővé a vízálló burkolat és az egyéb kiegészítők felszerelését Ha a nyitott hátulsó burkolatra kell az adaptert felszerelnie eltávolíthatja és rögzítheti azt a kívánt pozícióba Végezze a következőket Távolítsa el a kívánt adaptert a négy csavar m...

Страница 145: ...gyenlőtlen felületekre való felszereléséhez A kamerát egy Velcro val és egy csat nélküli Velcro val szállítják Például a következőképpen is felszerelheti a csatos Velcro t Vezesse át a Velcro t az adapter vezetőnyílásain Győződjön meg afelől hogy a Velcro sima fele legyen belül Ezután vezesse át a Velcro t a csaton és rögzítse annak végét a képen látható módon Ha a csatos Velcro nem felel meg a je...

Страница 146: ...tartót az adapterbe míg a forgó tartó a helyére kattan Rögzítse a kioldó reteszt a rögzítőcsavarokkal A kioldó retesz előzi meg a vízálló burkolat véletlenszerű leválását Ezután rögzítheti a forgó tartót egy ragadós aljzat segítségével Ehhez illessze a forgó tartót a ragadós aljzatba míg a forgó tartó a helyére kattan a ragadós aljzat egy felületre való rögzítéséhez távolítsa el a piros fóliát Ezu...

Страница 147: ...a le a rögzítőcsavart és távolítsa el a kioldóreteszt Nyomja meg a forgó tartón a kapcsot hogy eltávolítsa a forgó tartót a vízálló burkolatról A jó ragadós rögzítéshez a megtisztított szerelőfelületnek por olaj és zsírmentesnek kell lennie A ragadó párna cseréje A kamerát három ragadós párnával szállítják Ha a ragadós aljzat ragadási ereje meggyengül kicserélheti a ragadós párnát Végezze a követk...

Страница 148: ...es mértékben való meglazításával ahhoz hogy el tudja távolítani a kapocs oldalán található csavart az alsó darabról Fordítsa el az alsó részt Helyezze a felső részt a csőre és helyezze vissza az alsó részt Tegye vissza a csavart az alsó részbe A tartó rögzítéséhez szorítsa meg a csavarokat Ezután felrögzítheti a kamerát annak vízálló burkolatával együtt a kerékpáros tartó a forgó tartójára Nézze m...

Страница 149: ... A legtöbb problémát saját maga is megoldhatja a következő táblázat segítségével Ha a probléma a javasolt megoldás után is fennáll lépjen kapcsolatba az ügyfélszolgálati forródrótunkkal lásd 152 oldal Ne kísérelje meg a termék javítását Sohase nyissa ki a kamera házát mivel az nem tartalmaznak javítható alkatrészt Hiba Megoldás Nem lehet bekapcsolni a kamerát Az elem lemerült Töltse fel az elemet ...

Страница 150: ...ekelőtt győződjön meg arról hogy a nyitott hátsó burkolat sárga szigetelés megfelelő ahhoz a tevékenységhez melyet végezni kíván A videofelvétel hangereje túl alacsony Ön külső mikrofont használ megfelelően irányítsa a külső mikrofont A videofelvétel képe és vagy hangja torz Túl lassú memóriakártyát használ Csak 4 es vagy annál magasabb sebességosztályú memóriakártyát használjon ...

Страница 151: ...sználjon tisztító mosó vagy oldószereket mivel ezek a házba jutva a termék maradandó sérülését okozhatják Kérjük olvassa el a Cleaning after using under water A víz alatti használatot követő tisztítás című részt a 140 oldalon Környezetvédelmi szabályok és hulladékkezelési információk Az ilyen jellel ellátott eszközök a 2012 19 EU sz európai irányelv hatálya alá esnek Valamennyi elektromos és elekt...

Страница 152: ...megfelelt az elektromágneses összeférhetőségre vonatkozó 2004 108 EC sz és a kisfeszültségű villamos termékekre vonatkozó 2006 95 EC sz valamint a rádió és távközlési végberendezésekre vonatkozó 1999 5 EC sz és a 2011 65 EU RoHS direktíva irányelveinek megfelelő követelményeknek Az erre vonatkozó megfelelőségi nyilatkozatot megtalálhatja a Felhasználói kézikönyv végén Garanciális és szerviz tájéko...

Страница 153: ...t használva vagy karbantartva A termék szakszerű kezeléséhez pontosan be kell tartani a kezelési utasításban felsorolt utasításokat Feltétlenül el kell kerülni az olyan célokra való felhasználást vagy kezelést amelyektől a kezelési utasítás eltanácsol vagy amelyekre éppenséggel figyelmeztet Ez a készülék kizárólag privát nem ipari felhasználásra készült Visszaélésszerű vagy szakszerűtlen kezelés n...

Страница 154: ...ar Szerviz Telefon 061 77 74 75 8 E Mail service HU targa online com IAN 101051 Gyártó Figyelem a következő cím nem szervizcím Először a fent megadott szervizzel vegye fel a kapcsolatot TARGA GmbH Coesterweg 45 59494 SOEST GERMANY ...

Страница 155: ...icherheitshinweise 163 Urheberrecht 167 Übersicht 168 Vor der Inbetriebnahme 169 Einlegen entnehmen einer Speicherkarte 169 Einlegen des Akkus 170 Tasten 172 LEDs 172 Aufladen des Akkus 173 Datum Uhrzeit einstellen 174 Inbetriebnahme 176 Camcorder ein und ausschalten 176 Das Display 176 Modus auswählen 178 Aufnahme 178 Aufnehmen von Videos 178 ...

Страница 156: ...ahme einstellen 185 Aufnahme um 180 drehen 186 Endlosaufnahmemodus ein bzw ausschalten 187 Tauchmodus ein bzw ausschalten 188 Aufnahmen löschen Speicherkarte formatieren 189 Displayanzeige um 180 drehen 191 Status LEDs ein bzw ausschalten 192 Displayhelligkeit anpassen 193 Signalton Lautstärke anpassen 194 Automatische Abschaltzeit anpassen 195 Datum Uhrzeit einstellen 196 Eine Fernbedienung nicht...

Страница 157: ...5 Systemanforderungen 205 Die Software installieren 205 Die Software deinstallieren 205 Das Hauptfenster 206 Speicherort festlegen Sprache auswählen 206 Aufnahmen bearbeiten 207 Aufnahmen betrachten 207 Die Ansicht der Navigation auswählen 208 Das Vorschaufenster 208 Die Symbolleiste 209 Aufnahmen importieren 209 Video Zusammenfügung 210 AVCHD Disk erstellen 210 Videoclips schneiden 212 Hochladen ...

Страница 158: ...ustauschen 217 Adapter lösen und befestigen 218 Klettband 219 Schwenkhalterung 220 Klebepad austauschen 221 Fahrradhalterung 222 Adapter für andere Befestigungssysteme 223 Fehlerbehebung 223 Wartung Reinigung 225 Wartung 225 Reinigung 225 Umwelthinweise und Entsorgungsangaben 225 Konformitätsvermerke 226 Hinweise zu Garantie und Serviceabwicklung 226 ...

Страница 159: ...st SCW 5 A1 Action Camcorders Der Action Camcorder ist der ideale Begleiter für Ihre sportlichen Aktivitäten Das umfangreiche Zubehör ermöglicht den Einsatz des Action Camcorders für verschiedenste Gelegenheiten So können Sie jederzeit Ihre actionreichen Erlebnisse festhalten Bestimmungsgemäße Verwendung Der Camcorder ist ein Gerät der Unterhaltungstechnik und dient ausschließlich der Aufnahme von...

Страница 160: ...SilverCrest SCW 5 A1 158 Deutsch Lieferumfang SilverCrest SCW 5 A1 Action Camcorder Akku FJ SLB 10A 4 GB microSD Karte inkl SD Karten Adapter USB Kabel HDMI Kabel wasserdichtes Gehäuse inkl Adapter ...

Страница 161: ...A1 Deutsch 159 Linsenabdeckung wasserdichte Rückwand inkl Adapter am wasserdichten Gehäuse befestigt orange Dichtung offene Rückwand gelbe Dichtung Fahrradhalterung Schwenkhalterung Adapter für andere Befestigungssysteme ...

Страница 162: ...he Klettband ohne Lasche 3 x Ersatzklebepads 6 x Antibeschlagpads Software CD ROM Symbolbild Bedienungsanleitung Symbolbild Diesem Produkt ist ein separater Flyer zum Thema GNU General Public License beigelegt Dieser Flyer steht zusätzlich auf der Seite www lidl service com zum Download bereit ...

Страница 163: ...1080p 1920 x 1080 30 fps 960p 1280 x 960 30 fps 720p 1280 x 720 60 fps Foto Format JPEG Auflösung 5 Megapixel Stromversorgung 5V 0 5A bei Versorgung über USB Anschluss eines PC 5V 1 0A bei Versorgung über externes Netzteil Akkuladezeit Ca 3 0 Std bei Versorgung über USB Anschluss eines PC Ca 2 5 Std bei Versorgung über externes Netzteil Betriebsdauer mit vollgeladenem Akku ca 1 5 2 0 Std Akku Li I...

Страница 164: ...wenden da in diesem Fall durch die Eigenerwärmung bei Betrieb des Camcorders eine Unterkühlung des Akkus verhindert wird Bei Nichtgebrauch des Camcorders sollten Sie den Akku zum Beispiel in der Hosentasche warm halten Änderungen der technischen Daten sowie des Designs können ohne Ankündigung erfolgen Eingebauter Funkempfänger Modulationsart GFSK Frequenz 2403MHz 2477MHz Datenrate 250kbps 1Mbps 2M...

Страница 165: ...en oder sogar zum Tod führen kann WARNUNG Dieses Symbol kennzeichnet wichtige Hinweise für den sicheren Betrieb des Gerätes und zum Schutz des Anwenders Dieses Symbol kennzeichnet weitere informative Hinweise zum Thema Betreiben Sie den Camcorder ausschließlich mit dem mitgelieferten Akku Hersteller FUJI ELECTRONICS SHENZHEN CO LTD Typenbezeichnung FJ SLB 10A Achten Sie darauf dass keine direkten ...

Страница 166: ... beschädigt wird um Gefährdungen zu vermeiden Überprüfen Sie aus diesem Grund das Gerät und das Zubehör regelmäßig auf Beschädigungen Sollten Sie Beschädigungen feststellen dürfen Sie die entsprechenden Komponenten nicht weiter verwenden Öffnen Sie niemals das Gehäuse des Camcorders und lassen Sie Reparaturen nur von qualifiziertem Fachpersonal durchführen Bei Nichtbeachtung der zuvor genannten Hi...

Страница 167: ... entsprechend eingewiesen oder werden durch eine für Ihre Sicherheit zuständige Person beaufsichtigt Kinder sollten grundsätzlich beaufsichtigt werden damit sichergestellt werden kann dass sie mit diesem Gerät nicht spielen Kleinteile können bei Verschlucken lebensgefährlich sein Halten Sie auch die Verpackungsfolien fern Es besteht Erstickungsgefahr Akku Legen Sie den Akku stets polrichtig ein Di...

Страница 168: ...cht immer eindeutig ausgewiesen Dazu zählen Tankbereiche wie z B unter Deck bei Booten Kraftstoffüberführungen oder Kraftstoffaufbewahrungsbereiche Auch Bereiche in denen die Luft Chemikalien oder Teilchen enthält wie z B Getreide Staub oder Metallpulver und alle anderen Bereiche in denen Sie normalerweise angewiesen werden Ihren Kraftfahrzeugmotor abzuschalten Denken Sie an den Umweltschutz Verbr...

Страница 169: ...ehend vom wasserdichten Gehäuse abgewischt werden Verwenden Sie das wasserdichte Gehäuse nur bei Wassertemperaturen im Bereich von 0 C bis 35 C Vermeiden Sie übermäßige Erschütterungen und Vibrationen unter Wasser Es besteht die Möglichkeit dass sich dadurch das wasserdichte Gehäuse öffnen kann Hierdurch kann der Camcorder sowie bereits gespeicherte Aufnahmen beschädigt werden Urheberrecht Alle In...

Страница 170: ...nen diese Umschlagseite ausgeklappt lassen während Sie weitere Kapitel der Anleitung lesen So haben Sie immer eine Referenz zum betreffenden Bedienelement vor Augen 1 Display 2 Ein Aus Modus Taste 3 Status LED 4 Lautsprecher 5 Linse 6 Status LED 7 microSD Kartenslot 8 HDMI Ausgang 9 Aufnahme Taste 10 Akkufach 11 Status LED 12 Mikrofon 13 USB Ladeanschluss 14 Mikrofonanschluss 15 Status LED ...

Страница 171: ...dazu wie folgt vor Schalten Sie den Camcorder aus bevor Sie eine Speicherkarte einlegen oder entnehmen Schieben Sie die Speicherkarte mit den Kontakten nach vorne Richtung Linse 5 zeigend in den microSD Kartenslot 7 bis diese einrastet Um die Speicherkarte wieder zu entnehmen drücken Sie leicht auf die Speicherkarte Die Speicherkarte wird dadurch ein kleines Stück hinaus geschoben sodass Sie diese...

Страница 172: ...schlossene Pfeil auf der Akku fachabdeckung und der geöffnete Pfeil auf dem Kameragehäuse auf einer Höhe liegen Heben Sie jetzt die Akkufachabdeckung nach oben ab Legen Sie die Kontakte des Akkus an die Kontakte im Akkufach 10 Achten Sie darauf dass die Kontaktbezeichnungen und auf dem Akku und im Akkufach 10 überein stimmen Legen Sie den Akku nun vollständig ins Akkufach 10 Achten Sie darauf dass...

Страница 173: ...kufachabdeckung in Pfeilrichtung schieben bis diese fest einrastet und der geschlossene Pfeil auf der Akkufachabdeckung mit dem geschlossenen Pfeil auf dem Kameragehäuse auf einer Höhe liegt Wenn Sie den Akku entnehmen möchten öffnen Sie das Akkufach 10 wie zuvor beschrieben Den Akku können Sie durch Ziehen am Band leicht entnehmen ...

Страница 174: ...o aufzunehmen Drücken Sie diese Taste im Menü um ein Menüpunkt auszuwählen LEDs Die Status LEDs befinden sich oben unten vorne und an der Rückseite des Camcorders Dies ermöglicht Ihnen den Status des Camcorders bei den verschiedensten Montagemöglichkeiten zu erkennen LED Farbe Bedeutung Status LED 3 Grün Betrieb Einschaltvorgang oder Fotoaufnahme Langsam grün blinkend Betrieb WiFi ist aktiviert Sc...

Страница 175: ...ferten USB Kabels in den USB Ladeanschluss 13 des Camcorders und den großen Stecker in einen USB Anschluss Ihres Computers Der Camcorder kann während des Ladevorgangs ausgeschaltet werden Drücken Sie die Ein Aus Modus Taste 2 drei Sekunden um den Camcorder auszuschalten Die Status LED 6 blinkt während des Ladevorgangs orange Wenn der Ladevorgang abgeschlossen ist erlischt die Status LED 6 Manche C...

Страница 176: ...chbaren Steckdose betrieben werden um es in einer Gefahren situation schnell ausstecken zu können Datum Uhrzeit einstellen Stellen Sie das Datum und die Uhrzeit wie folgt ein Drücken Sie die Ein Aus Modus Taste 2 mindestens 3 Sekunden um den Camcorder einzuschalten Der Camcorder startet automatisch im Videomodus Um zum Menü zu gelangen drücken Sie die Ein Aus Modus Taste 2 sechsmal Sollte sich das...

Страница 177: ...n Tag die Stunde und die Minute festlegen Wählen Sie den einzustellenden Wert durch Drücken der Ein Aus Modus Taste 2 aus Den Wert können Sie durch Drücken der Aufnahme Taste 9 schrittweise erhöhen Wählen Sie nach vollständiger Eingabe mit der Ein Aus Modus Taste 2 OK aus Drücken Sie die Aufnahme Taste 9 um Ihre Eingabe zu bestätigen Um das MORE Menü zu verlassen drücken Sie die Ein Aus Modus Tast...

Страница 178: ...enden Informationen an 23 25 21 22 24 Nr Symbol Beschreibung 21 Anzahl der gespeicherten Aufnahmen 22 Akkukapazität 23 Zeigt im Wechsel folgendes an Zeigt das Sichtfeld der Kamera an WIDE bzw ULTRA Zeigt den freien Speicherplatz in Prozent an 24 Zeigt die Option an welche beim Drücken der Aufnahme Taste 9 ausgeführt wird Bei diesem Symbol wird beim Drücken der Aufnahme Taste 9 eine Videoaufnahme g...

Страница 179: ...eaktivieren Bei aktiviertem WiFi können Sie den Camcorder mit der SilverCrest Action Camcorder App steuern Serienbildmodus Verwenden Sie diesen Modus um 10 Serienbilder aufzunehmen Zeitraffermodus Verwenden Sie diesen Modus um Fotos bzw ein Video im Zeitraffer aufzunehmen Das Symbol zeigt auch die aktuellen Einstellungen an Selbstauslöser Verwenden Sie diesen Modus um den Selbstauslöser zu verwend...

Страница 180: ...ie Modi werden wie folgt durchgeschaltet Videomodus Fotomodus WiFi Modus Serienbildmodus Setup Selbstauslöser Zeitraffermodus Sollte sich das Display im abgedunkelten Energiesparmodus befinden drücken Sie einmal die Ein Aus Modus Taste 2 um in den aktiven Modus zu schalten Aufnahme Aufnehmen von Videos Drücken Sie die Ein Aus Modus Taste 2 mindestens 3 Sekunden um den Camcorder einzuschalten Der C...

Страница 181: ...nbildmodus Drücken Sie die Ein Aus Modus Taste 2 mindestens 3 Sekunden um den Camcorder einzuschalten Der Camcorder startet automatisch im Videomodus Um in den Serienbildmodus BURST zu gelangen drücken Sie die Ein Aus Modus Taste 2 dreimal Drücken Sie die Aufnahme Taste 9 um 10 Fotos Serienbild aufzunehmen Während der Speicherung leuchtet die Status LED 3 grün Zeitraffermodus Drücken Sie die Ein A...

Страница 182: ...e oder Tablet PC zu steuern Gehen Sie dazu wie folgt vor Installieren Sie zuerst die SilverCrest Action Camcorder App auf Ihrem Smartphone oder Tablet PC Die App können Sie im Apple App Store und im Google Play Store herunterladen Schalten Sie WiFi am Action Camcorder ein o Drücken Sie die Ein Aus Modus Taste 2 mindestens 3 Sekunden um den Camcorder einzuschalten Der Camcorder startet automatisch ...

Страница 183: ...pp auf Ihrem Smartphone bzw Tablet PC starten und den Action Camcorder damit steuern Das Menü Im Menü können Sie die Einstellungen für Ihre Aufnahmen und des Camcorders anpassen Drücken Sie die Ein Aus Modus Taste 2 mindestens 3 Sekunden um den Camcorder einzuschalten Der Camcorder startet automatisch im Videomodus Um zum Menü zu gelangen drücken Sie die Ein Aus Modus Taste 2 sechsmal Drücken Sie ...

Страница 184: ... ein bzw ausschalten Aufnahmen löschen Speicherkarte formatieren Menü verlassen Camcorder Einstellungen anpassen Displayanzeige um 180 drehen Status LEDs ein bzw ausschalten Displayhelligkeit anpassen Signalton Lautstärke anpassen Automatische Abschaltzeit anpassen Datum Uhrzeit einstellen Eine Fernbedienung nicht im Lieferumfang verbinden Auslieferungszustand wiederherstellen Menü verlassen Aufna...

Страница 185: ...igen Sie Ihre Auswahl mit der Aufnahme Taste 9 Das VIDEO Menü ist nun markiert Drücken Sie die Aufnahme Taste 9 um das VIDEO Menü zu öffnen Drücken Sie die Ein Aus Modus Taste 2 um eine Auswahl zu treffen Folgende Einstellungen stehen zur Verfügung 1080p 1920 x 1080 30 fps 960p 1280 x 960 30 fps 720p 1280 x 720 60 fps Drücken Sie die Aufnahme Taste 9 um eine Auswahl zu bestätigen Um das SETUP Menü...

Страница 186: ...aste 9 um das FOV Menü zu öffnen Drücken Sie die Ein Aus Modus Taste 2 um eine Auswahl zu treffen Folgende Einstellungen stehen zur Verfügung Ultra Weitwinkelobjektiv Weitwinkelobjektiv Drücken Sie die Aufnahme Taste 9 um eine Auswahl zu bestätigen Um das SETUP Menü zu verlassen drücken Sie die Ein Aus Modus Taste 2 mehr fach bis das EXIT Symbol markiert ist und bestätigen Sie mit der Aufnahme Tas...

Страница 187: ...hl zu treffen und bestätigen Sie Ihre Auswahl mit der Aufnahme Taste 9 Folgende Optionen stehen zur Verfügung Wählen Sie in diesem Menü die Einstellung um eine Zeitrafferaufnahme in einem Video aufzunehmen bzw die Einstellung um eine Fotoserie aufzunehmen Wählen Sie in diesem Menü das Zeitintervall für die Aufnahme auf Folgende Einstellungen stehen zur Verfügung 1 SEC nicht bei Fotoserie 3 SEC 5 S...

Страница 188: ...ch bis das UP DOWN Menü markiert ist Drücken Sie die Aufnahme Taste 9 um das UP DOWN Menü zu öffnen Drücken Sie die Ein Aus Modus Taste 2 um eine Auswahl zu treffen Folgende Einstellungen stehen zur Verfügung ON und OFF Bei der Einstellung ON werden die Aufnahmen um 180 gedreht aufgenommen Nutzen Sie die Einstellung OFF um die Aufnahmen nicht zu drehen Drücken Sie die Aufnahme Taste 9 um eine Ausw...

Страница 189: ...ufnahme Taste 9 um das LOOP Menü zu öffnen Drücken Sie die Ein Aus Modus Taste 2 um eine Auswahl zu treffen Folgende Einstellungen stehen zur Verfügung ON und OFF Die Einstellung ON aktiviert und die Einstellung OFF deaktiviert den Endlosaufnahmemodus Drücken Sie die Aufnahme Taste 9 um eine Auswahl zu bestätigen Sobald der Endlosaufnahmemodus aktiviert wurde kann eine Aufnahme direkt mit der Aufn...

Страница 190: ...e Taste 9 um das DIVING Menü zu öffnen Drücken Sie die Ein Aus Modus Taste 2 um eine Auswahl zu treffen Folgende Einstellungen stehen zur Verfügung ON und OFF Die Einstellung ON aktiviert und die Einstellung OFF deaktiviert den Tauchmodus Drücken Sie die Aufnahme Taste 9 um eine Auswahl zu bestätigen Sobald der Tauchmodus aktiviert wurde steht nur noch der Video und Fotomodus zur Verfügung Die and...

Страница 191: ...tnehmen falls eingelegt In diesem Menü können Sie Aufnahmen löschen und die Speicherkarte bzw den internen Speicher formatieren Gehen Sie dazu wie folgt vor Drücken Sie die Ein Aus Modus Taste 2 um das SETUP Menü auszuwählen und bestätigen Sie Ihre Auswahl mit der Aufnahme Taste 9 Drücken Sie die Ein Aus Modus Taste 2 mehrfach bis das DELETE Menü markiert ist Drücken Sie die Aufnahme Taste 9 um da...

Страница 192: ...s Taste 2 um eine Auswahl zu treffen Folgende Optionen stehen zur Verfügung Bestätigen DELETE bzw FORMAT Abbrechen EXIT Drücken Sie die Aufnahme Taste 9 um eine Auswahl zu bestätigen Um das DELETE Menü zu verlassen drücken Sie die Ein Aus Modus Taste 2 mehr fach bis das EXIT Symbol markiert ist und bestätigen Sie mit der Aufnahme Taste 9 Um das SETUP Menü zu verlassen drücken Sie die Ein Aus Modus...

Страница 193: ...cken Sie die Aufnahme Taste 9 um das UP DOWN Menü zu öffnen Drücken Sie die Ein Aus Modus Taste 2 um eine Auswahl zu treffen Folgende Einstellungen stehen zur Verfügung und Wählen Sie die Einstellung um den Auslieferungszustand wiederherzustellen Die Einstellung dreht die Display anzeige um 180 Drücken Sie die Aufnahme Taste 9 um eine Auswahl zu bestätigen Um das MORE Menü zu verlassen drücken Sie...

Страница 194: ... Sie die Aufnahme Taste 9 um das LED Menü zu öffnen Drücken Sie die Ein Aus Modus Taste 2 um eine Auswahl zu treffen Folgende Einstellungen stehen zur Verfügung ON und OFF Die Einstellung ON schaltet die Status LEDs des Camcorders ein und die Einstellung OFF schaltet sie aus Drücken Sie die Aufnahme Taste 9 um eine Auswahl zu bestätigen Um das MORE Menü zu verlassen drücken Sie die Ein Aus Modus T...

Страница 195: ...h bis das BRIGHT Menü markiert ist Drücken Sie die Aufnahme Taste 9 um das BRIGHT Menü zu öffnen Drücken Sie die Ein Aus Modus Taste 2 um eine Auswahl zu treffen Folgende Einstellungen stehen zur Verfügung 100 60 und 30 Sie können die Displayhelligkeit in drei Stufen 100 hell bis 30 dunkel anpassen Drücken Sie die Aufnahme Taste 9 um eine Auswahl zu bestätigen Um das MORE Menü zu verlassen drücken...

Страница 196: ...BEEP Menü markiert ist Drücken Sie die Aufnahme Taste 9 um das BEEP Menü zu öffnen Drücken Sie die Ein Aus Modus Taste 2 um eine Auswahl zu treffen Folgende Einstellungen stehen zur Verfügung Stellt den Signalton auf die höchste Lautstärke Stellt den Signalton auf die mittlere Lautstärke Stellt den Signalton aus Drücken Sie die Aufnahme Taste 9 um eine Auswahl zu bestätigen Um das MORE Menü zu ver...

Страница 197: ...hme Taste 9 Drücken Sie die Ein Aus Modus Taste 2 mehrfach bis das AUTO OFF Menü markiert ist Drücken Sie die Aufnahme Taste 9 um das AUTO OFF Menü zu öffnen Drücken Sie die Ein Aus Modus Taste 2 um eine Auswahl zu treffen Folgende Einstellungen stehen zur Verfügung 1 MIN 3 MIN 5 MIN 10 MIN 30 MIN 60 MIN und OFF Wählen Sie eine Zeit aus wann sich der Camcorder bei Nichtbenutzung automatisch aussch...

Страница 198: ...ie Aufnahme Taste 9 um das TIME Menü zu öffnen Jetzt können Sie nacheinander das Jahr den Monat den Tag die Stunde und die Minute festlegen Den Wert können Sie durch Drücken der Aufnahme Taste 9 schrittweise erhöhen Bestätigen Sie jede Eingabe mit der Ein Aus Modus Taste 2 Wählen Sie nach vollständiger Eingabe mit der Ein Aus Modus Taste 2 OK aus Drücken Sie die Aufnahme Taste 9 um Ihre Eingabe zu...

Страница 199: ...lebepads können Sie über unsere Service Hotline oder per E Mail bestellen siehe Seite 228 Um die Fernbedienung mit dem Camcorder zu verbinden gehen Sie wie folgt vor Drücken Sie die Ein Aus Modus Taste 2 um das MORE Menü auszuwählen und bestätigen Sie Ihre Auswahl mit der Aufnahme Taste 9 Drücken Sie die Ein Aus Modus Taste 2 mehrfach bis das BINDING Menü markiert ist Drücken Sie die Aufnahme Tast...

Страница 200: ...or auf den gewünschten Modus Foto Serienbild Zeitraffermodus bzw Selbstauslöser stellen Stellen Sie den Camcorder auf den Videomodus um über die Fernbedienung Videos aufzunehmen Im Videomodus können über die Fernbedienung durch Drücken der Taste Kamerasymbol zusätzlich auch Fotos aufgenommen werden Die Fernbedienung ist bis zu 60 m Tiefe wasserdicht Verwenden Sie die Fernbedienung zur Gewährleistu...

Страница 201: ...kiert ist Drücken Sie die Aufnahme Taste 9 um das DEFAULT Menü zu öffnen Sie müssen nun das Wiederherstellen des Auslieferungszustandes bestätigen Weiterhin können Sie den Vorgang auch abbrechen Drücken Sie die Ein Aus Modus Taste 2 um eine Auswahl zu treffen Folgende Optionen stehen zur Verfügung Bestätigen Auslieferungszustand wiederherstellen Abbrechen EXIT Drücken Sie die Aufnahme Taste 9 um e...

Страница 202: ...rät muss dazu über einen HDMI Anschluss verfügen Verbinden Sie den Camcorder mit Hilfe des HDMI Kabels mit einem HDMI Anschluss Ihres Fernsehgeräts Stecken Sie dazu den kleinen Stecker des mitgelieferten HDMI Kabels in den HDMI Ausgang 8 des Camcorders und den großen Stecker in einem HDMI Anschluss Ihres Fernsehgeräts Schalten Sie Ihr Fernsehgerät ein und wählen Sie den HDMI Eingang aus an dem Sie...

Страница 203: ...karte Art der Aufnahmen Miniaturansicht der Aufnahmen Modus Hier wird Ihnen der aktuelle Modus angezeigt Aufnahmen werden in der Miniaturansicht angezeigt Aufnahme Video oder Foto wird wiedergegeben Akkukapazität Zeigt die aktuelle Akkukapazität des Camcorders an ...

Страница 204: ...rt auszuwählen Miniaturansicht der Aufnahmen Hier werden Ihnen die Aufnahmen in der Miniaturansicht angezeigt Drücken Sie die Ein Aus Modus Taste 2 um eine Aufnahme zu markieren Die aktuell markierte Aufnahme wird in der Miniaturansicht umrahmt Wurde ein Video markiert wird Ihnen links im Bild zusätzlich die Auflösung angezeigt Drücken Sie die Aufnahme Taste 9 um ein markiertes Video bzw Foto groß...

Страница 205: ... Computer kopiert sind können diese selbstverständlich umbenannt oder bearbeitet werden Camcorder mit einem Computer verbinden Verbinden Sie den Camcorder mit Hilfe des USB Kabels mit einem USB Anschluss Ihres Computers Stecken Sie dazu den kleinen Stecker des mitgelieferten USB Kabels in den USB Ladeanschluss 13 des Camcorders und den großen Stecker in einen USB Anschluss Ihres Computers Schalten...

Страница 206: ...rt ist Öffnen Sie den Arbeitsplatz auf Ihrem Computer und führen einen Doppelklick auf das Laufwerk des Kartenlesegerätes aus Innerhalb des Laufwerks sind alle Aufnahmen in einem Unterordner des Verzeichnisses DCIM abgelegt Kopieren Sie jetzt Aufnahmen vom Camcorder in ein Verzeichnis Ihrer Wahl auf die Festplatte des Computers Schreibschutz des SD Karten Adapters Der SD Karten Adapter ist mit ein...

Страница 207: ...re installieren Die mitgelieferte Software befindet sich auf der beigelegten CD Rom Um die Software installieren zu können muss der Camcorder unbedingt mit dem USB Kabel an den Computer angeschlossen sein Verwenden Sie das USB Kabel um den Camcorder mit Ihrem Computer zu verbinden Schalten Sie den Camcorder dann ein Legen Sie die beigelegte CD Rom in das CD oder DVD Laufwerk Ihres Computers ein Di...

Страница 208: ...für Bilder und Videos festlegen bzw nachträglich die Sprache der Software verändern Klicken Sie im Hauptfenster Options Optionen Preferences Voreinstellungen Im ersten Feld können Sie den Speicherort für Bilder und Videos festlegen Bestätigen Sie dies durch Klicken auf OK oder Wählen Sie eine Sprache aus der Liste aus und bestätigen Sie dann durch Klicken auf OK Die Software meldet dass ein Neusta...

Страница 209: ...ünferreihe am oberen Rand des zu bewertenden Objektes Filmstreifen um die Aufnahme zu bewerten Klicken Sie auf das Infosymbol um weitere Informationen der Aufnahme zu erhalten Hier können Sie einen kurzen Kommentar hinzufügen welcher dann auch für die Schlagwortsuche verwendet werden kann Videoaufnahmen erkennen Sie im Vorschaufenster an das Wiedergabe und Schnittsymbol Um eine Aufnahme in einem n...

Страница 210: ... sortieren Klicken Sie auf das Kalendersymbol Es erscheinen Ordner der verschiedenen Jahre Nachdem auf einem Ordner ein Doppelklick ausgeführt wurde öffnet sich eine Monatsübersicht nach einem weiteren Doppelklick die Tagesübersicht des entsprechenden Monats Klicken Sie auf den Pfeil nach oben um auf die übergeordnete Ebene zu springen Die Pfeile nach links und rechts dienen zum Durchblättern der ...

Страница 211: ...Ihren Zugang bei YouTube hoch Hochladen auf Facebook Lädt Videoaufnahmen auf Ihren Zugang bei Facebook hoch Fotoalbum Erzeugt ein Fotoalbum aus Ihren Fotos Albumseite Erzeugt eine Seite z B Einladungskarte aus Ihren Fotos Das Symbol mit dem Titel YouKu verweist auf ein asiatisches Videoportal und ist für die Nutzung in europäischen Ländern nicht geeignet Aufnahmen importieren Um die Aufnahmen zu a...

Страница 212: ...Videoclips mit gleicher Auflösung und Bitrate zusammengeführt werden können Klicken Sie auf das Symbol Video Zusammenfügung um die Zeitleiste für die Videobearbeitung anzuzeigen Ziehen Sie alle gewünschten Videoclips mit gehaltener linker Maustaste in die Zeitleiste am unteren Fensterrand Klicken Sie auf die Schaltfläche Nächste um den Prozess zu starten Geben Sie den Speicherpfad auf Ihrem Comput...

Страница 213: ...e alle gewünschten Videoclips mit gehaltener linker Maustaste in die Zeitleiste am unteren Fensterrand Klicken Sie auf die Schaltfläche Nächste um den Prozess zu starten Wählen Sie das Laufwerk bzw den Pfad auf der Festplatte aus und klicken Sie dann auf OK Um diese Funktion nutzen zu können muss Ihr Computer über ein DVD Laufwerk verfügen mit dem eines der folgenden Medien beschrieben werden kann...

Страница 214: ...en Führen Sie das Schneiden durch indem Sie auf das Bestätigungssymbol klicken Der Schnitt wird ausgeführt und ein neuer Clip ohne den Ausschnitt erzeugt Der neue Clip wird im Ordner Eigene Kreationen gespeichert Hochladen auf YouTube Klicken Sie auf das Symbol Hochladen auf YouTube Ziehen Sie die gewünschte Videoaufnahme mit gehaltener linker Maustaste in die Leiste am unteren Fensterrand Klicken...

Страница 215: ...Klicken Sie auf Nächste Die Anwendung ArcSoft Print Creations startet automatisch Wählen Sie in der Anwendung eine Kategorie und dann eine Vorlage Führen Sie dazu einen Doppelklick auf die jeweilige Vorlage aus Albumseite Mit dieser Funktion können Sie aus einem oder mehreren Fotos eine Albumseite erstellen Dafür stehen zahlreiche Vorlagen zur Verfügung Klicken Sie auf das Symbol Albumseite Ziehen...

Страница 216: ... die Verwendung des Camcorder zum Beispiel bei Unterwasseraufnahmen oder beim Wassersport Den Camcorder können Sie wie gewohnt auch im wasserdichten Gehäuse bedienen Entfernen Sie vor der Aufnahme die Linsenabdeckung vom wasserdichten Gehäuse Legen Sie den Camcorder wie folgt in das wasserdichte Gehäuse ein Öffnen Sie die Verriegelung und danach den Verschluss Öffnen Sie das wasserdichte Gehäuse u...

Страница 217: ...erschluss und dann die Verriegelung Bitte beachten Sie die folgenden Punkte wenn Sie den Camcorder unter Wasser oder beim Wassersport nutzen Stellen Sie sicher dass das wasserdichte Gehäuse keine Beschädigungen aufweist Überprüfen Sie dass der Verschluss des wasserdichten Gehäuses richtig verschlossen ist und sich kein Schmutz oder Sand zwischen der Gummidichtung und dem Gehäuse befindet Die Verri...

Страница 218: ...rationen unter Wasser Es besteht die Möglichkeit dass sich dadurch das wasserdichte Gehäuse öffnet Reinigung nach Unterwasserbetrieb Das wasserdichte Gehäuse muss nach jedem Unterwassereinsatz gereinigt werden Stellen Sie sicher dass das wasserdichte Gehäuse keine Beschädigungen aufweist Nach der Verwendung unter Wasser reinigen Sie das wasserdichte Gehäuse mit Leitungswasser Tauchen Sie das wasse...

Страница 219: ...ät unter Wasser bzw beim Wassersport einsetzen möchten Die offene Rückwand kann verwendet werden wenn Videos mit Ton aufgenommen werden sollen Bitte beachten Sie jedoch dass das Gehäuse mit der offenen Rückwand nicht wasserdicht ist wasserdichte Rückwand inkl Adapter offene Rückwand Um die Rückwand auszutauschen gehen Sie wie folgt vor Öffnen Sie die Verriegelung und danach den Verschluss ...

Страница 220: ...Adapter an das wasserdichte Gehäuse und ein weiterer Adapter an der wasserdichten Rückwand befestigt Diese Adapter ermöglichen die Befestigung des wasserdichten Gehäuses in Verbindung mit dem weiteren Zubehör Benötigen Sie den Adapter an der offenen Rückwand können Sie die Adapter lösen und an der gewünschten Position befestigen Gehen Sie dazu wie folgt vor Entfernen Sie den gewünschten Adapter in...

Страница 221: ...chen anzubringen Dem Camcorder liegt je ein Klettband mit und ohne Lasche bei Befestigen Sie zum Beispiel das Klettband mit Lasche wie folgt Ziehen Sie das Klettband durch die Führungsschlitze des Adapters Achten Sie darauf dass die glatte Seite des Klettbands innen liegt Führen Sie dann das Klettband durch die Lasche und befestigen Sie das Ende des Klettbandes wie in der folgenden Abbildung gezei...

Страница 222: ...ung in den Adapter bis die Schwenkhalterung einrastet Befestigen Sie den Entriegelungsschutz mit der Feststellschraube Der Entriegelungsschutz verhindert ein unbeabsichtigtes Lösen vom wasserdichten Gehäuse Nun können Sie die Schwenkhalterung mit einem Klebesockel befestigen Schieben Sie dazu die Schwenkhalterung in den Klebesockel bis die Schwenkhalterung einrastet Um den Klebesockel am Montageor...

Страница 223: ...e Feststellschraube vollständig und entfernen Sie danach den Entriegelungsschutz Drücken Sie die Klammer an der Schwenkhalterung um die Schwenkhalterung vom wasserdichten Gehäuse abziehen zu können Um ein optimales Klebeergebnis zu erzielen muss die gesäuberte Montagefläche staubfrei sowie öl und fettfrei sein Klebepad austauschen Dem Camcorder liegen drei Ersatzklebepads bei Sollte die Klebewirku...

Страница 224: ... Seite der Klammer vom Unterteil entfernen können Drehen Sie das Unterteil zur Seite Legen Sie das Oberteil um eine passende Stange und setzen Sie das Unterteil wieder auf Setzen Sie nun wieder die Schraube in das Unterteil ein Befestigen Sie die Halterung an der Stange indem Sie die Schrauben wieder anziehen Nun können Sie den Camcorder in Verbindung mit dem wasserdichten Gehäuse und der Schwenkh...

Страница 225: ...der folgenden Tabelle lösen Falls ein Fehler nach Durcharbeiten dieser Ansätze fortbesteht wenden Sie sich an unsere Service Hotline siehe Seite 228 Führen Sie keine eigenhändigen Reparaturarbeiten durch Das Gehäuse des Camcorders darf niemals geöffnet werden es befinden sich keine zu wartenden Teile im Inneren Fehler Lösung Der Camcorder lässt sich nicht einschalten Akku ist leer Laden Sie den Ak...

Страница 226: ...tte prüfen Sie jedoch vorher ob sich die offene Rückwand gelbe Dichtung für Ihre Aktivität eignet Der Ton der Videoaufnahme ist zu leise Es wird ein externes Mikrofon verwendet Richten Sie das externe Mikrofon richtig aus Die Videoaufnahme hat Bild und Tonstörungen Die verwendete Speicherkarte ist zu langsam Verwenden Sie nur Speicherkarten der Speed Class 4 oder schneller ...

Страница 227: ...den Sie zur Reinigung ein weiches trockenes Tuch Verwenden Sie keine Reinigungs oder Lösungsmittel oder gar Verdünner da sie in das Gehäuse gelangen und dauerhafte Schäden verursachen können Beachten Sie auch die Hinweise zur Reinigung nach Unterwasserbetrieb auf Seite 216 Umwelthinweise und Entsorgungsangaben Die mit diesem Symbol gekennzeichneten Geräte unterliegen der europäischen Richtlinie 20...

Страница 228: ...ht den grundlegenden Anforderungen und den anderen relevanten Vorschriften der EMV Richtlinie 2004 108 EC der R TTE Richtlinie 1999 5 EC der Richtlinie für Niederspannungsgeräte 2006 95 EC sowie der RoHS Richtlinie 2011 65 EU Die dazugehörige Konformitätserklärung finden Sie am Ende dieser Anleitung Hinweise zu Garantie und Serviceabwicklung Garantie der TARGA GmbH Sehr geehrte Kundin sehr geehrte...

Страница 229: ...itung aufgeführten Anweisungen genau einzuhalten Verwendungszwecke und Handlungen von denen in der Bedienungsanleitung abgeraten oder vor denen gewarnt wird sind unbedingt zu vermeiden Das Produkt ist nur für den privaten und nicht für den gewerblichen Gebrauch bestimmt Bei missbräuchlicher und unsachgemäßer Behandlung Gewaltanwendung und bei Eingriffen die nicht von unserer autorisierten Service ...

Страница 230: ...1 79 57 60 09 E Mail service AT targa online com Telefon 0041 0 44 511 82 91 E Mail service CH targa online com IAN 101051 Hersteller Bitte beachten Sie dass die folgende Anschrift keine Serviceanschrift ist Kontaktieren Sie zunächst die oben benannte Servicestelle TARGA GmbH Coesterweg 45 59494 SOEST DEUTSCHLAND GERMANY ...

Страница 231: ...SilverCrest SCW 5 A1 Deutsch 229 ...

Страница 232: ......

Отзывы: