background image

15

Troubleshooting

SWW 1500 A1

GB

IE

Troubleshooting

In this section you will receive important information for malfunction localization 
and remedies.

 WARNING

Observe the following safety information to avoid danger and property damage:

Repairs to electronic devices may only be carried out by specialists who 


have been trained by the manufacturer. Considerable danger to the con-
sumer and damage to the device can occur as a result of incorrect repairs.

Malfunction causes and remedies

The following table will help with localizing and remedying minor malfunctions:

Defect

Possible cause

Solution

The device will 
not switch on

The mains plug is not inserted.

Insert the plug into the mains power 
socket.

The mains power socket is not 
providing power

Check the house fuses

The device is 
not providing 
heat.

The main switch POWER 

6

 is 

not switched on.
POWER/MODE 

3

 button and/

or 

12

 has not been activated.

The heating element is defective.

Switch on the main switch POWER 

6

.

Activate the POWER/MODE 

3


and/or 

12

 button.

Get in touch with customer service.

In the display 


appears 

the indicator 

The heating element 

9

 is exces-

sively overheated

Switch off  the device at the main 
switch POWER 

6

 and pull out the 

mains plug.
Allow the device to cool for a few 
minutes.

In the display 


appears 

the indicator 

Malfunction of the integrated 
temperature sensor

Switch the device off  and on at the 
main switch POWER 

6

.

If the indicator continues to appear 
get in touch with the customer service 
department.

NOTICE

If you cannot solve the problem with the aforementioned methods please 


contact customer service.


Содержание 66900

Страница 1: ... GMBH BURGSTRASSE 21 D 44867 BOCHUM www kompernass com ID Nr SWW 1500 A1 05 11 V3 IAN 66900 Wave Heater Operating instructions CV_66900_SWW1500A1_LB6 indd 1 3 CV_66900_SWW1500A1_LB6 indd 1 3 25 07 2011 11 15 13 Uhr 25 07 2011 11 15 13 Uhr ...

Страница 2: ...SWW 1500 A1 7 6 9 0 8 q w r e t 1 2 3 4 5 CV_66900_SWW1500A1_LB6 indd 4 6 CV_66900_SWW1500A1_LB6 indd 4 6 25 07 2011 11 15 14 Uhr 25 07 2011 11 15 14 Uhr ...

Страница 3: ... Inserting batteries into the remote control 8 Operating components 8 Assembly 9 Stationary assembly 9 Wall mounting 9 Handling and operation 11 Switching the device on and off 11 Heating operation 11 Setting the nominal temperature 12 Programming the switch off time 12 Programming the switch on time 12 Overheating protection 13 Frost protection function 13 Topple over protection 13 Cleaning 14 Stor...

Страница 4: ...is documentation is copyright protected Any copying and or reproduction wholly or partially including reproduction of the illustrations also in a modified format is only permitted with written consent from the manufacturer Limited liability All technical information data and instructions for the installation connection and operation contained in these operating instructions correspond to the latest...

Страница 5: ...or serious physical injury to people WARNING A warning of this danger level signifies a possible dangerous situation If the dangerous situation is not avoided it could lead to physical injuries Observe the instructions in this warning to avoid personal injuries CAUTION A warning of this danger level signifies possible property damage If the situation is not avoided it could lead to property damage O...

Страница 6: ...safety information regarding the han dling of the device This device complies with the statutory safety regulations Incorrect usage can lead to personal injury and property damage Do not cover the device Covering the device can lead to overheating and thus result in a fire Risks from electrical current DANGER Risk of potentially fatal electrical current Contact with wires or components that are und...

Страница 7: ...for the user In addition warranty claims become void A repair to the device during the warranty period may only be carried out by a customer service department authorised by the manufacturer otherwise no additional warranty claims can be considered for subsequent damages Defective components may only be replaced with original replacement parts Only by using original replacement parts can it be gua...

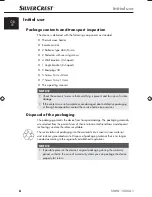
Страница 8: ...ged due to defective packaging or through transportation contact the service hotline see service Disposal of the packaging The packaging protects the device from transport damage The packaging materials are selected from the point of view of their environmental friendliness and disposal technology and are therefore recyclable The recirculation of packaging into the material circuit saves on raw ma...

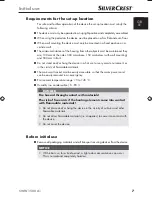
Страница 9: ...e in a hot wet or very moist environment or in the vicinity of flammable materials The mains wall socket must be easily accessible so that the mains power cord can be easily removed in an emergency Environment temperature range 5 to 45 C Humidity no condensation 5 90 DANGER Fire hazard through contact with materials The risk of fire exists if the heating elements come into contact with flammable mate...

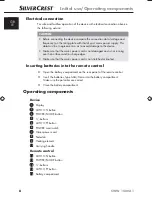
Страница 10: ...t running over hot surfaces and or sharp edges Make sure that the mains power cord is not stretched or knoted Inserting batteries into the remote control Open the battery compartment on the rear panel of the remote control Insert the batteries type AAA Micro into the battery compartment Make sure the polarities are correct Close the battery compartment Operating components Device Display 2 AUTO ON...

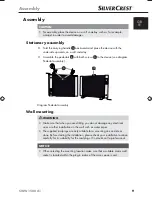
Страница 11: ...10 A 8 Diagram Pedestal assembly Wall mounting WARNING Make sure that when you are drilling you do not damage any electrical wires or other installations in the wall such as water pipes The supplied rawlplugs are only suitable for a mounting on concrete or stone Before starting the installation please check your installation location carefully for its suitability for the rawlplugs If in doubt call...

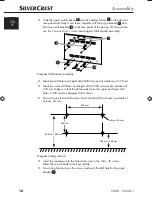
Страница 12: ...m and at a distance of 330 mm Mark two more drill holes at a height of 250 300 mm and at a distance of 330 mm Make sure that the distance between the upper and lower drill holes is 350 mm see diagram Drill scheme Now with an electric drill and an 8 mm drill bit drill four holes to a depth of at least 40 mm 330 mm ø 8 mm 40 mm 600 mm 650 mm 350 mm 250 mm 300 mm Diagram Drilling scheme Insert the ra...

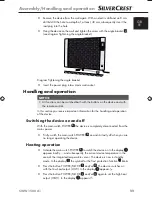
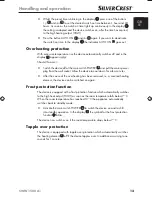
Страница 13: ...formation for the handling and operation of the device Switching the device on and off With the main switch POWER 6 the device is completely disconnected from the mains power Firstly switch the main switch POWER 6 on and or lastly off when you are no longer operating the device Heating operation Activate the main switch POWER 6 to switch the device on In the display appears briefly and subsequently t...

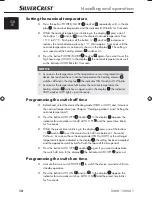
Страница 14: ...ow the nominal temperature the heating element 9 switches on again and in the display the indicator HIGH and or LOW lights up continuously Programming the switch off time Beforehand select the desired heating mode HIGH or LOW and if desired the nominal temperature see Chapter Heating operation and Setting the nominal temperature Press the button AUTO OFF 5 and or 14 In the display appears the indic...

Страница 15: ...er plug from the wall socket Allow the device to cool down for a few minutes After the cause of the overheating has been removed i e a covered heating element the device can be switched on again Frost protection function The device is equipped with a frost protection function which automatically switches to the high heat output HIGH as soon as the room temperature falls below 7 C When the room tem...

Страница 16: ... an extended period of time Store the device in a dry environment Disposal Disposal of the device Do not dispose of this device in your normal domestic waste This product is subject to the European directive 2002 96 EC WEEE Waste Electrical and Electronic Equipment Dispose of the device through an approved disposal centre or at your community waste facility Observe the currently applicable regulat...

Страница 17: ...wer socket The mains power socket is not providing power Check the house fuses The device is not providing heat The main switch POWER 6 is not switched on POWER MODE 3 button and or 12 has not been activated The heating element is defective Switch on the main switch POWER 6 Activate the POWER MODE 3 and or 12 button Get in touch with customer service In the display appears the indicator The heatin...

Страница 18: ...h Environmental temperature 5 to 45 C Humidity no condensation 5 to 90 Dimensions incl pedestal W x H x D approx 75 x 56 x 22 cm Weight approx 6 kg Information regarding the EG conformity declaration This device conforms with regard to compliance with the basic requirements and other relevant provisions of the low voltage directive 2006 95 EC and the electromagnetic compatibility directive 2004 10...

Страница 19: ...commercial use The warranty is void in the case of abusive and improper handling use of force and internal tampering not carried out by our authorised service branch Your statutory rights are not restricted in any way by this warranty The warranty period is not extended by repairs made under the warranty This applies also to replaced and repaired parts Damages and defects extant at the time of pur...

Страница 20: ......

Отзывы: