


2
OPERATION
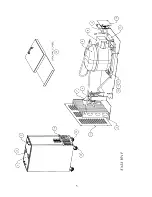
Initial Start Up
After satisfying the installation requirements, the freezer is ready to operate. The unit will start when the power cord is connected to
a live electrical receptacle. If the Compressor and Condenser Fan are not running when the unit is initially connected to power,
check to make sure that the Temperature Control is not set to the ‘off’ position. Allow the unit to run a minimum of two (2) hours
before loading it with product.
Temperature Control
The Temperature Control, located behind the service panel in the rear of the cabinet, comes set at the midpoint position, #4, which
will maintain an average cabinet temperature of about 0 Deg F. To obtain cooler temperatures turn the Temperature Control
clockwise and vice versa. Allow the unit a minimum of six hours to fully respond to a control setting adjustment if the product is in
the cabinet.
Defrost
The Silver King freezer is a manual defrost unit. The unit should be defrosted whenever the walls accumulate a frost layer that is
1/4 inch thick. To defrost the unit, either turn the Temperature Control stem to the ‘off’ position (fully counterclockwise) or disconnect
the Power Cord from the electrical receptacle, and remove or open the Lid Assembly. After the frost has melted or come loose from
the walls, wipe out the cabinet interior. Do not attempt to scrape or chisel off the frost as you could do irreparable damage to the
unit.
MAINTENANCE
Preventative maintenance is minimal although these few steps are very important to continued operation and maximizing the life of
the appliance.
Cabinet Surfaces
The interior and exterior surfaces are stainless steel and should be cleaned periodically with a solution of warm water and a mild
soap, rinsed with clean water and wiped dry. A good stainless steel cleaner can also be used. Should a surface become stained or
discolored, do not attempt to clean with an abrasive cleaner or scouring pad. Use a soft cleaner and rub with the grain of the metal
to avoid scratching the surface. Always rinse and dry afterwards. Do not use chlorinated cleaners on the stainless steel.
Condenser
Periodically, dust accumulated on the Condenser should be removed. First, disconnect the unit from the power supply. Remove
the service panel to expose the Condenser. Remove the accumulated dust by vacuuming or blowing air through the coil. This
procedure will save on Compressor running time (electrical costs) and also extend the life of the Compressor.
Casters
Retighten the Casters to the base of the unit regularly to prevent damage to the base of the cabinet.
MODEL
SERIAL NO.
DATE INSTALLED
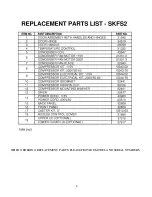
Содержание SKFS2
Страница 6: ...5 ...
Страница 7: ...6 WHEN ORDERING REPLACEMENT PARTS PLEASE PROVIDE MODEL AND SERIAL NUMBERS ...
Страница 8: ...7 ...


