background image

13.2

Barometer Mode -

Pressure History Graph for the Last 24 Hours

Pressure History Graph

!

!

!

!

!

!

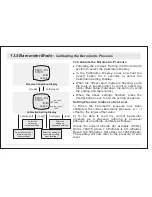
The ADC is equipped with a barometric

pressure memory function. It records the last
24 hours barometric pressure readings, and
it can display them by bar-graph.

In Barometer Mode, press the [set] button to

select the Pressure History Graph Display.

While in the Temperature History Graph

Display, the right most bar will start flashing.

The right most bar represents the current

temperature (0 hour), while the other bars
represent the pressure records of the last 24
hours. Each pressure record is taken at the
hour (i.e 12:00, 1:00 and 2:00 ... ).

To browse the pressure record at different

times, press the [set] button to scroll the
record backward (from the current record to
the -24 hour record) or press the [reset]
button to scroll the record forward (from the
-24 hour record to the current record).

Press the [mode] button once to exit the
Pressure History Graph Display.

Barometer Mode

Pressure History Graph Display

[set]

[set]

hold [set]

[mode]

[reset]

hold [reset]

BAR

hPa

1-00

1023.2

flashing bar
represents
the selected record
(graphical bar)

0 hour (current)

-24 hour

the time that
took this record

the pressure
of the selected
record (numeric)

Select the record by

backward scrolling

from current to -24 hour

(1 hour per step)

Select the record by

forward scrolling from

-24 hour to current

(1 hour per step)

Select the lap time by

backward scrolling

(fast scrolling)

Select the lap time by

forward scrolling

(fast scrolling)

BARO hPa

1001.3

Содержание ADC Pro

Страница 1: ...User Manual 06MAR 12 38 28 THU 28 0 C 8 88 2 ...

Страница 2: ...and is ideal for conditions you endure during outdoor activities such as hiking climbing hunting kayaking skiing and racing Every ADC also includes current time daily alarm chronograph and race timer functions ADCs are equipped with a propeller and other precise sensors to measure outdoor conditions WARNING Make sure that you fully understand the functions and limitations of the ADC before relying...

Страница 3: ...o extreme heat or extreme cold for an unreasonable amount of time Avoid severe impacts to the ADC Store the ADC in a dry place when it is not in use Clean the ADC with a soft moistened cloth occasionally D O N O T e x p o s e t h e A D C t o s t r o n g chemicals such as gasoline and alcohol as they will damage this product ...

Страница 4: ...end data from this product to PC via this port Detachable Belt Clip mode North Orientation blade RED Propeller blades set light reset Buttons Display 1st row 2nd row 3rd row 4nd row 06MAR 12 38 28 THU 06MAR 12 38 28 THU 28 0 C 8 88 2 28 0 C 8 88 2 ...

Страница 5: ...ton to select the Daily Alarm Display In Daily Alarm Mode Press the set button to switch the daily alarm between ON and OFF In Chronograph Mode and Race Timer Mode Press the set button to start or stop the counting In Lap Time Recall Mode Press the set button to select the available lap time s In setting displays press the set button to scroll the through the settings 4 0 Button Operation Summary ...

Страница 6: ...mer to target time In Lap Time Recall Mode Press the reset button to select the available lap time s In setting displays press the reset button to scroll the through the settings In any functional mode display press the light button once to turn ON the EL backlight for about 3 seconds 4 1 Button Operation Summary 2 light reset Note The button operations are summarized in the following paragraphs f...

Страница 7: ...ode Time Function Major Functional Modes Sensor Function set mode mode mode mode mode mode mode mode mode mode CHRONO GRAPH RACE TIMER DAILY ALARM 00 0 00 00 0 10 00 12 00 BARO hPa 18 3 8 3 TEMP C 8 18 2 13 2 28 3 1001 3 21 3 ON DATALOG r001 0023 2 10 30 06 MAR 2003 06MAR 28 0 C 8 88 2 12 38 28 THU ALTITUDE m HUMIDITY 734 80 44 0 62 2 8 8 C C 144 88 2 H INX 50 2 C 8 WIND mph ...

Страница 8: ...w for more detail on the means of the weather forecast symbols The indicator appears on the 1st row of the display The altitude at the current location appears on the 2nd row of the display The indicator appears on the 1st row of the display The current barometric pressure appears on the 2nd row of the display ALTITUDE BAROMETER Current Time Mode Functional Displays 5 Seconds 5 Seconds 5 Seconds 0...

Страница 9: ...nd to zero If one of the settings minute hour year month date starts flash press the set or reset button to scroll through the setting hold down the button to scroll the setting at a faster pace When the above settings finished press and hold the mode button for about 2 seconds to exit the setting sequence 12 24 12 24 second year 12 24 minute month date second hour hold mode hold mode mode 12 chan...

Страница 10: ... generally indicates slightly cloudy weather ahead A Cloudy symbol generally indicates deteriorating weather or cloudy weather ahead A Rainy symbol generally indicates adverse weather or rainy weather ahead A Stormy symbol generally indicates stormy weather ahead 06MAR 12 38 28 THU Weather Forecast Display Weather Forecast Symbols Sunny Partial Cloudy Cloudy Rainy Stormy Current Time Mode Note Whe...

Страница 11: ...alarm between ON and OFF press the set button once When the daily alarm is ON the Alarm ON Indicator appear otherwise it is OFF When the daily alarm is ON the product will beep at the predefined alarm time for about 30 seconds When the beep sounds it can be stopped prematurely by pressing any of the buttons except the light button DAILY ALARM ON OFF DAILY ALARM 12 00 ON DAILY ALARM OFF Alarm ON Di...

Страница 12: ...d hold the mode button for about 2 seconds to select the setting display the minute digits will start flashing In setting display press the mode button to move the setting between minute and hour settings When one of the settings minute and hour digits start to flash on the display press the set or reset button to scroll through the setting hold down the button to scroll the setting at a faster pa...

Страница 13: ...1 Elapsed time 2 Accumulative elapsed time 3 Lap time In Chronograph Mode the display will show the following 1 The mode indicator appears on the 1st and 2nd row of the display 2 The chronograph time hours minutes seconds appears on the 3rd row of the display 3 The lap number and chronograph time 1 100 second appears on 4th row of the display The display shows the Zero display if the product or th...

Страница 14: ...he reset button to display Lap Time Display for 10 seconds When the Lap Time is displaying the chronograph remains counting in the background To reset the chronograph to be ready for a new operation press the reset button once when the chronograph has stopped counting The display will then return to Zero Display CHRONO GRAPH 00 0 00 00 CHRONO RUNNING 01 0 00 00 CHRONO RUNNING 01 1L 0 00 00 CHRONO ...

Страница 15: ...de indicator appears on the 1st and 2nd row of the display 2 T h e l a p t i m e h o u r s m i n u t e s seconds appears on the 3rd row of the display 3 The lap number and lap time 1 100 second appears on the 4th row of the display CHRONO RECALL CHRONO STOP CHRONO RECALL 20 20 0 00 00 0 02 02 Select the lap time by backward scrolling 1 lap per step Select the lap time by forward scrolling 1 lap pe...

Страница 16: ...e the display will show the following 1 The mode indicator appears on the 1st row of the display 2 The target time hours minutes seconds appears on the 3rd row of the display The maximum counting range of the Race Timer is 99 hours 59 minutes and 59 seconds RACE TIMER beep beep 3 Reset to preset target time time set set set set set set reset 0 10 20 30 40 2 Multi phases down counting 1 Single phas...

Страница 17: ...ton to scroll at a faster pace When the setting finished press and hold the mode button for about 2 seconds to exit the setting sequence The setting display will change to Race Timer Mode automatically if no key stoke has been activated for about 1 minute Race Timer Mode RACE TIMER 0 10 00 scroll the setting by decrement of 1 scroll the setting by increment of 1 Minute Hour Second hold mode hold m...

Страница 18: ...evious Setting the Race Timer Mode section for more detail on how to set the Racer Timer Mode At the last 10 minutes the Alarm will beep once for every minute At the last 10 seconds the Alarm will beep once for every second At zero the Alarm will beep for about 2 seconds stop counting Counting Display Stop Counting Display set set reset 29 59 set the target time to 30 minute beeps Stop Counting Di...

Страница 19: ...e and date that data was logged The ADC can log data automatically or manually Check the Automatic Data Log section below for more detail on how to log data automatically To log a data manually press and hold the set button for about 2 seconds in one of the functional modes Temperature Wind Speed Barometer Altimeter and Relative Humidity Mode When two beeps sounds the record is logged You can log ...

Страница 20: ...nger until the propeller blades are entirely exposed and it is not sheltered by the case Select Wind Speed Mode Point the blades directly towards the wind direction and make sure that the blades rotate freely When the wind passes through the propeller the blades rotate The ADC starts to measure and shows the current average and maximum wind speed readings After a wind speed measurement rotate the ...

Страница 21: ... wind speed is higher than the predefined level 4 Wind Speed Display Lock This feature can lock the wind speed display for 5 seconds 5 Time Span Setting This feature defines the time for the Average Wind Speed Calculation Check the coming section for more detail on the setting 6 Manual Data Log The function to log the sensor functional mode readings that is currently obtained from sensors Beaufort...

Страница 22: ...average wind speed appears on the 4th row of the display This ADC can display wind speed in the following wind speed units 1 Km h Kilometer per hour 2 mph mile per hour 3 feet s feet per second 4 m s meter per second and 5 Knots In Wind Speed Mode press the reset button to change the wind speed unit following the adjacent diagram WIND Wind Speed Mode Wind Speed Unit Selection Sequence 18 3 8 3 21 ...

Страница 23: ...he display One exhibited bar is equivalent to one Beaufort Scale force number For example if there are 5 bars on the display the average wind speed is equivalent to force number 5 of Beaufort Scale The ADC displays the Beaufort Scale force number from 0 to 10 if the average wind speed is higher than force number 10 the ADC will display 10 Wind Speed Mode What is Beaufort Scale 11 3 Wind Speed Mode...

Страница 24: ...Wind Speed Mode Beaufort Scale Table 11 4 ...

Страница 25: ...about seconds to confirm the reset the maximum wind speed will reset to zero To abort the reset press and hold the mode button for 2 seconds in the display YES NO Wind Speed Mode Wind Speed Mode Display Locked Maximum Wind Speed Reset Display NO Maximum Wind Speed Reset Display Yes 18 3 8 3 18 3 8 3 RESET MAX WIND NO RESET MAX WIND YES set hold reset hold mode abort the reset hold mode confirm the...

Страница 26: ...o or larger than the preset wind speed level the ADC will start beeping for about 5 seconds After the first beeping the ADC will beep again for every 2 minutes if the current wind speed holds above the preset level The above repeated alarm will stop unless the wind speed again exceeds the preset level or the wind speed alarm is set to OFF 11 6 The Wind Speed Alarm Range 0 Wind Speed Time Below Ala...

Страница 27: ...et or reset button to scroll the target time span for average wind speed calculation by 1 hold down the button to scroll the setting faster Press and hold the mode button for about 2 seconds to exit the setting sequence The setting display will change to Wind Mode automatically if no key stoke has been activated for about 1 minute 11 7 Wind Speed Mode 18 3 8 3 WIND mph 21 3 Wind Speed Alarm Time S...

Страница 28: ... entirely exposed to air Tilt the ADC until the propeller blades are parallel to the horizon and the propeller blades rotate freely The red colored blade of the propeller will points to the magnetic north pole Make use of the reference points marked on the product to check the direction of the target object The ADC measures ambient temperature wind speed and it also tells compass directions One of...

Страница 29: ...e T h e w i n d e f f e c t o n temperature Check the WindChill Temperature section below for more detail on Wind Chill Temperature 3 The Temperature History Graph The temperature memory for the last 24 hours 4 The Wind Chill Temperature Alarm alarm to alert the user when the current Wind Chill Temperature is lower than the predefined limit 5 The Calibration The process to calibrate the temperatur...

Страница 30: ...ator and the temperature unit appear on the 1st row of the display 2 The Current Temperature appears on the 3rd row of the display 3 The Current and Minimum Wind Chill Temperature appear on the 4th row of the display The ADC can display temperature in the following units 1 Degree Celsius C 2 Degree Fahrenheit F In Temperature Mode press the reset button once to change the temperature unit See adja...

Страница 31: ... is 9 4 degrees Celsius and the wind blows at 80 5 km per hour People will feel as if the temperature is 23 3 degrees Celsius In this case the wind chill temperature is 23 3 degrees Celsius The ADC is also equipped with wind chill temperature functions including displaying current and minimum wind chill temperature and having a wind chill temperature alarm Wind chill temperature is the effect that...

Страница 32: ...r about 2 seconds to confirm the reset the minimum wind chill temperature will reset to zero To abort the reset press and hold the mode button for 2 seconds in the display YE NO YES NO S Temperature Mode Maximum Wind Speed Reset Display NO Maximum Wind Speed Reset Display Yes RESET MIN W CHILL NO RESET MIN W CHILL YES hold reset TEMP C 8 18 2 13 2 18 2 13 2 18 2 13 2 28 3 set Note This diagram ill...

Страница 33: ...rature record at different times press the set button to select the record by backward scrolling or reset button to select time by forward scrolling hold down the button to scroll the setting at a faster pace Press the mode button once to exit the Pressure History Graph Display 12 4 Temperature Mode Temperature History Graph Display set set hold set mode reset hold reset TEMP C 8 18 2 13 2 28 3 TE...

Страница 34: ...or lower than the preset wind chill temperature level the ADC starts beeping for about 5 seconds After the first beeping the ADC will beep again for every 2 minutes if the current wind chill temperature holds at or below the preset value The above repeated alarm will stop unless the wind chill temperature equals or drops below the preset value or the wind chill temperature alarm is set to OFF The ...

Страница 35: ...elow for more detail on temperature calibration When the temperature digits are flashing press the reset button to scroll through to select target wind chill temperature level hold down the button to scroll the setting at a faster pace or press the set button to select the between wind chill temperature alarm ON and OFF When the above settings finished press and hold the mode button for about 2 se...

Страница 36: ...gh to select target offset value hold down the button to scroll the setting at a faster pace When the above settings finished press the mode button once to exit the setting sequence 1 When the temperature has been calibrated the ADC will offset the current temperature by the target offset value For example If the offset value is 2 and the current temperature is 26 degrees C the ADC will display 28...

Страница 37: ...ming weather is stormy Check the coming Storm Alarm section for more detail on the Storm Alarm 3 Calibration The process to calibrate the Barometric Pressure reading 4 Manual Data Log The function to log the sensor functional mode readings that are currently obtained from sensors Barometer Mode Barometer Mode Function 13 0 24 Hour Pressure History Graph Stormy Alarm Barometer Mode Functions Pressu...

Страница 38: ...rd row of the display The ADC can display Barometric Pressure in the following units 1 Hecto Pascal hPa 2 milli bar mb 3 Inches of mercury inHg In Barometer Mode press the reset button to change the barometric pressure unit following the adjacent diagram BARO Barometer Mode Barometer Display 13 1 reset reset reset hPa mb inHg Barometric Pressure Unit Selection Sequence BARO hPa 1001 3 Barometer Mo...

Страница 39: ...ecord at different times press the set button to scroll the record backward from the current record to the 24 hour record or press the reset button to scroll the record forward from the 24 hour record to the current record Press the mode button once to exit the Pressure History Graph Display Barometer Mode Pressure History Graph Display set set hold set mode reset hold reset BAR hPa 1 00 1023 2 fl...

Страница 40: ... another stormy condition is predicted The alarm gives beep alert when the ADC predicts the upcoming weather as stormy Then in the Current time Weather Forecast Display the stormy weather forecast symbol will appear 13 3 Barometer Mode About Storm Alarm 06MAR 12 38 28 THU Weather Forecast Display Weather Forecast Symbols Stormy Storm alarm on 28 0 C 8 88 2 beep ...

Страница 41: ... 1001 3 OFF ON STORM STORM set Stormy Alarm Pressure Calibration Storm Alarm and Pressure Calibration Setting Sequence Select the Setting Display Press and hold the mode button for about 2 second to select the setting display the or will start flashing In the setting display press the mode button to move the setting following the adjacent diagram When the or starts to flash press the set button to...

Страница 42: ...he set or reset button to scroll to select the target offset value hold down the button to scroll the setting at a faster pace When the above settings finished press the mode button once to exit the setting sequence 1 When the barometric pressure has been calibrated the current barometric pressure w i l l offset by the target offset value Setting Pressure relative to Sea Level Barometer Mode Calib...

Страница 43: ...reading 5 Air Density Relative Air Density and Density Altitude The temperature pressure and humidity effects on air density 6 Manual Data Log The function to log the current sensor readings The ADC estimates altitude by air pressure Hence these altitude values may be changed if air pressure changes DO NOT rely on the ADC for those activities that demands commercial standard Altitude Alarm Current...

Страница 44: ...ect between the above displays following the adjacent diagram In the above displays the indicator and altitude unit appear on the 1st row of the display and the current altitude appears on the 3rd row of the display In this display the number of Ski Runs appears on the 2nd row of the display and the accumulated ascent and descent appear on the 4th row of the display In this display the maximum and...

Страница 45: ... can display altitude in the following units 1 Meter m 2 Feet ft In any of the functional displays Ski Run Max Min and Air Density Display press the reset button to select the altitude unit following the adjacent diagram reset m ft Select among the Altitude Units Altimeter Mode ...

Страница 46: ...ters the total ascend or descend altitude during the ski runs When the Ski Run functions is ON 1 The ADC will record a Ski Run count Counter 1 automatically when a ski run has descended 15 meters point A to B or point D to E 3 The ADC will record a new ski run record Counter 1 once a 30 meters ascend point C to D is completed before another ski run record is allowed to be registered Check the To T...

Страница 47: ...Settings following the adjacent diagram Check the To Reset the Ski Run Counter Ascend Descend section below for more detail on reset setting When the Ski Run Function ON OFF Setting YES or NO is flashing press the set button to select between the Ski Run Function ON and OFF When the YES Display is flashing press and hold the mode button for about 2 seconds to confirm the setting and exit the setti...

Страница 48: ...button for about 2 seconds to abort the reset and exit the setting sequence IMPORTANT Accumulative ascend and descend will only work when Ski Run function is activated ON Altimeter Mode To Reset the Ski Run Counter Ascend Descend 14 3 2 Ski Run Display ALTITUDE m 2237 2418 144 SKI RUN 99 mode mode mode mode Ski Run Counter Reset Ski Run Ascend Reset Ski Run Descend Reset Ski Run Function ON OFF ho...

Страница 49: ...o get a reading After the first three minutes of Altitude Display the ADC needs one minute to get a reading Reset the maximum or minimum altitude prior to recording a new one check the To Reset the Maximum and Minimum Altitude section below to reset the respective reading Altimeter Mode Altitude Max Min Functions Trail 1 Trail 1 at point A at point B Trail 2 This Product will display Trail 2 200 3...

Страница 50: ... to confirm the reset of the respective altitude i e the maximum or minimum altitude the maximum or minimum altitude will be reset to zero To abort the reset press and hold the mode button for 2 seconds in the Display NO YES YES NO RESET MAX 734 80 RESET MIN 734 80 RESET MAX 734 80 RESET MIN 734 80 Minimum Altitude Reset Display NO Minimum Altitude Reset Display YES Maximum Altitude Reset Display ...

Страница 51: ... ALTITUDE and altitude unit appear on the 1st row of the display and the current altitude appears on the 3rd row of the display The air density AD or relative air density RAD appears on the 2nd row of the display and the density altitude appears on the 4th row of the display Check the Setting the Altimeter Mode section below for more detail on how to set the data for calculating the relative humid...

Страница 52: ...r or jet engine decreases When the air s density is low airplanes need longer runways to take off and land and they don t climb as quickly as when the air s density is high Air density also affects the performance of automobiles with lower density decreasing performance in the same way it decreases the performance of aircraft engines Density Altitude As air s density varies by altitude the combina...

Страница 53: ...rm In Altitude Mode When the current altitude is equal to or higher than the preset altitude level the ADC starts beeping for about 5 seconds After the first beeping the ADC will beep again for every 2 minutes if the current is still equal or higher than the preset value The repeated alarm beeps will stop until the altitude is equal or higher than the preset value or the Altitude Alarm is set to O...

Страница 54: ... In the setting display press the mode button to select between the Altitude Alarm Setting Altitude Calibration Display and Relative Air Density Setting following the adjacent diagram Check the Altitude Alarm Setting Altitude Calibration and Relative Air Density Setting sections below for more detail on the above settings Altimeter Mode Altitude Mode Setting 14 7 0 Altitmeter Mode Altimeter Mode S...

Страница 55: ...s are flashing press the reset button to scroll by 1 to select target altitude level hold down the button to scroll the setting faster or press the set button to select the between altitude alarm ON and OFF When the above settings finished press and hold the mode button for about 2 seconds to exit the setting sequence or press the mode button to set the other settings 18 3 8 3 W CHILL C 8 Altimete...

Страница 56: ...o exit the setting sequence or press the mode button to set the other settings 1 When the altitude has been calibrated the ADC will offset the current altitude by the target offset value For example If the offset value is 20 and the current altitude is 144 the ADC will display 164 144 20 2 The maximum and minimum altitude will NOT be updated as the above Note Calibration Setting Display Altitude C...

Страница 57: ...setting sequence or press the mode button to set the other settings 1 hen the above Relative Air Density setting has been set the Relative Air Density and the Absolute Air Density will be calculated by this setting 2 The standard default values in the RAD settings are 15 0 C 1013 3hPa and 0 RH Note Temperature Setting Pressure Setting Humidity Setting RAD SETTING TEMP C 8 RAD SETTING BARO hPa RAD ...

Страница 58: ... Temperature appear on the 4th row of the display unctional Displays HUMIDITY To Change Temperature Unit The above temperature readings can be display in the following units 1 Degree Celsius ºC 2 Degree Fahrenheit ºF Set the temperature unit in the Temperature Mode to change the temperature unit Check the previous section for more detail on how to change the temperature unit Temperature Display We...

Страница 59: ... below For logging data manually check the previous Manual Data Log 1 The log memory can log up to 256 records and 1980 data 2 If log memory is full a message will display for few seconds Delete some data or transfer the data to PC if necessary 3 Always check the memory level before data logging Note MEMORY FULL Data Log Mode Data Log Function 16 0 Record and Data Memory Full Display MEMORY FULL r...

Страница 60: ...record was logged appears on the 2nd row of the display The time of which the record was logged appears on the 3rd row of the display The data number and record number appear on the 4th row of the display If NO data is found on the Data Log Mode the display appears The mode indicator appears on the 1st row of the display The free memory appears on the 1st row of the display NO RECORD DATALOG Data ...

Страница 61: ... the ADC will log a data at the predefined interval Check the Setting the Data Log Mode section below for more detail on how to set the interval Data Log Mode Automatic Data Log 16 2 beep beep beep beep beep beep time sec time sec hold set to start hold set to start hold set to stop hold set to stop 0 0 10 30 20 60 30 90 40 120 Record 1 set 10 seconds as the interval Record 2 set 30 seconds as the...

Страница 62: ...come the last one of the data list If the displaying record is erased the record will shift it s location onward following the adjacent diagram Delete data 1 data 2 new data data 1 data 2 data 3 Acquire a New Data Record Record Log a new data Delete a record Record 1 Record 1 Record 2 Record 2 Record 2 Record 3 Delete a Record ...

Страница 63: ...urrent data 2 Set the logging interval for auto log 3 Enable the PC Synchronization transfer data from the ADC to PC 4 Delete all data Check the PC Synchronization section below for more detail on the communication between the ADC and PC Logging interval setting PC Synchronization Delete all Record Data Delete the current data Data Log Mode Setting ...

Страница 64: ...that is displaying and Display 2 When the interval digits starts to flash press the set or reset button to scroll to select the target auto log interval hold down the button to scroll the setting at a faster pace 3 When the PC SYNC START starts to flash press set button to send the data from the ADC to PC 4 When the starts to flash press the set button to select between delete all records and Disp...

Страница 65: ...to activate the synchronization The data of the ADC will send to the target PC Note Start the PC s communication software prior to the transmission Check the PC s hardware and software manual for the detail on how to transfer and receive data via infrared device Make sure that the infrared port of the ADC is pointing towards the target ADC IR infrared port during the transmission Data Log Mode PC ...

Страница 66: ...t diagram shows the operations for employing a review on the logged data Check the To Select the Logged Record and To Review the Logged Data sections below for more detail on how to review logged data Data Log Mode Logged Record and Data 16 6 0 Erase a Dive Record current wind speed ambient barometric pressure ambient temperature relative humidity altitude at the current location Record no Data no...

Страница 67: ...agram If a record is selected the logging date and time appear on the 2nd and 3rd row of the display The record number and the total number of data stored by such record appear on the 4th row of the display When the target record is displaying press the set to enter the Data Selection Sequence Check the To Review among Logged Data section below for more detail on how to select target data Data Log...

Страница 68: ...last data following the adjacent diagram Or press the set button to scroll backward to select the target data among the logged data from last data to data following the adjacent diagram relative humidity The wind speed temperature barometric pressure and the altitude at the current location will appear one by one Data Log Display Data 1 Date Time Barometric Pressure Wind Speed Altitude Data Select...

Страница 69: ...idity Heat Index Dew Point Temperature and Wet Bulb Temperature Current Time Mode Wind Speed Mode Temperature Mode Hour minute and second Month day day of week and year 12 24 hour format selectable Auto calendar from year 2003 to 2099 Current Average and Maximum Wind Speed Beaufort Scale for Average Wind Speed 5 Wind Speed Unit Selection Km h mph feet s m s and Knots User defined time span for Ave...

Страница 70: ...ly Alarm Mode Chronograph Mode Log data includes logging time and date wind speed barometric pressure altitude temperature and relative humidity Manual and Automatic Data Log User define logging interval for automatic data log Data transfer from the ADC to PC via the infrared synchronization ADC IR unit is required Daily Alarm 1 daily alarm Alarm Duration about 30 seconds Resolution 1 100 second C...

Страница 71: ...ius Fahrenheit Better than 1 5mb 700 1100 mb offset calibration possible Resolution 0 1 hPa Units hPa mbar inHg Altimeter Humidity Time Weather Forecast Better than 3 meter provided properly calibrated Resolution 1 meter Units meter feet Between 20 and 80 Better than 3 5 Other range better than 5 0 Resolution 0 1 Better than 1 sec day 5 weather forecast symbols that predict the coming 12 hour weat...

Страница 72: ...40m s Temperature Measuring Range 20 to 40 C Weight 70 gram including battery and strap Only the strap incl bracket on ADC 6 gram Wind Chill Is measured from 12 C degrees and colder Altimeter Measuring Range 500 to 9000 meters Barometer Measuring Range 300 to 1100 hPa ...

Страница 73: ...against manufacturing material faults The warranty does not apply to modifications normal wear and tear or abuse Silva is not responsible for any consequences direct or indirect or damage resultant from use of this product Warranty 18 ...

Страница 74: ...Silva Sweden AB BOX 998 SE 191 29 Sollentuna Info silva se www silva se ...

Отзывы:

Похожие инструкции для ADC Pro