


66
007-4382-002
3: Using TPM
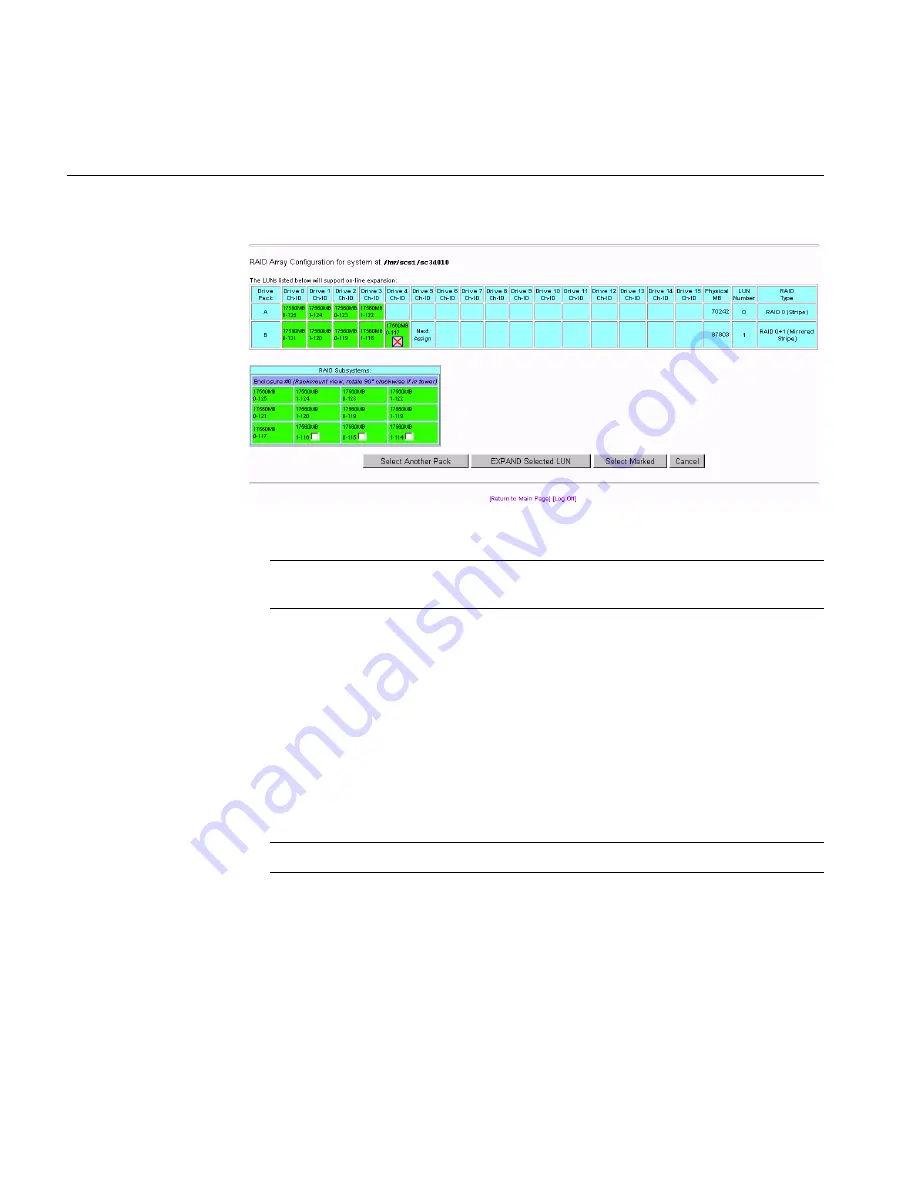
Figure 3-35
Expand LUN Screen
Note:
In the screen shown in Figure 3-35, one disk drive has just been added to drive
pack A, leaving three unused disk drives that can still be used to expand a LUN.
The drives shown in green are in an online state, which means they are configured
into LUNs which happen to be online.
2. When there are drives shown in the RAID Subsystems Map area of the screen with
an empty checkbox visible, the drives are unused and can be assigned to expand a
LUN. Click the
Select Another Pack
button until the cell labeled
Next Assign
is in
the desired drive pack that is being expanded. Then activate the desired checkboxes
and click
Select Marked
to add the drive(s) to the pack.
When you expand the LUN, the drive pack to which the drive has just been added
will still be assigned to the LUN, but will have more capacity, thus expanding the
LUN.
Note:
If a LUN does not qualify for expansion, it will not be displayed.
Содержание TP9100
Страница 1: ...TPM Installation Instructions and User s Guide for TP9100 007 4382 002 ...
Страница 4: ......
Страница 8: ......
Страница 14: ......
Страница 47: ...Configuration Functions 007 4382 002 31 Figure 3 3 Modify Disk Device Status Dialog Box for 6 14 Firmware ...
Страница 48: ...32 007 4382 002 3 Using TPM Figure 3 4 Modify Disk Device Status Dialog Box for 7 01 and Later Firmware ...
Страница 60: ...44 007 4382 002 3 Using TPM Figure 3 10 All Drive Packs Created 7 01 and Later Firmware ...
Страница 65: ...Configuration Functions 007 4382 002 49 Figure 3 15 All LUNs Defined 6 14 Firmware ...
Страница 87: ...Configuration Functions 007 4382 002 71 Figure 3 40 Initialization Progress 6 14 Firmware ...
Страница 103: ...Administrative Functions 007 4382 002 87 Figure 3 50 View Modify Controller Configuration partial for 6 14 Firmware ...
Страница 104: ...88 007 4382 002 3 Using TPM Figure 3 51 View Modify Controller Configuration partial for 6 14 Firmware ...
Страница 105: ...Administrative Functions 007 4382 002 89 Figure 3 52 View Modify Controller Configuration partial for 7 01 Firmware ...
Страница 106: ...90 007 4382 002 3 Using TPM Figure 3 53 View Modify Controller Configuration partial for 7 01 Firmware ...
Страница 107: ...Administrative Functions 007 4382 002 91 Figure 3 54 View Modify Controller Configuration partial for 7 75 Firmware ...
Страница 108: ...92 007 4382 002 3 Using TPM Figure 3 55 View Modify Controller Configuration partial for 7 75 Firmware ...
Страница 109: ...Administrative Functions 007 4382 002 93 Figure 3 56 View Modify Controller Configuration partial for 7 75 Firmware ...
Страница 116: ...100 007 4382 002 3 Using TPM Figure 3 64 Background Initialization Status Screen 6 14 Firmware ...
Страница 117: ...Administrative Functions 007 4382 002 101 Figure 3 65 Background Initialization Status Screen 7 01 and 7 03 Firmware ...
Страница 118: ...102 007 4382 002 3 Using TPM Figure 3 66 Background Initialization Status Screen 7 75 Firmware ...
Страница 131: ...Reporting Functions 007 4382 002 115 Figure 3 80 Physical Subsystem Information partial for 6 14 Firmware ...
Страница 132: ...116 007 4382 002 3 Using TPM Figure 3 81 Physical Subsystem Information partial for 7 01 and later Firmware ...
Страница 158: ...142 007 4382 002 3 Using TPM Figure 3 109Identify a Disk Click PING to identify a selected drive ...
Страница 164: ......
Страница 176: ......
Страница 182: ......


