WARninG:
Carefully read and understand the information given in this manual before beginning the assembly and installation. Failure to do so could lead to electric shock, fire, or
other injuries which could be hazardous or even fatal. • Ensure the electricity to the wires you are working on is shut off. Either remove the fuse or turn off the circuit breaker.
• SUITABLE FOR OPERATION IN AMBIENT NOT EXCEEDING 45°C. SUITABLE FOR DAMP LOCATIONS. MINIMUM 90°C SUPPLY CONDUCTORS. CAUTION-RISK OF SHOCK. DISCONNECT
POWER BEFORE SERVICING. • STORE IN AMBIENT NOT EXCEEDING 45°C.
notiCe:
This device complies with Part 15 of the FCC Rules. Operation is subject to the following two conditions: (1) this device may not cause harmful interference, and (2) this
device must accept any interference received, including interference that may cause undesired operation. These limits are designed to provide reasonable protection against harmful
interference in a residential installation. This equipment generates, uses and can radiate radio frequency energy and, if not installed and used in accordance with the instructions, may
cause harmful interference to radio communications. However, there is no guarantee that interference will not occur in a particular installation. If this equipment does cause harmful
interference to radio or television reception, which can be determined by turning the equipment off and on, the user is encouraged to try to correct the interference by one or more of
the following measures: Reorient or relocate the receiving antenna, increase the separation between the equipment and the receiver, connect the equipment into an outlet on a circuit
different from that to which the receiver is connected, and consult the dealer or an experienced radio/TV.
•
Changes or modifications not expressly approved by the party responsible for compliance could void the user’s authority to operate the equipment.
MAINTENANCE: See website for Warranty, Troubleshooting or Care and Cleaning details at www.ETiSSL.com.
Questions, problems, missing parts? Call ETiSSL Customer Service 8 a.m. - 5 p.m., CST, Monday - Friday
1-855-eTI-SSLI (1-855-384-7754) www.eTiSSL.com
C
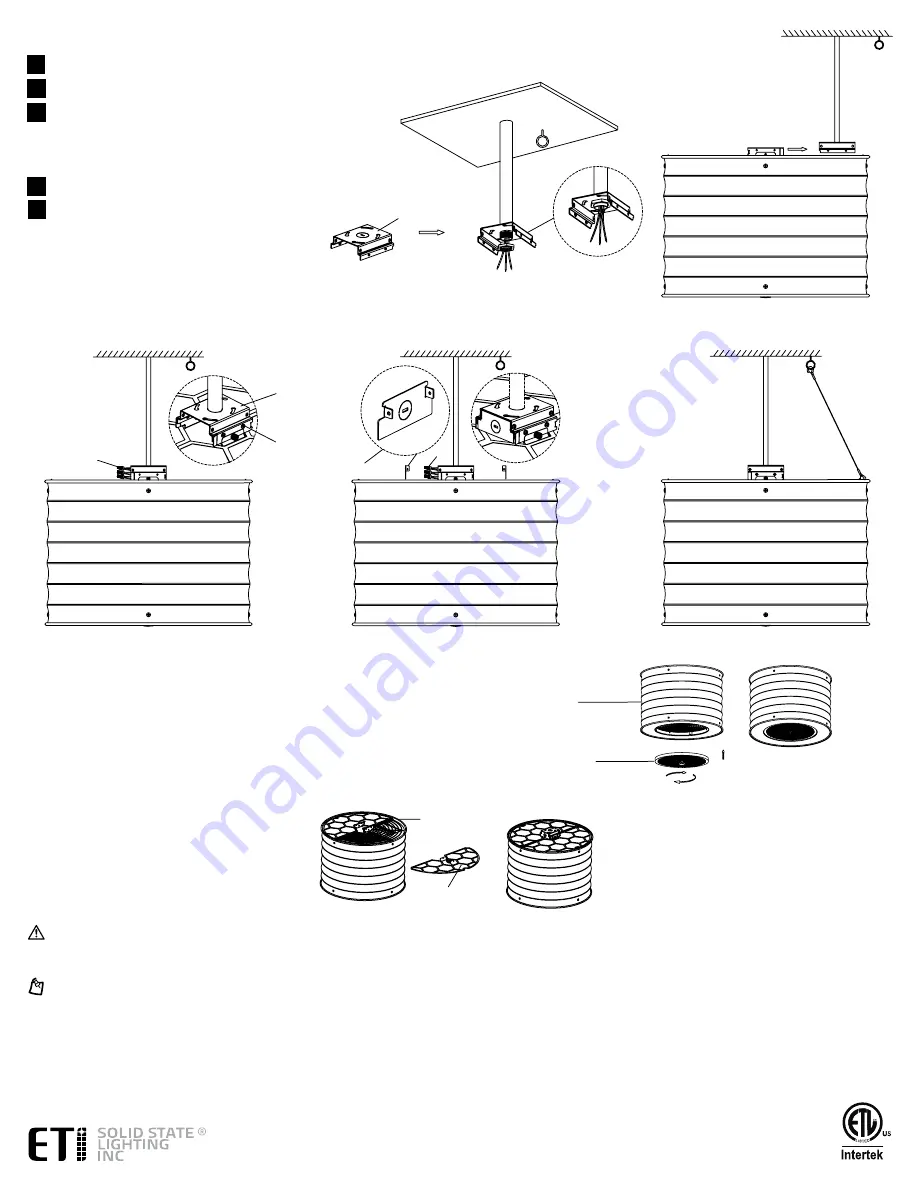
Replacing the Ozone net
•
Turn off the main power.
•
Twist the rotary knob.
•
Remove the Ozone net.
•
Tighten the rotary knob.
note
:
If the fixture is not turning on after replacing the Ozone net please check the knob
is tightened all the way.
Fixture
Ozone Net
Cleaning the air inlet net
•
Turn off the main power.
•
Remove the air inlet net .
•
Clean the air inlet net with a brush.
•
Reinstall the air inlet net.
Fixture
Air Inlet Net
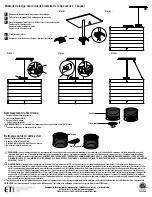
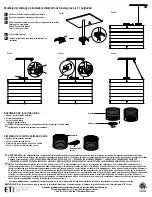
1
2
4
3
Punch out the knock out hole of the mounting bracket.
Slide the mounting bracket into the fixture.
Fix the mounting bracket by screws and then connect wires.
Black color to black color.
White color to white color.
Green color to green color.
Fix the side cover.
5
Hang the safety rope, to complete the installation.
Stem Mounting Not Included (diameter of the stem is 1.1inch)
STEP 1:
STEP 2:
STEP 3:
STEP 4:
STEP 5:
E
D
F
D
C
C


