SIIG CN-WR0512-S1 Скачать руководство пользователя страница 6

6

2.

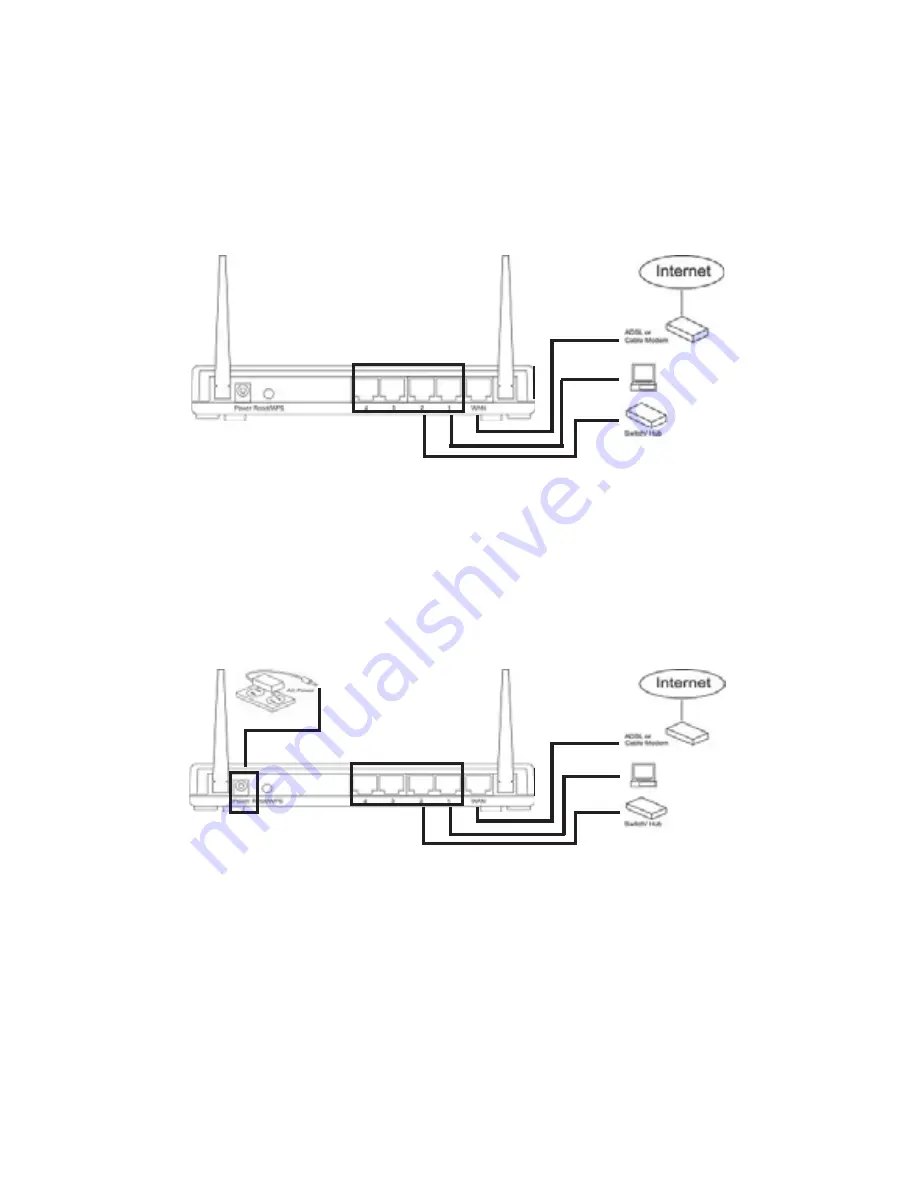
Connect all your computers, network devices

(network-enabled consumer devices other than

computers, like game console, or switch / hub) to

the LAN port of the router, shown in 

Figure 4

.

Figure 4

3.

Connect the A/C power adapter to the wall socket,

and then connect it to the 

Power

 socket of the

router, shown in 

Figure 5

.

Figure 5

4.

Please check all LEDs on the front panel. 

PWR

 LED

should be steadily on, WAN and LAN LEDs should

be on if the computer / network device connected

to the respective port of the router is powered on

and correctly connected.

Содержание CN-WR0512-S1

Страница 1: ...Internet line Share a single Cable or xDSL internet connection Access private LAN servers from the internet Four wired LAN ports 10 100M and one WAN port 10 100M SystemRequirements Internet connection...

Страница 2: ...2 PackageContents Wireless N Router Switching power adapter User s manual CD Quick Installation Guide Layout Figure 1 Front Panel...

Страница 3: ...3 LAN Figure 2 Back Panel AntennaA AntennaB Reset WPS Power WAN...

Страница 4: ...disconnect cables from the router first 4 If you want to place this router at high places or hang on the wall please make sure the router is firmly secured Falling from high places would damagetherou...

Страница 5: ...you do anything or contact an experienced technician for help 9 If you smell something strange or even see some smokecomingoutfromtherouterorpowersupply remove the power supply or switch the electric...

Страница 6: ...n in Figure 4 Figure 4 3 Connect the A C power adapter to the wall socket and then connect it to the Power socket of the router shown in Figure 5 Figure 5 4 Please check all LEDs on the front panel PW...

Страница 7: ...ation procedures your computer must be able to get an IP address automatically use dynamic IP address If it s set tousestaticIPaddress oryou reunsure pleasefollowthe following instructions to configur...

Страница 8: ...ta 1 Click Start then click Control Panel 2 Click View Network Status and Tasks and then click Manage Network Connections 3 Right click Local Area Network then select Properties Right click Local Area...

Страница 9: ...ion 4 TCP IPv4 and then click Properties 6 Select Obtain an IP address automatically and Obtain DNS server address automatically then click OK 7 Select Internet Protocol Version 6 TCP IPv6 and then cl...

Страница 10: ...by Default Gateway In this example the IP address of router is 192 168 2 1 please note that this value may be different shown in Figure 6 Figure 6 Note If the IP address of Gateway is not displayed or...

Страница 11: ...the router s management interface by web browser After your computer obtained an IP address from router please start your web browser and input the IP address of router in address bar shown in Figure...

Страница 12: ...wn in Figure 8 Figure 8 Note If you can t see the web management interface and you re being prompted to input user name and password again it means you didn t input username and password correctly Ple...

Страница 13: ...assword since everyone can see it This is very important when you have wireless function enabled 1 Click System menu on the left of web management interface 2 Click Password Settings a windows will po...

Страница 14: ...to the router Solution 2 If all LEDs on this router are off please check the status of A C power adapter make sure it s correctly powered Solution 3 You must use the same IP address subnet which the...

Страница 15: ...ttached to the device provided by your Internet service provider Solution4 CheckPPPoE L2TP PPTPuserIDand password again Solution 5 Call your Internet service provide and checkifthere ssomethingwrongwi...

Страница 16: ...re you using QoS function Try to disable it and try again Solution 2 Internet is slow sometimes be patient Solution 3 Try to reset the router and see if it s better after that Solution 4 Find out what...

Страница 17: ...not a malfunction if you can keep your hand on the router s case Solution 2 If you smell something wrong or see the smoke coming out from router or A C power adapter please disconnect the router and...

Страница 18: ...18 Blank Page...

Страница 19: ...licyperiod pleasefollowthesestepstohavetheproductrepaired orreplaced Step 1 Submit your RMA request Go to www siig com click Support then RMA to submit a request to SIIG RMA If the product is determin...

Страница 20: ...uter is a trademark of SIIG Inc SIIG and the SIIG logo are registered trademarks of SIIG Inc Microsoft Windows and Windows Vista are either registered trademarks or trademarks of Microsoft Corporation...

Отзывы: