background image


5

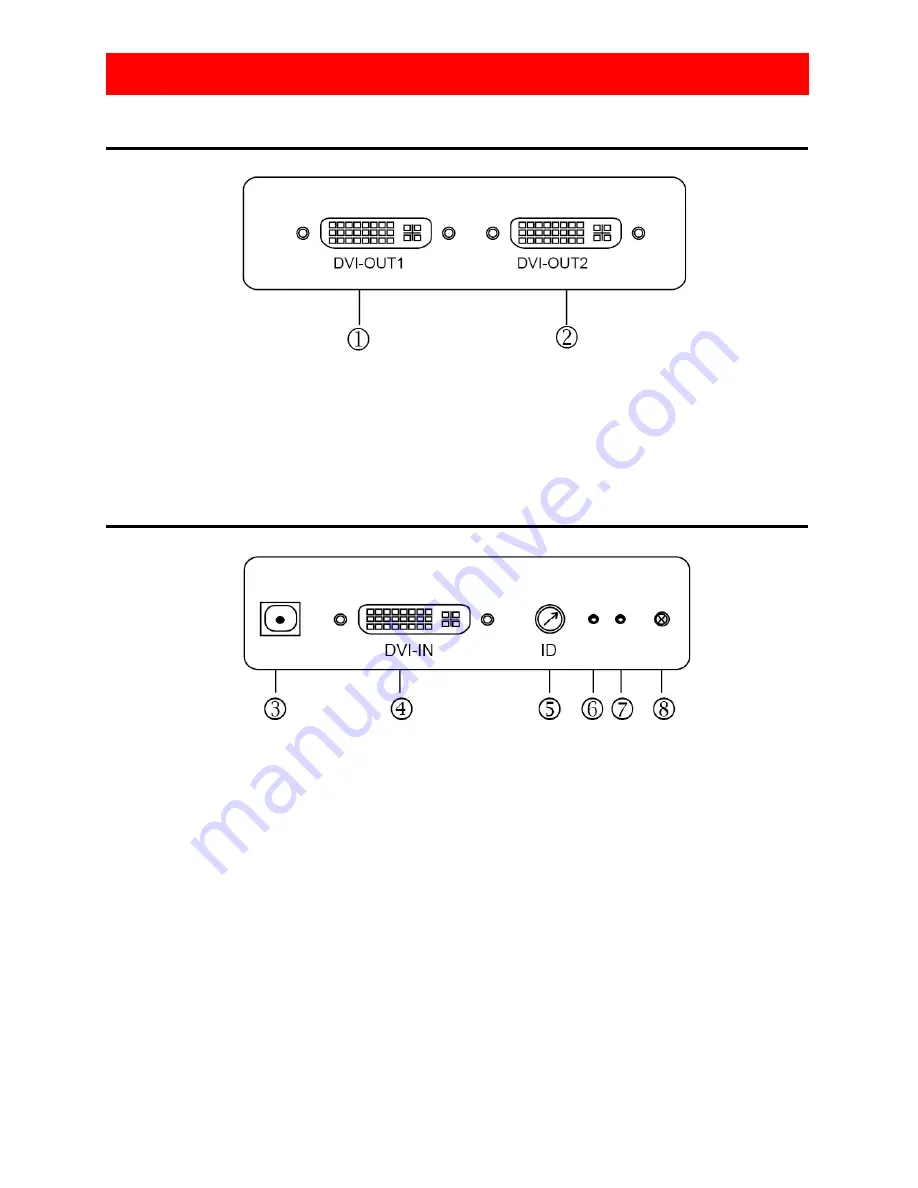
Front View 


Rear Panel 


Panel Descriptions


3. 5V 

DC 

4.  Connect a device equipped with DVI output (such as a PC) to 3-Port DVI

Splitter here. 

5.  Rotary switch- Assign an ID (0-7) for the device while cascading.  For

example, you can set rotary switch at 1 for the first 3-Port DVI Splitter and 2

for the second 3-Port DVI Splitter.  Please ignore the rotary switch when

only a single 3-Port DVI Splitter exists. 

6.  Green LED- lights when the 3-Port DVI Splitter is selected. 

7.  Red LED- lights when power on. 

8.  Infrared Receiver (optional) 

1.  Connect a DVI display here. 

2.  Connect a DVI display or two displays by a DVI Y-cable. 

*While cascading, use the short line of the DVI Y-cable to connect to the next splitter input and

the long line to connect to a display.   

Содержание CE-DV0031-S1

Страница 1: ...3 Port DVI Splitter CE DV0031 S1 Quick Installation Guide ...

Страница 2: ...e the risk of damage to the unit Follow all instructions and warnings marked on this unit Do not attempt to service this unit yourself except where explained in this manual Provide proper ventilation and air circulation and do not use near water Keep objects that might damage the device and assure that the placement of this unit is on a stable surface Use only the power adapter and power cords and...

Страница 3: ...ore the EDID information sent over the Data Display Channel DDC Connects a DVI video source to 3 DVI compatible displays comes with a DVI Y cable Perfectly as a repeater by regenerating the DVI signal Stackable 8 devices stacked can support up to 17 outputs Reads and remembers the EDID of displays Can be modified EQ with two modes Extends greater than 45 ft of input output DVI cable Introduction 3...

Страница 4: ...l Specifications Input connector 1 x DVI I Output connector 2 x DVI I Maximum Resolution 1600 x 1200 LEDs 1 x Green ID 1 x Red Power DIP switch 2 Power Supply 5V DC Dimensions 12mm L x 88mm W x 25mm H Weight 300g ...

Страница 5: ... Splitter and 2 for the second 3 Port DVI Splitter Please ignore the rotary switch when only a single 3 Port DVI Splitter exists 6 Green LED lights when the 3 Port DVI Splitter is selected 7 Red LED lights when power on 8 Infrared Receiver optional 1 Connect a DVI display here 2 Connect a DVI display or two displays by a DVI Y cable While cascading use the short line of the DVI Y cable to connect ...

Страница 6: ...will be initiated and the green LED lights The green LED will turn of after the reading process is completed Warning Don t plug in DVI source while the 3 Port DVI Splitter is writing default EDID or recording EDID from displays This will cause damage to the EDID in the flesh memory If you cannot boot your computer from the connected 3 Port DVI Splitter due to the damaged EDID in the 3 Port DVI Spl...

Страница 7: ...1 2 Plug DVI Y cable into 3 Port DVI Splitter DVI OUT 2 and then plug in power adapter 3 Connect the second display to the DVI female connectors of the long line of the Y cable and plug in the short line of the Y cable to the DVI IN of the second 3 Port DVI Splitter 4 Connect the third display to the DVI OUT 1 of the second 3 Port DVI Splitter 5 Follow from step 2 to step 4 for cascading the remai...

Страница 8: ...8 Monitor 1 Monitor 2 Monitor 4 Monitor 6 DVI PC 1st DVI Splitter 2nd DVI Splitter 3rd DVI Splitter 4th DVI Splitter Monitor 3 Monitor 5 Y cable ...

Страница 9: ...9 Blank Page ...

Страница 10: ...10 Blank Page ...

Страница 11: ... steps to have the product repaired or replaced Step 1 Submit your RMA request Go to www siig com click Support then RMA to submit a request to SIIG RMA If the product is determined to be defective an RMA number will be issued Step 2 After obtaining an RMA number ship the product Properly pack the product for shipping All software cable s and any other accessories that came with the original packa...

Страница 12: ...12 ...

Отзывы: