SIIG AV-GM07C3-S1 Скачать руководство пользователя страница 13


11


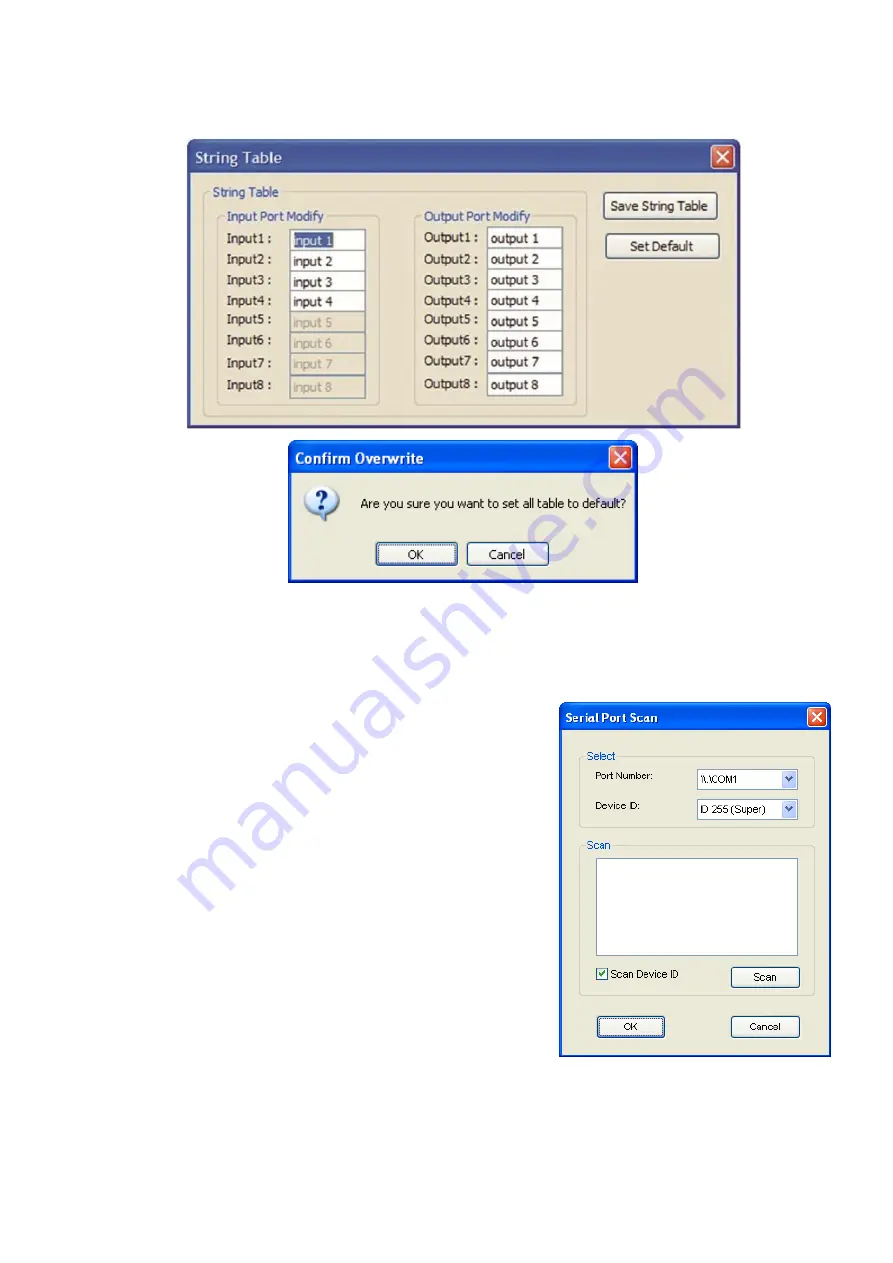
Click Save String Table to save the caption setting (turn effective after program restart). 

Click Set Default to pop up the confirmation message below to erase the captions and reset the 
string table back to default setting (turn effective after program restart). 


2.


Scan button: 
 
Serial Port Scan 

Click Scan button, the machine will scan the all COM 
port and show them. 
Select the RS232 serial port connected to the Matrix 
switch. 
And set device ID 255 is for all device. 
Only the same device id or 255 can get the command 
you sent. 
Click OK. Get the new status from the Matrix switch 
(the port you select.) 


3.


Linkage button: 

Click Linkage button to read back all status. 


4.


Open/Close button:   

Содержание AV-GM07C3-S1

Страница 1: ...4x8 HDMI Matrix Switcher with Full 3D Support P N AV GM07C3 S1...

Страница 2: ...attempt to service this unit yourself except where explained in this manual Provide proper ventilation and air circulation and do not use near water Keep objects that might damage the device and assur...

Страница 3: ...ES Support HDMI Deep Color full 3D HDCP compliant Allows any source to be displayed on multiple displays at the same time Allows any HDMI display to view any HDMI source at any time Supports 7 1 chann...

Страница 4: ...2 1x IR remote control 1x Installation CD 1x User Manual...

Страница 5: ...HDMI HDMI Input selection Push button IR remote RS 232 IR remote control Electro optical characteristics 25 Carrier frequency 36 40kHz HDMI connector Type A 19 pin female RS 232 connector DE 9 9 pin...

Страница 6: ...t panel push buttons Used to input source and display channel number 4 IR SENSOR IR sensor for receiving the IR commands from the IR remote 5 Ext IR IR receiver Rear Panel 6 RS 232 RS 232 control port...

Страница 7: ...UT 1 4 HDMI inputs 9 OUPUT 1 8 HDMI outputs for each output channel 10 AC Power 100 240V 11 SW MAIN DIP switches for more detail please see DIP Switch section 12 USB For channel control via USB contro...

Страница 8: ...If you encounter any unsolved audio video output problem during system installation please turn any SW1 SW8 to pin 1 at ON pin 2 at OFF for safe mode to select the system EDID up to 720p 1080i video a...

Страница 9: ...Firmware update only can be done via RS 232 port and connection to PC set at COM1 1 Power off the AV GM07C3 S1 Execute the firmware update program on your PC via COM1 port connection to the RS 232 po...

Страница 10: ...M07C3 S1 1 Connect all sources to HDMI Inputs on the 4x8 HDMI Matrix 2 Connect all outputs to HDMI devices 3 Connect the 5V 6A DC power supply to the 4x8 HDMI Matrix 4 Power on the 4x8 HDMI Matrix AV...

Страница 11: ...will be effective in a few seconds Method B IR Remote Control Firstly please push one of the INPUT buttons to choose which HDMI input source you are going to setup After that you can have multiple ou...

Страница 12: ...String Table assign the captions for each input and output port for easy recognition For example Rename the Input1 to Blu ray player Input2 to Sat receiver input3 to Game console input4 to AV receiver...

Страница 13: ...after program restart 2 Scan button Serial Port Scan Click Scan button the machine will scan the all COM port and show them Select the RS232 serial port connected to the Matrix switch And set device...

Страница 14: ...o ports one and two 6 Fast Select button Click Fast select button Quick setting Input one Output Port one Input two Output Port two Click Fast select pull down menu Select Input Num Output Num Input s...

Страница 15: ...3 E3 Output E selects Input 3 A4 Output A selects Input 4 E4 Output E selects Input 4 B1 Output B selects Input 1 F1 Output F selects Input 1 B2 Output B selects Input 2 F2 Output F selects Input 2 B3...

Страница 16: ...INPUT1 INPUT4 port where your source device has trouble to show the picture normally 2 To learn the display s EDID for source device connected to respective HDMI INPUT1 INPUT4 port pull both pins of...

Страница 17: ...d sent the Output Port then written to the chosen Input Channel 4 If the operation is successful the Input Channel will show O OK If the operation is not successful it will show F failure One to All l...

Страница 18: ...t 5 could get the HDMI signals from every HDMI input please learn EDID information from output 5 to all eight HDMI inputs For more information about EDID Learning please refer to EDID LEARNING section...

Страница 19: ...age in transit Under no circumstances will a unit be accepted without a return authorization number The warranty is in lieu of all other warranties expressed or implied including without limitations a...

Отзывы: