33
11. FUNCTION SETTING
It is possible to set various functions according to a use conditions and intended use.
The Function Setting of the printer is stored to the Memory Switch (hereinafter referred to as MS) in the
FLASH memory which mounts in the printer, and it is possible to set by using the switch operation and
command input.
In this section, the switch operation procedure is described below.
See "22 MS SETTINGS LIST" for MS setting list.
NOTE
◆
Be sure to set the directed value as "Fixed" according to 0 or 1 in the table.
Otherwise, the printer may not work correctly or may crash.
HINT
•
See "MP-A40 SERIES THERMAL PRINTER TECHNICAL REFERENCE" for details of
the function settings by the switch operation and other methods.
•
When neither switch is pressed within 30 seconds, the printer exits the Function Setting
mode, and returns to print-ready status.
Procedure of Function Setting using Switch Operation
The function setting using the switch operation the printer enters the Function Setting mode.
To enter the Function Setting mode, follow the procedures below.
(1)
Set the thermal paper in the printer as instructed in "9 THERMAL PAPER SETTING".
And check that no error occurs, and then turn off the printer.
See "7 LED DISPLAY OF PRINTER" for error conditions.
(2)
Turn the POWER Switch on while holding down the FEED Switch. Release the POWER Switch
firstly.
Test print starts, then release the FEED Switch.
(3)
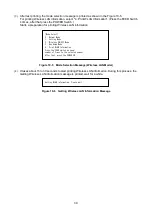
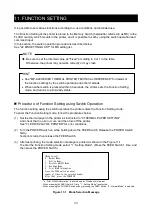
After test printing, the mode selection message is printed as shown in the Figure 11-1.
To enter the Function Setting mode, select "1 : Setting Mode". (Press the FEED Switch 1 time, and
then press the POWER Switch.)
・
"4 : Print WLAN Information" is printed only for Wireless LAN model.
・
When pressing the FEED Switch 1 time, "1 : Setting Mode" is selected.
・
When pressing the POWER Switch without pressing the FEED Switch, "0 : Normal Mode" is selected.
Figure 11-1 Mode Selection Message
[Mode Select]
0 : Normal Mode
1 : Setting Mode
2 : Wireless ON/OFF Mode
3 : Hex Dump Mode
4 : Print WLAN Information
Press the FEED switch an equal
number of times to the selected number.
After that, press the POWER SW.

