background image

6

6


R

R

E

E

V

V

I

I

E

E

W

W

I

I

N

N

G

G


I

I

M

M

A

A

G

G

E

E

S

S


SIGMA Photo Pro User Guide 


24 

6

6

.

.

5

5


V

V

i

i

e

e

w

w

i

i

n

n

g

g


I

I

m

m

a

a

g

g

e

e

s

s


w

w

i

i

t

t

h

h


H

H

i

i

g

g

h

h

l

l

i

i

g

g

h

h

t

t


a

a

n

n

d

d


S

S

h

h

a

a

d

d

o

o

w

w


W

W

a

a

r

r

n

n

i

i

n

n

g

g

s

s


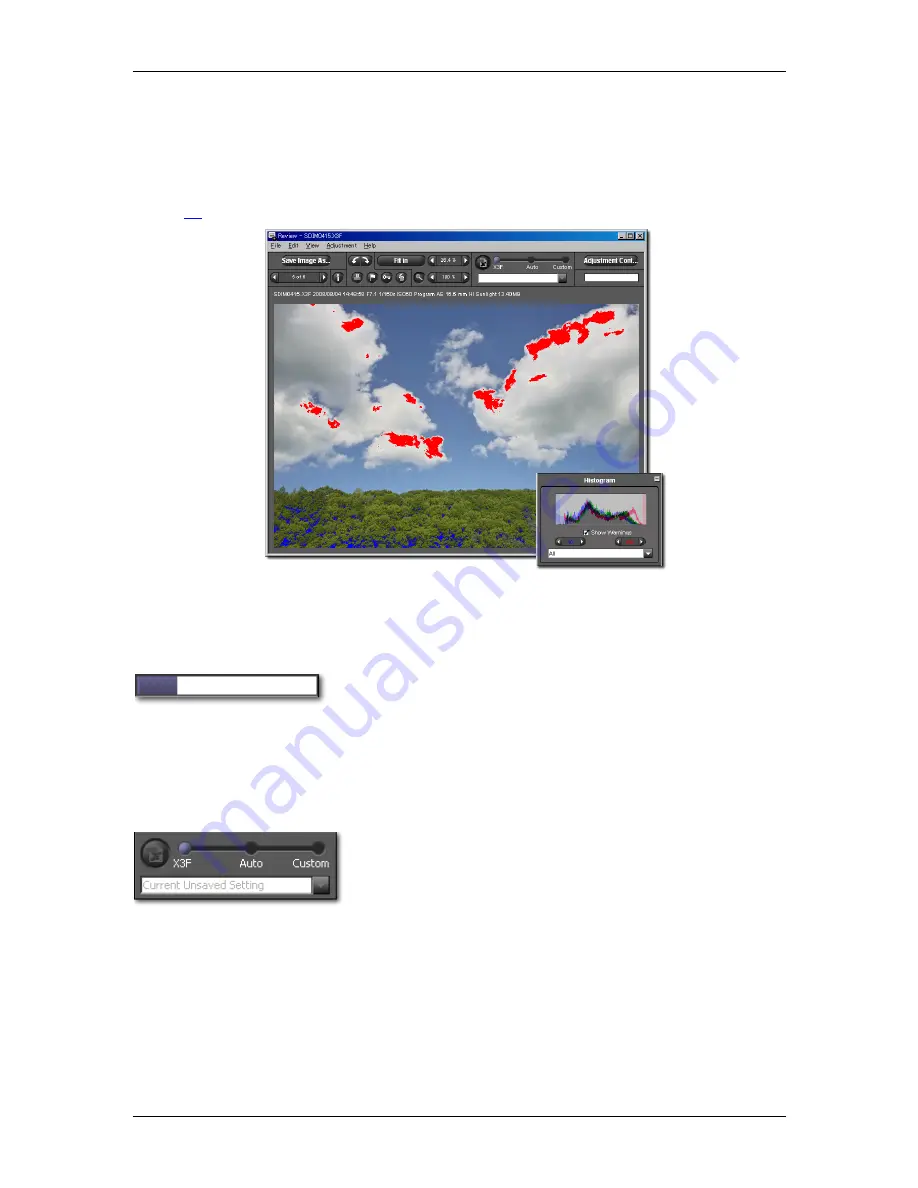
Using masks to analyze highlights and shadows 

Red represents highlight areas exceeding the value set in the Histogram located in the Adjustment Controls 
Palette, and blue represents shadow areas below the value set in the Adjustment Controls Palette. See 
Section 

8.4

 for more information about the Highlight and Shadow Warning Mask. 


6

6

.

.

6

6


U

U

s

s

i

i

n

n

g

g


t

t

h

h

e

e


A

A

d

d

j

j

u

u

s

s

t

t

m

m

e

e

n

n

t

t


M

M

o

o

d

d

e

e


S

S

e

e

t

t

t

t

i

i

n

n

g

g

s

s


Use the Adjustment Modes switch to control how image files are processed. 
 

The indicator in the upper right corner of the Review Window animates 
while the image is processing. When the animation stops, the display 
will update to a higher resolution reflecting the current adjustment mode. 

 
To select a different mode, drag the blue ball to another adjustment mode or click on the desired mode. 
 

In the case of indicated images, files are X3F format. 

X3F Mode: Reviewing images with default adjustments (to match in-camera preview) 

With X3F selected, each image displayed in the Review Window first 
appears as it was rendered on your SIGMA digital camera, without 
further adjustment to tone, scale or color. You can later change the 
stored X3F settings if you wish to store your own adjustment settings 
in the X3F file, by clicking the X3F button.  

 
X3F Mode remains selected until you choose another mode, or manually adjust a setting using 

Adjustment 

Controls


Содержание PHOTO PRO 4.2

Страница 1: ...S SI IG GM MA A P Ph ho ot to o P Pr ro o U Us se er r G Gu ui id de e Companion Processing Software for SIGMA Digital Cameras Version 4 2 For WINDOWS ...

Страница 2: ... sign when using the product can result in serious injury or other dangerous results Warning Do not play the included CD ROM s in an Audio CD ROM player Listening to the included CD ROM with headphones on a music CD player can cause hearing loss Playing the included CD ROM on a music CD player could damage the speakers The images recorded with this camera are intended strictly for personal use and...

Страница 3: ...ents 7 Installing and uninstalling software 7 2 2 Setting up your monitor 8 Verifying monitor brightness gamma and color 8 Using a pre existing monitor profile 8 Choosing the best monitor resolution for your screen size 8 3 3 B BE EF FO OR RE E Y YO OU U B BE EG GI IN N 9 9 3 1 Connecting the camera to your computer 10 Connecting the cables 10 Turning on the camera 10 Connecting the camera 10 3 2 ...

Страница 4: ...d Review Windows 18 Rotating images 18 Marking and unmarking images 18 Locking and unlocking images 18 5 7 Deleting images in the Main or Review Window 19 Deleting images 19 5 8 Printing images in the Main or Review Window 19 Printing images 19 5 9 Slideshow in the Main Window 19 Slideshow in Main Window 19 6 6 R RE EV VI IE EW WI IN NG G I IM MA AG GE ES S 2 20 0 6 1 The Review Window 21 Opening ...

Страница 5: ...images without adjustment 26 Auto Reviewing images with automatic adjustment 26 Custom Mode Reviewing images with a specific setting applied 26 6 7 Multiple Review Windows 27 Opening Multiple Review Windows 27 Using multiple Review Windows to compare images 27 Using multiple Review Windows to compare modes 27 7 7 P PR RO OC CE ES SS SI IN NG G S SA AV VI IN NG G 2 28 8 7 1 Main Window Processing 2...

Страница 6: ...mage 38 8 8 Reduction for Chroma and Luminance Noise This feature is provided only for X3F files which were taken at ISO 400 or higher 39 8 9 Saving and applying custom settings 39 Applying settings from the Adjustment Controls Palette 39 Saving application settings 39 Deleting application settings 39 Replacing stored X3F settings 40 9 9 G GE ET TT TI IN NG G I IM MA AG GE E I IN NF FO O 4 41 1 9 ...

Страница 7: ...SIGMA Photo Pro User Guide vi T T A A B B L L E E O O F F C C O O N N T T E E N N T T S S Header Footer Printing 46 10 2 SLIDE SHOW 47 Display Type Slide Show 47 ...

Страница 8: ...SIGMA Photo Pro User Guide 1 1 1 I I N N T T R R O O D D U U C C T T I I O O N N In this section you will learn The main features of SIGMA Photo Pro How this manual works ...

Страница 9: ...ned settings View histogram Set highlight and shadow warnings Adjust White Balance Show Navigation Color Mode Setting Reduction for Chroma Noise and Luminance Noise Image Information Window View capture information View file information View processing information Review Window Cycle through images displayed in the Main Window Choose adjustment mode Save images Change the displayed magnification r...

Страница 10: ... on a drive or folder in the Computer Pane to display images in a folder Click on the Review Images button p 21 to open a Review Window for viewing and adjusting an image Click on the Save Images As button p 29 to process and save X3F images in TIFF or JPEG formats Use Edit Buttons p 18 to rotate mark lock or delete selected images Click on the Info Button p 42 to open the Image Information Window...

Страница 11: ...nfo Button p 42 to open the Image Information Window Press the Magnification button p 23 to increase or decrease image display size Press the Navigation Buttons p 23 to move forward and backward through images Press the Save Image As button p 30 to process and save the X3F image in TIFF or JPEG format Press the Fit in button p 23 to resize the image to fit window Press Adjustment Controls p 33 to ...

Страница 12: ...noted as follows Menu Header Menu Choice Keyboard Equivalents are shown as follows Ctrl Letter or Symbol Ctrl is an abbreviation for the Control Key on a Windows system Navigating the on screen version of the manual To view the SIGMA Photo Pro manual while working in SIGMA Photo Pro select Help SIGMA Photo Pro Help from any window menu The following features in the screen version of the PDF manual...

Страница 13: ...SIGMA Photo Pro User Guide 6 2 2 C C O O M M P P U U T T E E R R S S E E T T U U P P In this section you will learn How to install SIGMA Photo Pro on your computer How to set up your monitor ...

Страница 14: ...t the installation disc that shipped with your SIGMA camera Double click on the CD icon on your desktop Then double click on the Set Up Windows to install the program The Welcome Screen should appear on your screen The wizard will take you through step by step instructions which will allow you to choose the language SIGMA Photo Pro displays on your computer assign destination folders for the appli...

Страница 15: ...acteristics of your monitor change so check your monitor s performance periodically Consult your monitor documentation and perform calibration adjustments as recommended by the manufacturer Using a pre existing monitor profile For information regarding monitor profiles consult the documentation for your monitor after market profiling software or operating system Choosing the best monitor resolutio...

Страница 16: ...SIGMA Photo Pro User Guide 9 3 3 B B E E F F O O R R E E Y Y O O U U B B E E G G I I N N In this section you will learn How to connect your camera to your computer How to start up SIGMA Photo Pro ...

Страница 17: ...and turned the camera on your computer will detect the camera as a storage device It will be displayed as a storage device in the Computer Pane of SIGMA Photo Pro By clicking this folder the images in its folder will be displayed to the Thumbnail Pane If images are not saved in the card nothing will be displayed in the Thumbnail Pane Note SD9 and SD10 cameras will not be detected 3 3 2 2 L La au u...

Страница 18: ...SIGMA Photo Pro User Guide 11 4 4 T T R R A A N N S S F F E E R R R R I I N N G G I I M M A A G G In this section you will learn How to copy images from your camera to your computer ...

Страница 19: ...e please click right mouse button and select new folder from the menu 2 Open the SIGMA folder from DCIM folder created by the camera and select the image file s to transfer 1 Double click on the drive displayed on the left hand side of the Main Window of the computer pane 2 Click on the DCIM folder 3 Click on the SIGMA folder created in the DCIM folder 4 Select the images that you wish to transfer...

Страница 20: ... 5 M M A A N N A A G G I I N N G G I I M M A A G G E E S S In this section you will learn How to display view and sort images How to select and move images How to rename images How to mark lock and rotate images How to delete images ...

Страница 21: ...hanging White Balance Preference Settings The Thumbnail Pane displays images directly from the camera when the Camera Pane is selected or images from folders when the Computer Pane is selected Note that the selected pane title will be highlighted in blue The Main Window is always open when working in SIGMA Photo Pro Closing the window exits the program and closes any other open windows or palettes...

Страница 22: ...nd do ow w View images stored on your computer Click on the Computer Pane to select the last folder viewed The Computer Pane title will be highlighted with blue and the images in the folder will appear in the Thumbnail Pane If the last folder viewed has been deleted the Computer Pane will be highlighted but no folder will be selected Click on a drive or folder to select it A blue band and an open ...

Страница 23: ...her side You can also change the thumbnail size from View Thumbnail Minimum Small Midium Large in the Main Window Small thumbnails with details Click on the button or select View Thumbnails with Details in the Main Window menu Sorting and filtering thumbnails Sorting and filtering options for thumbnails are located under View in the Main Window menu Use these selections or their keyboard equivalen...

Страница 24: ...de of the application the file extension X3F must be retained in order for the file to be recognized by SIGMA Photo Pro as the original Processed files will have the file extensions TIF and JPG and these also must remain unchanged Note Do not change extensions when you change the file name If the extension is changed file is not identified properly by Sigma Photo Pro 5 5 5 5 S Se el le ec ct ti in...

Страница 25: ...ring to your computer Select one or more images and click the Mark button or select Mark from Edit menu to mark Select one or more marked images and click the Mark button or select Unmark from Edit menu to unmark If a selected group has both marked and unmarked images all images will be marked If all selected images are marked clicking the Mark button will unmark the images Only X3F images can be ...

Страница 26: ...G TIFF and X3F images can be deleted Images can also be recovered from your computer s recycle bin or trash can Note Read only media such as a CD ROM will not be able to proceed the above action 5 5 8 8 P Pr ri in nt ti in ng g i im ma ag ge es s i in n t th he e M Ma ai in n o or r R Re ev vi ie ew w W Wi in nd do ow w Printing images Click on Print button or select File Print from the menu For f...

Страница 27: ...ection you will learn How to open a Review Window How to view different images in the Review Window How to view details using the Magnification How to check shadows and highlights with the warning mask How to use adjustment modes How to display multiple Review Windows How to update settings in X3F files ...

Страница 28: ...ize and higher resolution Process and save images individually Review images with different adjustment settings Access Adjustment Controls for custom processing Mark lock rotate or delete images Navigate through other images on the camera or in a selected folder Access the Image Information Window Links to more information Click on any link below to view detailed descriptions of Review Window elem...

Страница 29: ... you are viewing the last image in the folder Whenever you switch folders in the Main Window both Navigation buttons will be disabled until you replace the image in the Review Window with an image from the new folder Selecting specific images from the Main Window To view a specific image displayed in the Main Window once you have already opened a Review Window double click on that thumbnail in the...

Страница 30: ... of the loupe For additional information on color refer to Section 8 3 Making Color Adjustments Change the Loupe size To change the loupe size click the right mouse button and select the desired loupe size while using the loupe in Review Window You can also change the loupe size by selecting the desired loupe size from View Loupe S M L 6 6 4 4 U Us si in ng g t th he e M Ma ag gn ni if fi ic ca at...

Страница 31: ...to control how image files are processed The indicator in the upper right corner of the Review Window animates while the image is processing When the animation stops the display will update to a higher resolution reflecting the current adjustment mode To select a different mode drag the blue ball to another adjustment mode or click on the desired mode In the case of indicated images files are X3F ...

Страница 32: ... selecting Custom again Saving Current Unsaved Settings When Current Unsaved Setting is displayed in the pop down menu the adjustment settings reflect whatever is currently displayed in Adjustment Controls Current Unsaved Setting will instantly appear in the pop down menu any time you manually adjust an image using Adjustment Controls Moving controls or sliders automatically changes the mode to Cu...

Страница 33: ...ny of the settings in the Adjustment Controls Pallet Note that the Auto Mode is replaced with Custom Custom Mode Reviewing images with a specific setting applied With Custom selected each image displayed in the Review Window will be rendered with the custom setting listed in the pop down menu or the current unsaved setting The current setting in Custom Mode remains selected until you select anothe...

Страница 34: ...dow Note Each Review Window requires additional computer memory so the program may run more slowly with multiple windows open To optimize program performance close Review Windows when not in use Using multiple Review Windows to compare images Displaying similar images in several Review Windows side by side allows you to compare details such as composition facial expressions or focus before decidin...

Страница 35: ... Pro User Guide 28 7 7 P P R R O O C C E E S S S S I I N N G G S S A A V V I I N N G G In this section you will learn How to process and save images How to choose resolution file type and color space for your proc ...

Страница 36: ...sing To process a batch of images 1 Select the folder containing the X3F images you wish to process 2 You can process the entire folder selected images or marked images 3 Select or mark specific thumbnails if desired 4 Click on the Save Images As button The following dialog box appears Note Above proceeding can not be used with JPEG and TIFF Adjustment Mode Choose Adjustment Mode for image proceed...

Страница 37: ... have chosen the image to process press the Save Image As button The following dialog box appears Choosing a destination When you save images you can also choose a destination Images are saved in the previous saving folder If you change the destination click Select button and select the folder Note In the case of JPEG and TIFF repeated processing is decrease image quality Source The original captu...

Страница 38: ...the user For more information on how settings work see Section 6 6 For information on saving settings see Section 8 9 Color Space Selecting the correct color space according to your output needs allows other programs printers and users to receive correct color data If you do not have a specific color management preference it is recommended that you choose either the PC or Mac standard color space ...

Страница 39: ... A G G E E S S In this section you will learn How to use the Adjustment Controls palette How to make tonal adjustments How to make color adjustments How to use the Histogram How to set the Warning Masks How to change White Balance How to save settings How to delete saved settings ...

Страница 40: ...within the Adjustment Controls Palette click on the gray button in the upper right hand corner of any of each Adjustment control panel Adjustment Mode Tone Adjustment White Balance Color Adjustment or Histogram Click the Close Box in the upper right hand corner of the Adjustment Controls Palette title bar to completely close the palette Closing all Review Windows will also cause the palette to clo...

Страница 41: ...e Contrast slider affects the blackness of the blacks and the whiteness of the whites with a single control Increasing the constrast brightens the whites and darkens the blacks Decreasing the contrast grays both the whites and the blacks The range of the Contrast slider is 2 0 to 2 0 Shadow The Shadow slider affects the blackness of the shadows Increasing the number makes shadows lighter decreasin...

Страница 42: ...ximize the panel titled Color Adjustment Using the Color Wheel Click and drag the target ring anywhere in the colored portion of the circle As you move to the edge of the color wheel the color in the image will become more intense in that range Moving outside of the circle will continue to produce color changes even when the target ring is no longer in view To return the image to the original defa...

Страница 43: ...age appears too red move the target ring towards cyan on the opposite side of red in the Color Wheel Using the Color Adjustment Eyedropper to adjust color Use the Color Adjustment Eyedropper to let SIGMA Photo Pro create neutral gray tones in your image Locate a portion of your image in the current Review Window that includes a known neutral color that is not rendered as a neutral color Click on t...

Страница 44: ...ide of the graph The scale in which these values are measured is between 0 blackest shadow and 255 whitest highlight Enabling disabling and setting values for the Warning Masks To turn the warning masks on and off click the checkmark box at the bottom of the Histogram panel You can set the values in the warning mask to alert you when a shadow or highlight value on one or more of the channels falls...

Страница 45: ...fied with the updated information The thumbnail image in the Main Window and the preview image in the Review Window will not appear to change Each time you select a different White Balance setting the new setting will be automatically saved to the X3F file To view the effect of the change wait for the image to complete processing 8 8 6 6 C Ch ha an ng ge e t th he e C Co ol lo or r M Mo od de e o ...

Страница 46: ...g gs s Applying settings from the Adjustment Controls Palette To view the Adjustment Mode display the Adjustment Controls Palette on your screen and open the panel titled Adjustment Mode The Adjustment Mode settings in the Adjustment Control Palette reflect the same information as the Adjustment Mode settings found in the active Review Window See section 6 6 for a review of this information Saving...

Страница 47: ... to store your preferred adjustment settings directly in the X3F file allows you to save unique settings for fast accurate processing in the future To restore the original X3F settings select Custom Mode and choose Zero Adjust from the pop down box Once Zero Adjust is selected click the X3F button again to replace the current X3F settings with the original X3F settings as rendered on your SIGMA di...

Страница 48: ... Guide 41 9 9 G G E E T T T T I I N N G G I I M M A A G G E E I I N N F F O O In this section you will learn How to find image info in the Main and Review Windows How to open an Image Info Window for additional information ...

Страница 49: ...nd white balance pixel The same information field appears above the image pane in the Review Window When a single image is selected in the Main Window basic information about the image as well as icons of Mark and Lock will be displayed as thumbnail depending on your setings Image information in the Thumbnail Pane Information about selected images is located in the information field at the bottom ...

Страница 50: ...utton in the Title Bar or on the Close button at the bottom of the window There are three sections in the Information Window The top section contains general information about your file Next the capture section summarizes the photometric settings on the camera at the time the image was captured Finally the processing section lists the stored settings when you are viewing an X3F file and the applie...

Страница 51: ...SIGMA Photo Pro User Guide 44 1 1 0 0 P P R R I I N N T T I I N N G G A A N N D D S S L L I I D D E E S S H H O O W W In this section you will find How to print images How to proceed slideshow ...

Страница 52: ...is inscribed on the right side Print Setup window Print Preview Window Print Setup Paper size The paper size of the print will be displayed Source You are able to select images you want to print from All Images Marked Images or Selected Images Adjustment Mode You are able to select adjustment mode of Images you want to print from X3F Auto or Custom Only X3F file is applied this adjustment Print Se...

Страница 53: ...utomatically rotate your photo for the best fit on the paper Auto Crop The images are trimmed automatically to fit to the print size The cursor will change to a hand icon on the preview image It is possible to adjust the trimming position with the hand icon Image Copies It is possible to print multiple copies of images Information Printing It is possible to print basic information such as the file...

Страница 54: ...ick Play Button To abort the Slide Show click Cancel Button To mark images use the Space Bar on the keyboard once the images already have inscribed Press ESC key on the keyboard during the Slide Show to finish Display Type Slide Show Zoom Next image appears and expands from the center Fade Next image appears after the current displayed image has faded Roll The image rolls to the right hand side Tr...

Страница 55: ... G A A N N D D S S L L I I D D E E S S H H O O W W SIGMA Photo Pro User Guide 48 Page Turn Next image appears like a turning page from the upper left corner Diamond A diamond shape image will appear and expand from the centre of the screen ...

Отзывы: