


10
INSTALLATION & OPERATION
1
§3 Installation & Operation
§3.1 Layout for Front and Rear panel
1 Negative output
: The welder’s negative polarity output.
2 Shield gas connector
: Is connected to the gas input pipe of torch.
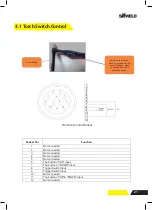
3 Aero socket
: Is connected to torch switch control wire.
4 Positive output
: The welder’s positive polarity output.
5 Power source switch
: Switch to “ON”, the welder is turned on, while switch to
“OFF”, the welder is turned off.
6 Power source input
: To connect power source.
7 Shield gas input joint
: To connect one head of the gas hose while the other head is
connected to argon gas cylinder.
1.4 Overview of Machine
Front View
Power Source Front Panel Layout
1 Negative output
2 Shield gas connector
3 Control socket
4 Positive output
Rear View
5 Power source switch
6 Power source mains input
7 Shield gas input joint
INSTALLATION & OPERATION
1
§3 Installation & Operation
§3.1 Layout for Front and Rear panel
1 Negative output
: The welder’s negative polarity output.
2 Shield gas connector
: Is connected to the gas input pipe of torch.
3 Aero socket
: Is connected to torch switch control wire.
4 Positive output
: The welder’s positive polarity output.
5 Power source switch
: Switch to “ON”, the welder is turned on, while switch to
“OFF”, the welder is turned off.
6 Power source input
: To connect power source.
7 Shield gas input joint
: To connect one head of the gas hose while the other head is
connected to argon gas cylinder.
Содержание Evolution TS200DC
Страница 27: ...27 Notes ...


