Integriti/Inception SIFER Keypad Smart Card Reader. Installation Manual.
Revision 1.0 May. 2017.
V+
0V
A
B
Red
Black
White
Green
Orange
Factory use only
.
Not used in the field.
Preliminary Installation Notes
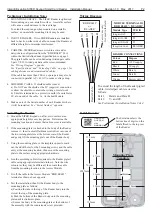
1. MOUNTING SURFACE. The SIFER Reader is optimized
for mounting on a non-metallic surface. A metallic surface
will cause a small decrease in the read range.
To extend the read range when mounted on a metallic
surface, a non-metallic mounting block may be used.
2. IN/OUT READERS. If two SIFER Readers are installed
back to back on either side of a Door, mount the Readers at
different heights to minimize interference.
3. CABLING. SIFER Readers are wired in a star and/or
daisy-chain configuration from the “RDR RS485” Port,
within the limits defined under Specifications on page 1.
The pigtail cable can be extended using twisted pair cable.
2-pair, 7/0.20 twisted pair data cable is recommended.
See “Wiring Diagram” opposite.
See “Specifications” and “Extending Cable” on page 1 for
cabling distances and recommended cables.
If the cable has more than 2 Pairs, a spare pair may also be
connected in parallel to V+ & OV to reduce voltage drop.
4. SHIELDED CABLE. If shielded cable is used:
a) Do NOT use the shield as the 0V (negative) connection
or allow the shield to contact other wiring or metalwork.
b) Shield is terminated to a protective earth (if available) or
0V, at one end of the cable. i.e. At the host Module.
5. Make a note of the Serial number of each Reader & where
it will be installed.
See “Serial Number” opposite.
‘RDR RS485’
or
‘READER’
Mounting Plate
Template
14mm
To extend the length of the Reader pigtail
cable, twisted pair cable is used as
follows:
Pair 1.
Data A and Data B
Pair 2.
V+ and 0V.
See Preliminary Installation Notes 3 & 4.
D
I
L
A
N
I
M
R
E
T
E
L
U
D
O
M
'
R
E
D
A
E
R
'
/
'
5
8
4
S
R
R
D
R
'
e
p
y
T
e
l
u
d
o
M
D
I
B
C
P
C
A
I
i
t
i
r
g
e
t
n
I
7
T
M
A
L
I
i
t
i
r
g
e
t
n
I
1
T
M
A
L
S
i
t
i
r
g
e
t
n
I
1
T
.
t
n
o
C
n
o
i
t
p
e
c
n
I
R
E
D
A
E
R
S
N
O
I
T
C
E
N
N
O
C
R
E
D
A
E
R
r
u
o
l
o
C
e
s
o
p
r
u
P
d
e
R
y
l
p
p
u
s
V
2
1
+
k
c
a
l
B
y
l
p
p
u
s
V
0
e
t
i
h
W
A
a
t
a
D
n
e
e
r
G
B
a
t
a
D
e
g
n
a
r
O
y
l
n
o
y
r
o
t
c
a
F
Reader Cable.
Installing the Reader
1. Mount the SIFER Keypad on a flat, solid surface at an
appropriate height for easy keypad use. Determine the
mounting location and ensure that cable access is available.
2. If the mounting plate is attached to the body of the Reader,
remove it. Insert a small flat blade screwdriver into one of
the two rectangular slots at the bottom rear of the Reader
and gently lift the mounting plate out of the Reader body.
3. Using the mounting plate, or the template opposite, mark
out, then drill holes for the 2 mounting screws and the cable
entry at the mounting location, then secure the mounting
plate to the surface using appropriate hardware.
4. Join the extending cable (if required) to the Reader pigtail
cable using appropriate terminals/joiners. Note the wire
colours (as they may be different), then route the cable
from the mounting location to the Access Module.
5. Fit off the cable to the Access Module “RDR RS485”
terminal as shown above opposite.
6. Test the installation, then fit the Reader body to the
mounting plate as follows:
a) Position the tabs in the top of the Reader body into the
slots at the top of the mounting plate.
b) Push the bottom of the Reader body onto the mounting
plate until it clicks into place.
c) Secure the body to the mounting plate at the bottom of
the assembly with the countersunk screw provided.
P 2
Wiring Diagram
Serial Number
The Serial number is the
bottom line of digits on the
label affixed to the top rear
of the Reader.
964725-
091116-
00-
000019
11.5mm
37mm
76mm
102.7mm
16mm
23mm
15.2mm
30mm
30mm


