6
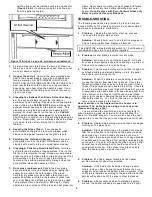
Figure 13
Prior to stove operating on thermostat, confirm proper
operation by servicing and adjusting the stove as
outlined in the “Installation Guide”. When servicing
stove, operate with therm ostat bypassed as stove will
reset to start up mode each tim e therm ostat is
activated.
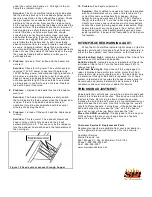
Figure 14
B.
In the
LOW
position, the EASYFIRE will be feeding
approxim ately 1 to 1½ lbs. of pellets per hour and the
flam e will fluctuate between 1" and 6" in height.
C.
In the
M EDIUM
position the EASYFIRE will be feeding
approxim ately three (3) pounds of pellets per hour and
the flam e will fluctuate between 3" and 8" of fire.
D.
In the
HIGH
position the EASYFIRE will be feeding
approxim ately 4+ lbs. per hour and the flam e will
fluctuate between 3" and a full flam e. The fan speed
will increase accordingly as the heater autom atically
adjusts itself based on tem perature inside the heater.
E.
The
CLEAN
position is to be used only when the
heater is not burning and you wish to clean out the
accum ulated ash in the front of the fire area. See
CLEAN OUT
section of m aintenance instructions.
F.
After the heater is running for several hours and you
wish to turn it off sim ply press the button to
OFF
.
The
heater w ill continue running until it cools dow n
and then will automatically shut itself dow n
.
G. REM EM BER:
Each feed position will fluctuate
because the m icroprocessor is autom atically adjusting
the feed and air based on tem perature. This m eans
the pellet feed rate and flam e height will change
accordingly based on quality of pellet and heat loss of
dwelling.
3. Starting the Stove:
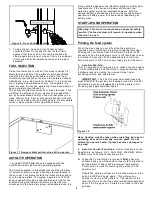
Push a Heat Range button (Low or
Medium is best for start up) (
Figure 13
) and turn the
therm ostat up to
“Call for heat”
. The stove fan will begin to
operate along with the ignitor cycle. After about a m inute
the pellets will begin to fall in the burn pot. After five
m inutes there will be a fire in the burn pot and the stove
will begin to heat up. W hen the stove reaches start up
operating tem perature it will then switch to the control
panel setting and begin it’s autom atic operation cycle.
Feed Trim Adjustment
Underneath the control button you will find a sm all round
button that will turn forward and reverse. This button can
adjust the feed m otor in the LOW operating position. By
turning the button clockwise you can increase the feed on
LOW and by turning it counterclockwise you can decrease
the feed in the LOW position. Factory setting is 9:00 o’clock.
Once the stove is at operating tem perature for one hour
set the stove on LOW . Adjust the trim button so that
average flam e is approx. 1-2" above the burn pot. This
w ill set the average feed rate (air/flue) for best
operation.
M ove this button carefully!
It is designed to fine tune your
LOW setting in the event you change brands of pellets
and/or live at a higher elevation. If this setting is to low the
stove m ay go out during LOW setting operations. If this
should happen increase the trim by sm all am ount.
MATCH LIGHT FIRE AND START-UP
1.
Filling the Hopper and Start-Up:
CAUTION: FUEL HOPPER LID M UST BE CLOSED
BEFORE OPERATING UNIT. M AINTAIN HOPPER SEAL
IN GOOD CONDITIO N. DO NOT OVERFILL HOPPER!
THE EASYFIRE W ILL HOLD ABOUT 60 LBS. OF
PELLETS.
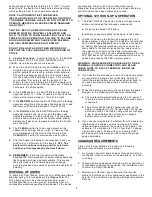
Open the top lid and fill the hopper with pellets (
Figure 11
).
Make sure hopper lid is fully closed. Open the front door
and fill the burn pot with a hand full of pellets.
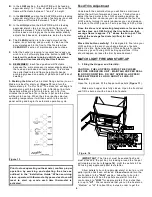
IM PORTANT:
The fire pot m ust be seated flush and
m ust sit even in the pot tray. Air leaking around the fire pot
will create a poor burn (
Figure 14)
. Light the pellets in Fire
Pot using any approved pellet fuel starter.
Allow pellets to burn for approxim ately 1 m inute, or until
pellet ignition has been achieved.
Close door
and turn the
control knob to the
"FAN"
position. Allow fire to burn for
several m inutes. W hen the pellets are well lit, turn the
control knob to
"LOW "
for approxim ately 10 m inutes then
turn up to
"HI"
. W e recom m end that you run the heater on
“Medium ” or "HI" for about 30 m inutes in order to get the

