


Installation and connection
en
15
■
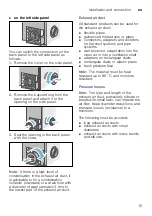
on the left side panel
You can switch the connection on the
back panel to the left side panel as
follows:
1.
Remove the cover on the side panel.
2.
Remove the bayonet ring from the
back panel and attach it to the
opening on the side panel.
3.
Seal the opening in the back panel
with the cover.
Note:
If there is a high level of
condensation in the exhaust air duct, it
is advisable to fix a condensation
collector (standard) or a drain hole with
a diameter of approximately 3 mm to
the lowest part of the exhaust air duct.
Exhaust air duct
All standard products can be used for
the exhaust air duct:
■
flexible pipes
■
galvanised metal ducts or pipes
■
connectors, adapters and diverters
for flat duct systems and pipe
systems
■
wall boxes for evaporation into the
open air or into a ventilation shaft
■
adapters on rectangular ducts
■
rectangular ducts or plastic pipes
■
back pressure flap
Note:
The material must be heat
resistant up to 80 °C and moisture
resistant.
Pressure losses
Note:
The type and length of the
exhaust air duct, particularly elbows or
bends with small radii, can impede the
air flow. Keep diameter reductions and
pressure losses (resistance) to a
minimum.
The following must be avoided:
■
long exhaust air ducts
■
exhaust air ducts with small
diameters
■
exhaust air ducts with many bends
and elbows.
Содержание WT34A201HK
Страница 39: ...6 ...


