background image


UTMC OTU/MOVA Handbook


667/HB/31601/000 

Page 55 

Issue 5 

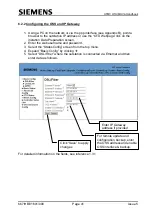
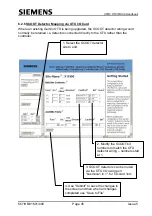
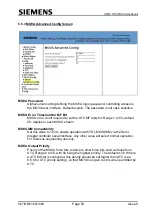
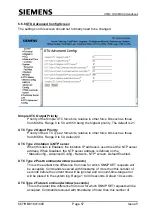
6.6.4 TMA Log Auto-export Config Screen  

This screen is not available in MOVA 6. It allows the start time and period at which TMA 
logs will be exported to the outstation support server to be configured. 


TMA log export start date-time (UTC) 

Allows the date and time at which log export starts. This enables a point in the 
future to be selected – useful after initial installation to prevent logs with minimal 
data being exported. Where immediate export is required set a date and time 
equal to or before the current. 
 
Format: dd:mm:yy-hh:nn(UTC)  where dd = day 01-31, mm = month 01-12, yy = 
year 00-37, hh = hour 00-23, nn = minutes 00-59.  
 
Default value is set to:-  

01:01:12-00:00 


TMA log export period


After log export starts this will set the subsequent period at which they are 
transmitted. 
 
Format: dd:hh:mm where dd = days (00-31), hh = hour 00-23, mm = minutes 00-
59.  For example 00:23:00 for 23 hours, 01:12:00 for 36 hours, 00:01:00 for one 
hour, 00:00:30 for 30 minutes etc. The minimum period is 15 minutes. 
 
Default value is set to a week:-   07:00:00 
 

NB: Changes to the TMA log export period will take affect on completion of the 
current period ie. if there are 6 days left before the next export occurs and the 
export period is changed to 1 day it will be 6 days before exports start occurring 

Содержание UTMC MOVA

Страница 1: ...B 31601 000 3 Mantis 14440 13 Jan 2012 667 HB 31601 000 3 Mantis 17268 26 Oct 2012 667 HB 31601 000 4 Mantis 18206 14837 10 Jan 2013 667 HB 31601 000 5 Align issue no 4 Sep 2013 THIS DOCUMENT IS ELECTRONICALLY HELD AND APPROVED Siemens plc 2011 All rights reserved The information contained herein is the property of Siemens plc and is supplied without liability for errors or omissions No part may b...

Страница 2: ...icity at Work Regulations 1989 and the relevant Highways Agency DoT procedures of test and maintenance ii Such personnel must take heed of all relevant notes cautions and warnings in this handbook and any other documents and handbooks associated with the equipment including but not restricted to the following a The equipment must be correctly connected to the specified incoming power supply b The ...

Страница 3: ...ase Line Modem Unit 17 2 8 3 UMTS 3G Mobile Router 17 2 9 THE POWER SUPPLY UNIT PSU 18 2 9 1 PSU Features 18 2 10 THE EXPANSION BUS 18 3 SPECIFICATIONS 19 3 1 GENERAL 19 3 2 ELECTRICAL 19 3 2 1 Mains Supply 19 3 2 2 Power Supply 19 3 2 3 Power Dissipation 19 3 2 4 Support Batteries 19 3 3 MECHANICAL 20 3 4 ENVIRONMENTAL 20 3 5 ISOLATED OUTPUTS 21 3 6 DIGITAL INPUTS 21 3 7 COMMUNICATIONS 21 3 7 1 C...

Страница 4: ...2 ACTIONS TO CONFIGURE A SEMI INTEGRAL OTU 39 6 2 1 Putting the OTU onto the Network 39 6 2 2 Configuring the OSS and IP Gateway 41 6 2 3 Importing the CSV file 42 6 2 4 Modifying and Saving the I O Bit Mapping 43 6 2 5 SCOOT Detector Mapping via Controller Serial Link 44 6 2 6 SCOOT Detector Mapping via OTU I O Card 45 6 3 ACTIONS TO CONFIGURE A FREESTANDING OTU 46 6 3 1 Putting the OTU onto the ...

Страница 5: ...OVA Site Names 82 7 3 7 MOVA Detector and Stage Control Reply Bit Mapping 82 7 3 8 Download New Site Data 84 7 3 9 Commissioning Screen 86 7 3 10 The Error Log DE and CE 88 7 3 11 Enabling MOVA Control 89 7 3 12 Completing MOVA Commissioning 90 7 4 TMA LOGGING AND ALERTS 91 7 4 1 OSS Access 91 7 4 2 Browser Access 93 7 4 3 TMA Alerts 93 7 5 MOVA COMMUNICATIONS NOTES 95 7 5 1 Starting Remote Commun...

Страница 6: ...tup for Bluetooth IP Connection 120 C 1 Setting Up the Airserial3x Serial Bluetooth Adaptor 120 C 2 Setting up the PPP over Bluetooth serial connection 120 C 3 Setting up the Windows Bluetooth Link IVT Blue Soliel Widcomm 121 C 4 Setting up the Windows Bluetooth Link Advent Netbook 121 Appendix D UTMC Guide 123 Appendix E UTMC OTU Network Requirements 126 E 1 Adjustments to Network requirements wh...

Страница 7: ... 2 2 Hardware Components 11 Figure 2 3 Software Components 15 Figure 4 1 IO Card s 25 Figure 4 2 Lease Line Modem Power Connections 26 Figure 4 3 PSU Connectors 27 Figure 5 1 LED Indicators 35 Figure 7 1 TMA Log Auto Export Screen 92 Figure 7 2 OSS Screen Shot 92 Figure 7 3 TMA Logs Screen Shot 93 Figure 7 4 Example 4 Stream MOVA Stage Confirm Bits 101 Figure 7 5 Example 4 Stream MOVA Force Bits 1...

Страница 8: ...2 Gemini2 Traffic Outstation Handbook 667 HB 32600 000 3 Electromagnetic Compatibility Road Traffic Signal System Product Standard BS EN 50293 2001 4 UTMC V34 LEASED LINE HANDBOOK 667 HB 42021 000 5 IR711 WH01 3G Router Third Party Approval Report 667 AY 46471 000 6 Digi Connect WAN 3G Router 3rd Party Approval Report 667 AY 46472 000 7 IP Router Installation Guide 667 CI 45025 000 8 3G OTU Commun...

Страница 9: ...t ICG Inter Cycle Gap A Siespace Protocol Parameter ICMP Internet Control Message Protocol IMG Inter Message Gap A Siespace Protocol Parameter IP Internet Protocol JFFS2 Journaling Flash File System Version 2 LAN Local Area Network LED Light Emitting Diode LMU Lamp Monitoring Unit MD5 Message Digest 5 MIB Management Information Base MIB II Management Information Base II Two NTP Network Time Protoc...

Страница 10: ...MPv2 SNMP Version 2 SNMPv3 SNMP Version 3 SNTP Simple Network Time Protocol STC Siemens Traffic Controls Telnet Telnet Protocol TfL Transport for London TFTP Trivial File Transfer Protocol TMA Traffic Management Act TS Siemens Traffic Solutions Mobility Division formerly Siemens Traffic Controls UDP User Datagram Protocol UMTS Universal Mobile Telecommunications System UTC type 1 See Simple UTC UT...

Страница 11: ...mployed will be dependent on the system application and particular customer requirements see UTMC Network Requirements Appendix E IP Network UTMC Outstation On Street Equipment Network to Instation Figure 2 1 Typical Outstation Processor Card 999 variant Local PC handset Port I O Card 1 optional Digital IO Port Low voltage inputs Lease Line To Controller serial port Lease line Modem optional Ether...

Страница 12: ...11 of this handbook Remote handset to connected controller Remote software upgrade see reference 1 3 1 Automatic backup of OTU configuration to OSS see reference 1 3 1 Extra features when used with ST700 750 800 900 family controllers o Upload download of controller data section 6 9 o Upload of IC4 file section 6 9 o Web display of controller historic log section 6 8 o SCOOT detectors can be conne...

Страница 13: ...and issue state can be displayed as follows On the web interface view the system web screen On the handset telnet interface use the version command The latest releases of software can be obtained from the Siemens website currently at http www siemens co uk traffic en index downloads htm Details of the upgrade procedure are included in the download zip file 2 2 1 Controller Compatibility The UTMC O...

Страница 14: ...gured for semi integral with a ST700 750 800 900 family controller or freestanding via I O card The outstation is mains powered and is fitted with a battery to support the unit in the event of a mains failure Assuming the communication equipment is still powered this allows the outstation to remain in communication with the instation when the mains fails The complete unit can fit within a standard...

Страница 15: ...services provided by GVP and eCos to implement user functions e g MOVA and OTU Redboot eCos GVP including File System Application 1 Application 2 Figure 2 3 Software Components 2 5 UTMC COMMUNICATIONS The connection between Instation and Outstation is by an IP network Refer to Appendix F for a guide to UTMC and refer to Appendix G for IP Network Requirements The connection of the Outstation to the...

Страница 16: ...2 Port Auxiliary RS232 Port for connection to controller Modem RS232 Port d A battery backed Real Time Clock e Flash memory for program storage and Journaling File system f Zero Cross Over signal derived from the associated PSU support PCB g Power Fail monitoring low voltage inhibit h A Watchdog monitor i Processor error indication j Voltage Regulation allowing a range of DC input k Power for the ...

Страница 17: ...e 2 wire Connection d Line status and data indicators e Powered by 12V DC from the CPU card Due to its small size the modem can be mounted onto the back of the Gemini2 PSU See section 4 2 2 for connection instructions See ref 1 3 4 for instation setup 2 8 3 UMTS 3G Mobile Router An option is available to connect the OTU back to the instation via a UMTS mobile communication network Viability of thi...

Страница 18: ...backup in the event of mains failure 2 9 1 PSU Features The main features of the PSU are a A wide range of AC input voltage b 3000V isolation from the mains c It can be powered by a 12V to 15V DC input supply d A single 12V sealed lead acid battery e Automatic switching to the battery support in the event of mains failure to the system f Automatic battery recharge on restoration of mains supply to...

Страница 19: ...ssemblies associated with the complete unit The cards operate from a single voltage regulated supply Output Supply Regulated 13 65V DC Rating 3 15A Powering Processor card IO card s Modem and Charging the Battery 3 2 3 Power Dissipation Low power CMOS devices are used throughout the unit to keep the power dissipation as low as possible Total power consumption 8 0 W typical using maximum configurat...

Страница 20: ...tery has expired 3 3 MECHANICAL The construction of the unit is based on the standard 3U high IEC297 Eurocard rack system The unit does not use the conventional backplane approach Instead it uses an expansion bus see section 2 10 on page 18 to interconnect the cards electrically The rack does not need to have guide rails but if present they need to be on 25 8mm spacing Mechanically the cards are h...

Страница 21: ...sistors 3 6 DIGITAL INPUTS The Processor card supports 8 x TR2523 TR0141 compliant digital inputs Each BUS MOVA IO Card supports 48 x TR2523 TR0141 compliant digital inputs These digital inputs have the following input electrical characteristics Processor card Inputs BUS MOVA IO Card Inputs Input Impedance 4300 4300 Off Threshold 50k 50k On Threshold 600 600 Absolute Max Voltage 1kV 7V 1kV 7V Isol...

Страница 22: ...tions with the associated controller 3 7 2 Communications Channel 2 Modem Port The Connector Type is a 9 Way D Type on the end of a flying ribbon cable connected to Plug PL2 3 7 3 Communications Channel 3 Handset Port The Connector Type is a 25 Way D Type on the front of the Processor Card SK2 3 7 4 Communications Channel 4 Ethernet Port The Connector SK4 is an RJ45 Socket on the back edge of the ...

Страница 23: ...R FAULT CONDITIONS MAY LEAK HAZARDOUS SUBSTANCES CARE MUST BE TAKEN WHEN FITTING BATTERIES OR HANDLING THE UNIT FIT BATTERIES ONLY OF THE SPECIFIED OR EQUIVALENT TYPE BATTERIES FITTED INCORRECTLY COULD CAUSE AN EXPLOSION 4 1 USER RESPONSIBILITIES It is the responsibility of the Engineer or purchasing authority to provide a At least one auxiliary mains supply or suitable alternative mains supply ou...

Страница 24: ...k 4 6 3 12 Identify all connectors cable forms 4 6 4 13 Connect all connectors to the unit 14 Connect the unit to mains outlet 4 6 5 15 Switch on unit supply 16 Connect unit support battery 4 6 6 7 17 Commission the application 6 and 7 THE REST OF SECTION 4 TAKES YOU THROUGH THE STEPS IN THE INSTALLATION CHECKLIST above IN MORE DETAIL Section 4 2 takes you through the steps that configure the hard...

Страница 25: ...ch provide the IO card with its own unique address within the Outstation unit S5 S6 PSU CPU Card I O Card 1 I O Card 2 I O Card 3 BUS MOVA I O Card Edge of the board 1 5 6 ON 2 1 ON 2 ON 1 2 ON 1 2 ON 1 2 ON 1 2 ON 1 2 ON 1 2 BUS MOVA I O Board WHITE switch position Figure 4 1 IO Card s On each I O card only one of the three card address switches should be in the ON position while the unit is powe...

Страница 26: ...2 12V Supply PL3 socket 1 0V Supply Before connecting the plug into the modem with the unit powered up check with a multi meter that the correct power supply selection has been made Connection of MultiTech MT5634IND Lease Line Modem Wire the fused power cable to plug 531 4 03539 000 and insert into CPU card connector PL3 Check the voltage with meter before connecting to modem Figure 4 2 Lease Line...

Страница 27: ...ink for 110V 1 2 3 4 EXT Power Earth Live Figure 4 3 PSU Connectors Before applying the mains power recheck the correct voltage setting has been selected for the Zero Crossover Mains Input ZXO Mains I P 4 2 4 RAM RTC Back Up STEP FUNCTION REFERENCE 8 Enable RTC battery and confirm the watchdog link is correctly installed 4 2 4 RTC Battery The Processor card has a Lithium Coin Cell battery fitted t...

Страница 28: ...a The unit may occupy space in a suitable rack with sufficient space in a cabinet See the bottom half of drawing 667 GA 26577 000 referenced in Appendix A b If no suitable rack space exists as in a the unit rack mounting facility can be used the M6 screws in rack angles to allow the unit installation See the top half of 667 GA 26577 000 drawing referenced in Appendix A c If options a and b are not...

Страница 29: ...quipment fitted within the cabinet 4 6 INTERFACING 4 6 1 RS232 Handset Interface Type Cannon DP 25 way socket RS232C CCITT V24 and V28 Pin Allocation see section B 4 for serial cable wiring Pin 1 Protective ground Pin 2 Transmit data from terminal to controller Pin 3 Received data from controller to terminal Pin 4 Request to send Pin 5 Clear to send Pin 6 Data set ready Pin 7 Signal ground Pin 9 5...

Страница 30: ...nnected to the PL1 and PL2 connectors of the BUS MOVA IO card These are to cover differing connection requirements See section 5 6 2 for cable part numbers The wire colouring for the cables connected to PL1 and PL2 on the BUS MOVA IO card is identical so ensure that wiring looms for PL1 and PL2 are clearly identified Processor Card Connector PL5 Connector Allocation Pin Wire Colour Processor PL5 1...

Страница 31: ...ffered I P 93 22 Brown Slate Buffered I P 22 Buffered I P 46 Buffered I P 70 Buffered I P 94 23 Orange Brown Buffered I P 23 Buffered I P 47 Buffered I P 71 Buffered I P 95 24 Orange Slate Buffered I P 24 Buffered I P 48 Buffered I P 72 Buffered I P 96 25 White I P Common Ret I P Common Ret I P Common Ret I P Common Ret 26 White I P Common Ret I P Common Ret I P Common Ret I P Common Ret 27 Blue n...

Страница 32: ...Signals Group 2 Mains Voltage Signals b Earth Continuity The EARTH CONTINUITY RESISTANCE must not exceed 0 5 on exposed metal parts of the unit when measured with reference to the EARTHING TERMINATION POINT of the cabinet 4 6 4 Cable Form Identification STEP FUNCTION REFERENCE 12 Identify all connectors cable forms 4 6 4 13 Connect all connectors to the unit The label sleeve attached to all Monito...

Страница 33: ...his facility or if this is not convenient a suitable alternative mains supply must be provided being careful not to compromise the safety of the controller A suitable disconnect device must be provided for this supply Refer to Poole Engineering if in doubt Mains fused The recommended rating of this external fuse is up to 5A anti surge 4 6 6 Connect Unit Support Battery STEP FUNCTION REFERENCE 16 C...

Страница 34: ...E OR EQUIVALENT TYPE DISPOSE OF USED BATTERIES BY RETURNING TO POOLE SITE OR DEPOT BATTERIES REPLACED INCORRECTLY COULD CAUSE AN EXPLOSION 5 1 INTRODUCTION Only skilled or instructed personnel with relevant technical knowledge and experience who are also familiar with the safety procedures required when dealing with modern electrical electronic equipment are to be allowed to use and or work on the...

Страница 35: ...evel The status LED indicators on the Processor card provide a visual identification of the fault condition existing on the unit The software has a diagnostic routine which when accessed by the handset can identify many other types of fault conditions 5 3 1 LED Indications Figure 5 1 LED Indicators The three LED indicators on the Processor card give the following status or fault indication LP1 GRE...

Страница 36: ...d keeping the watchdog triggered ON The hardware watchdog has timed out sometime in the past When illuminated this does not mean that the unit is currently in a watchdog state To clear Hold down the Processor card Reset button for 2 seconds 5 4 ROUTINE MAINTENANCE Units only require annual maintenance which can be performed at the same time as the inspection of other equipment On these visits trai...

Страница 37: ...annual maintenance of the unit 5 4 2 5 Yearly Maintenance It is recommended that every five years in addition to the annual maintenance routine described above all batteries be replaced See Section 5 6 3 for battery part numbers 5 5 PART NUMBERS Gemini2 CPU PCB 667 1 26608 999 Gemini2 PSU PCB Assembly 667 1 32604 000 Gemini2 Aux PSU PCB Assembly 667 1 26560 000 Basic Gemini2 Outstation Processor P...

Страница 38: ...n Cell 418 4 53433 000 Outstation Back up Battery 12V Sealed Lead Acid 418 4 42314 010 Note 1 Lead Acid Batteries have a one year shelf life if stored at below 20 C at which stage they must be recharged to maintain their efficiency Consult the manufacturer s data for this recharge procedure It is recommended that batteries should not be held as spares but ordered as and when required from Siemens ...

Страница 39: ...The actions to configure a freestanding OTU are described in section 6 3 It is assumed that 1 The controller has already been installed and configured for serial UTC control 2 The junction data has been defined and entered into the UTC instation 3 The CSV file for the junction has been exported from the UTC instation and is available The CSV file defines the control and reply bit functions require...

Страница 40: ... IP Netmask Move to the next set of options using the key Enter the Ethernet IP Gateway if required using 1 Ethernet IP Gateway Enter the Site name using 2 Site Name usually the SCN e g X11990 The site name should match the SCN used to reference the site at the instation Move back to the first set of options using the key Enable Ethernet using 1 Eth IP Mode and select 1 for Manual 5 Use the ping c...

Страница 41: ... Preparation screen 2 Enter the web username and password 3 Select the StatusConfig screen from the top menu 4 Expand Basic Config by clicking 5 Select DSL Fiber where the outstation is connected via Ethernet and then enter data as follows For detailed information on the fields see reference 1 3 1 For remote update and configuration backup enter the OSS address and enable OSS interface backup Ente...

Страница 42: ...ts to be used on the OTU See Appendix G for example CSV file content 2 Select Browse navigate to the location of the csv file and select Open 3 Select either the Freestanding OTU or Semi Integral OTU radio button as appropriate 4 Click Import to process the csv file and create one or more Sites on the left hand pane 1 Select the OSE Config screen from the top menu ...

Страница 43: ...iven a default mapping from the csv file This mapping can be changed if required 3 Use Submit to save the changes on each screen 5 Use Save to File to activate and store all changes 1 Select the Site to edit 4 Check SCOOT detector mapping see following page NB UTC offsets start at 1 Values of 0 are used for locally generated signals ...

Страница 44: ...that SCOOT loop 1 is allocated to detector 64 SCOOT loop 2 is allocated to detector 63 etc to avoid clashing with MOVA detectors which are allocated from 1 upward 2 Modify the detector bit numbers to match the detector allocations on the IC4 Serial MOVA screen 3 SCOOT detectors are routed via the controller using port csi det in 1 1 Select the SCOOT detector site to edit 4 Use Submit to save the c...

Страница 45: ...retained i e detectors connected directly to the OTU rather than the controller 2 Modify the SCOOT bit numbers to match the OTU detector wiring numbers start at 1 3 SCOOT detectors can be routed via the OTU I O using port busmova1 in 1 for I O card 1etc 1 Select the SCOOT detector site to edit 4 Use Submit to save the changes to the screen and then when all changes completed use Save to File ...

Страница 46: ...roller Serial Link Screen see section 6 6 5 for screenshot 2 De select Enable Semi Integral Link to Siemens Controller 3 Select the correct baud rate for the controller from the pull down list 4 Save the settings 5 To check the link start a handset session either via Telnet or direct terminal connection then type in XXC and once connected type in the controller commands and check for the expected ...

Страница 47: ...integral OTU see section 6 2 6 2 All reply bits except SCOOT should be inverted 4 Use Submit to save the changes on each screen 5 Use Save to File to activate and store all changes 1 Select the Site to edit NB UTC offsets start at 1 Values of 0 are used for locally generated signals 3 Control and reply bit mapping must match the controller interface wiring Numbers start at 1 not 0 ...

Страница 48: ...MPLE UTC By default the OTU configuration is set to run full UTC UTC type 2 This section describes typical sequence of operations to be carried out in order to switch from full UTC to simple UTC UTC type 1 operation This may be required for example in order to operate with an instation which has not yet been upgraded to support full UTC 1 Go to the Status Config web page and select the NTP Screen ...

Страница 49: ...d the comms LED will be illuminated flashing off each time an SNMP message is received Check the UTC Override Screen see section 6 10 shows force and reply bits If no force bits are being activated check with the instation operator that the outstation is on control and not isolated Also check that the outstation configuration of control and reply bits matches the instation To switch to Type 1 UTC ...

Страница 50: ...y using the xxo command See section 2 2 1 for controller types supported 6 6 OTU MOVA CONFIG STATUS SCREENS The following sections detail the additional Config Status screens which are related to the OTU and MOVA applications These screens are in addition to the general Config Status screens described in reference 1 3 1 6 6 1 OTU Status Screen The OTU Status screen displays the current status and ...

Страница 51: ...mber of UTMC type 1 UTC control timeouts since last restart i e the number of times missing Set control messages have caused the controller drop off UTC and revert to local control Type 2 UTC connection status Indicates if the outstation is currently receiving type 2 UTC Set messages Values are STANDALONE In standalone mode all output bits are set to zero Reply bits are not sent but can be polled ...

Страница 52: ...2 UTC Good Inform Messages Number of SNMP UTMC type 2 UTC Inform messages sent to the instation without requiring retry accumulated since last outstation restart Type 2 UTC Bad Inform Messages Number of SNMP UTMC type 2 UTC Inform messages sent to the instation that required retransmission accumulated since last outstation restart Type 2 UTC synchronisation via NTP This field Indicates if the outs...

Страница 53: ... used to temporarily enable facilities while a permanent licence number is obtained The temporary licence will expire after 7 days Licence Facility Code LIF This licence code is required to enable MOVA Enter the 6 character string supplied by Poole MOVA Site 1 Name MOVA Site 2 Name MOVA Site 3 Name MOVA Site 4 Name Alpha numeric string identifying MOVA stream site 1 or 2 or 3 or 4 This must be the...

Страница 54: ...lies to each MOVA stream MOVASIM Compatibility Set this value to 123 to enable operation with TRL MOVASIM via the Semi Integral controller serial interface Any other value will select normal operation For Siemens engineering use only MOVA Output Priority Priority of the MOVA force bits relative to other force bits such as those from UTC Range 0 to 50 with 50 being the highest priority The default ...

Страница 55: ...e current Format dd mm yy hh nn UTC where dd day 01 31 mm month 01 12 yy year 00 37 hh hour 00 23 nn minutes 00 59 Default value is set to 01 01 12 00 00 TMA log export period After log export starts this will set the subsequent period at which they are transmitted Format dd hh mm where dd days 00 31 hh hour 00 23 mm minutes 00 59 For example 00 23 00 for 23 hours 01 12 00 for 36 hours 00 01 00 fo...

Страница 56: ...00 900 family controllers the value is not used Controller Diagnostics Upload Interval Defines the time interval between each retrieval of the controllers Current Fault Flags and Historic Fault Log Range 5 to 1440 minutes Current fault flags are asserted in the main Gemini Fault Table The Historic Fault Log may be found in the Controller Log tab Default 10 minutes Controller Settings Files Upload ...

Страница 57: ...tem is Enabled the instation IP address is used to set the NTP server address When Disabled the NTP server address is defined on the StatusConfig Advanced Config Network NTP screen Default Enabled UTC Type 2 Past Command window seconds This is the earliest time difference from now for which SNMP SET requests will be accepted Commands received with timestamp of more than this number of seconds befo...

Страница 58: ...ill start timestamped control reply operation Range 100 to 1000mS Default 500 mS UTC Type 2 Optimise Data Transmission When enabled the OTU will not transmit successive duplicate SCOOT data When connected to a Siemens instation this should be enabled When connected to a PEEK instation it should be disabled Simple UTC Control Timeout seconds Simple UTC control message timeout in seconds If no contr...

Страница 59: ...troller faults are displayed i e as provided by the FFS controller command Entries can be made in the table by each running application The applications currently running are displayed on the System screen Additional information on fault timing and fault history can be obtained by examination of the System Log screen and in the case of ST800 900 etc controllers the Controller Log screen Reload Pre...

Страница 60: ...e fault numbers and mnemonics are contained in the controller handbook Lines This field sets the number of lines to be displayed on each page Use Update Page to apply the new setting Newest at top Select this field to order the log entries so that the more recent events are at the top of the page Use Update Page to apply the new setting Oldest at top Select this field to order the log entries so t...

Страница 61: ...re recent page of log entries Newest Change to the most recent page of log entries Export Log File Press Export Log File and then Save the file in the desired location on the user PC Files are named as Ctrl Log_ Site Name _ date time wri e g Ctrl Log_GEM06_2009 09 21 15 45 05 wri ...

Страница 62: ...ly default 24 hours see 6 6 5 IC4 File Export Use this interface to save the IC4 file to the users PC Last Retrieved This is the date and time when the IC4 configuration file was last transferred from the controller to the outstation Export Press Export and then Save the file in the desired location on the user PC Files are named as IC4_ Site Name _ date time _config 8UL e g IC4_GEM06_2009 09 21 1...

Страница 63: ...file from the users PC to the controller The imported Controller Data file updates the controller level 2 access timings etc and so should be used with care Ensure that where several Controller Data files are available the correct file for the site is selected ESP Link Status This interface shows the current file transfer activity taking place on the serial link to the controller Typical displays ...

Страница 64: ...his has been selected and then refreshes the screen data values Any outputs which have not been forced i e with release selected will remain under control of UTC or MOVA On later versions of firmware issue 3 0 and above control outputs which have been overridden are displayed in bold in the table Release All This control sets all overrides back to the release state and then refreshes the screen da...

Страница 65: ...he outstation what function they perform and how they are routed to the controller or other equipment e g SCOOT detectors The screens are also used for the mapping of MOVA forces confirms and MOVA detectors 6 11 1 Site Creation and Input Output Mapping Pressing the next to a field will bring up help text in the right hand window pane Import CSV file Use this interface to import a CSV Comma Separat...

Страница 66: ...ite To view or edit the contents of a site press the Edit link next to its name Rename or Delete To change the site name edit the name in the text box then press Rename or Delete before continuing To delete a site select the tick box next to the site name and press Rename or Delete Save to File No settings are written to the Gemini or take effect until the Save to File button is pressed Over the c...

Страница 67: ...the OTU while UTC messages are being received from the instation TO Take Over TS Time Sync The following output functions are generated locally for use with MOVA MOVATO MOVA Take Over MOVAES1LIn MOVA end of saturation flow type 1 on link MOVAES2LIn MOVA end of saturation flow type 2 on link MOVAES3LIn MOVA end of saturation flow type 3 on link MOVAES4LIn MOVA end of saturation flow type 4 on link ...

Страница 68: ... Signal Aspect Failure MC Manual Control MF 1 MOVA Fault ML 1 MOVA Online MR 1 MOVA Override Reply Local MOVA Ready PC Pedestrian Stage Green Confirm PR Puffin Pedestrian Clearance Period RF1 Vehicle Red Signal Aspect Failure 1 RF2 Vehicle Red Signal Aspect Failure 2 RR Remote Reconnect SB Solar Bright Confirm SCn Switch Facility Confirm SDn Stage Demands TF 2 Controller Handset Connected TPn RTIG...

Страница 69: ...ull UTC UTC type 2 this field is for information only When running simple UTC UTC type 1 this field is used to control the position of bits in the control and reply words The numbering starts at One Note that on the Siemens instation MONI screen the bit displays are numbered from zero so that for example bit 004 on MONI would be given a UTC offset of 5 Functions which are only local to the outstat...

Страница 70: ...put for stream 2 mova3 alerts in 1 TMA alert input for stream 3 mova4 alerts in 1 TMA alert input for stream 4 Bit Indicates the I O bit number to be wired to the controller in the case of I O Card or the serial message bit assigned in the case of the Controller Serial Interface Invert This field indicates whether the signal should be inverted or not Select the checkbox to invert the signal The re...

Страница 71: ...e over the Function in the table Add Bits Table To add an item to the site manually select a function from the list and enter the item s configuration values Then press Submit Submit Pressing submit holds changes without saving them permanently or causing them to take effect This allows a series of changes on different pages to be created and verified before Save to File is pressed causing them to...

Страница 72: ...ng in the normal forward direction will activate the A loop first The U loop is installed so that traffic travelling in the reverse direction will activate the U loop first The output of the UD unit is activated only if the vehicle is travelling in the normal forward direction Where it is required to monitor the reverse direction as well then an additional UD unit can be configured with A and U lo...

Страница 73: ... be configured for counting the vehicles on two lanes together N 1 counting This arrangement handles vehicles which straddle both lanes by special placement of the loop detectors and provides a more accurate count Also four inputs can be configured for counting the vehicles on three lanes A count input can be mapped to a UD unit output see section 6 11 2 Count Weighting Factor The Count Weighting ...

Страница 74: ...itoring three lanes An occupancy input can be mapped to a UD unit output see section 6 11 2 Occupancy Unit Weighting Factor This is used to define the number of internal occupancy counts required to cause the reply bit to change state The internal count rate is 25 Hz for 100 percent occupancy so a weighting factor of 6 is normally used giving a change of state every 1 28 seconds max representing 1...

Страница 75: ...range of junctions Also refer to the Highways Agency Installation Guide for MOVA MCH 1542 and the TRL manuals AG44 and AG45 These documents complement this handbook by covering the design of MOVA intersections such as determining the location of the vehicle loops and the construction of the MOVA site data as well as commissioning the completed MOVA intersection See section 4 for the installation a...

Страница 76: ... Siemens controller the serial interface would normally be used When connecting to another manufacturer s controller it will be necessary to use the parallel interface The controller serial interface can convey at most the state of 64 detectors so in the case of an installation requiring more than 64 detectors the balance will have to be connected directly via a Bus MOVA card even when using a Sie...

Страница 77: ...k that the ESP link status is not link down 7 7 3 4 Set the time and date in the outstation 8 7 3 5 Enter the correct MOVA licence codes 9 7 4 1 For MOVA 7 if log file export to an OSS logging is to be used set up the export start time and period and enable the OSS 10 7 4 3 For MOVA 7 enable alerts if required 11 7 3 6 Configure the MOVA site Names 12 7 3 7 Import MOVA detector and control reply b...

Страница 78: ... as the controller changes from stage to stage that the Warm up Count increments When this count reaches the number of stages plus one e g 6 on a 5 stage controller the MOVA unit will put itself on control Check a The On Control flag changes from 0 to 1 b The TO bit changes from 0 to 1 c The MOVA unit demands the current or next stage d The Error Count remains at zero e The UTC MR and ML reply bit...

Страница 79: ...e command is not recognised the MOVA application for that stream must be started running to view running applications use the web interface and display the System web screen When the command is executed the MOVA data sets MOVA working data MOVA error logs flow logs and assessment logs for that MOVA stream are restored to the first time start up state Other MOVA streams will be unaffected In the ca...

Страница 80: ...s required Note MOVA streams do not run by default Once a MOVA stream has been started the MOVA application can be accessed via MOVAComm 7 3 2 Communicating Locally via MOVA Comm 5 7 3 2 Use the appropriate MOVA Comm shortcut to connect to the required MOVA stream Use this sequence when located at the outstation If the PC connection has already been established the steps 1 and 2 can be skipped 1 C...

Страница 81: ...ions then an entry will be placed in the outstation fault table 7 3 4 Setting the Time and Date 7 7 3 4 Set the time and date in the outstation Check if the date and time on the outstation is already being set via the NTP service check on the StatusConfig Advanced Config Network NTP screen If not being set by NTP then the date and time can be set manually using the date command see reference 1 3 1...

Страница 82: ... screen see section 6 6 2 enter the Site Name for each MOVA stream This must be the same site name as defined on the OSE Config screen see section 6 11 1 for the OTU MOVA uses the site name to access it s force and reply bits so if it is not correct then MOVA will not operate correctly 7 3 7 MOVA Detector and Stage Control Reply Bit Mapping The relationship between the OTU I O and MOVA detectors a...

Страница 83: ...s are available to suit the particular type of installation a A semi integral installation OTU connected to the controller via the serial interface for up to 64 detectors b Free standing parallel interface installation for up to 64 detectors c Where more than 64 detectors are required a separate config is required per stream These files are described in Appendix K On the OSE Config screen see sect...

Страница 84: ...sions of MOVA The appropriate TRL version of MOVA Setup will convert between the differing formats e g MOVA Setup M7 0 will convert MOVA 6 data sets to MOVA 7 MOVA Site Data Loading New site data can be downloaded into the MOVA unit using the Data Set option DS from the MOVA main menu followed by the R command Up to four plans can be loaded into the MOVA unit s memory Normally only plan 1 will be ...

Страница 85: ...rking data load the new site data and begin monitoring the intersection Note MOVA will be initially disabled Use the Look screen to put MOVA back on control after a warm up cycle Press Return to reconnect to the unit after it reboots Checking the Site Data When new site data has been loaded check it by displaying the site data using the L T and D options If more than one plan has been downloaded t...

Страница 86: ...he detectors the force bits and the confirm bits Typical MOVA Commissioning Screen SIEMENS MOVA COMMISSIONING SCREEN J12345 Detectors 1 2 3 4 5 6 7 8 9 10 11 12 13 14 15 16 17 18 19 20 21 22 23 24 25 26 27 28 29 30 31 32 33 34 35 36 37 38 39 40 41 42 43 44 45 46 47 48 49 50 51 52 53 54 55 56 57 58 59 60 61 62 63 64 Confirms 1 2 3 4 5 6 7 8 9 10 11 12 13 14 15 16 CRB 17 18 19 20 21 22 23 24 25 26 2...

Страница 87: ...ag can be toggled by simply pressing M or C respectively Similarly the Error Count can be cleared back to zero by simply pressing Z 10 7 3 9 Important The following causes the MOVA unit to take control of the Intersection and care should be taken to avoid undue disruption to traffic flows Still using the commissioning screen force each stage in turn and check that the controller moves to the requi...

Страница 88: ...Key Press a key listed above or Press Space for Main Menu While the MOVA Main Menu is being displayed enter the two letter menu option required and press Return When the required option completes the main screen will automatically re appear 7 3 10 The Error Log DE and CE 11 7 3 10 Check that the Error Log contains no unexpected entries and then clear the error log To display the error log enter DE...

Страница 89: ... section describes in the more detail the MOVA Enabled and On Control flags and their interaction with the Error Count count and the Warm up count Both flags must be set to 1 before MOVA will attempt to control the junction If either flag is set to 0 then MOVA will not attempt to control the junction at that time but may still be monitoring the traffic flows over its detectors The MOVA Enabled fla...

Страница 90: ...s Error Count Depending on the nature of the fault the MOVA unit will increment the Error Count by one two or five Every hour on the hour the MOVA unit decrements the Error Count unless it has reached the value of 20 when the unit will reset the MOVA Enabled flag back to 0 7 3 12 Completing MOVA Commissioning To close communications with the MOVA unit type FI at the main menu This will allow the M...

Страница 91: ...itted A complete history will be available therefore in consecutively loaded log files The logs collect and record data in intervals of 15 30 45 60 or 90 minutes as configured by the MOVA data set In total 672 records one weeks worth at 15 minute intervals rounded up to the nearest number of whole days will be recorded 7 4 1 OSS Access To enable transmission of log files to the OSS the facility mu...

Страница 92: ... 000 Page 92 Issue 5 Figure 7 1 TMA Log Auto Export Screen On enabling the OSS and setting the export times the logs will now be periodically exported and can be viewed on the OSS see Figure 7 2 OSS Screen Shot Figure 7 2 OSS Screen Shot ...

Страница 93: ...ogs Screen Shot below There is also an option to save the complete set on the local machine Figure 7 3 TMA Logs Screen Shot 7 4 3 TMA Alerts MOVA7 also introduces alerts The intention of alerts is to bring exceptional or unusual conditions at a junction to the attention of the traffic manager The MOVA kernel comes with the alert functionality embedded and an API to allow MOVA resellers to interfac...

Страница 94: ...execute on their occurrence To engage the alerts they should be mapped to a general purpose bit within the OTU using the GP function as follows Stream Alert type Function Card Port Bit 1 Any GPn mova1 alerts in 1 1 1 Oversaturation GPn mova1 alerts in 1 2 1 Exit blocking GPn mova1 alerts in 1 3 1 Occupancy GPn mova1 alerts in 1 4 2 Any GPn mova2 alerts in 1 1 2 Oversaturation GPn mova2 alerts in 1...

Страница 95: ...ibes some of the MOVAComm options which may be useful once MOVA is functioning normally See the TRL MOVAComm User Guide for full descriptions 7 5 1 Starting Remote Communications To communicate remotely with the MOVA unit use the link on the UTC instation screen as shown below Click here to launch MOVA Comm to communicate with this outstation for MOVA stream 1 or 2 or 3 or 4 ...

Страница 96: ... MOVA stream 3 IP port 12003 MOVA stream 4 IP port 12004 If the outstation IP address is known then MOVAComm application can be launched manually from a DOS prompt using the command format MOVAComm exe pcmova TCP IP address 12001 Where IP address is the IP address of the outstation e g MOVAComm exe pcmova TCP 172 16 100 96 12001 The command can be pasted into a shortcut for ease of use After a sho...

Страница 97: ...b menu gives five options In reverse order these are Return to MAIN MENU R The fifth and final option is used to return to the main menu Set Force bits F Clear force bits C The third and forth options allow force bits to be tested This option is only provided for backward compatibility as it is recommended that the commissioning screen be used to test the force bits Look at Flags L The second opti...

Страница 98: ...hone Home Flag The phone home flag is not used directly MOVA indicates a serious fault by setting the UTC MF reply bit and so the phone home flag is not required 7 5 4 View MOVA Messages VM The commissioning screen is mainly concerned with checking the I O connections to the MOVA unit To aid diagnosis of run time problems with the MOVA algorithm MOVA produces a series of output messages To view th...

Страница 99: ...nly where the detector is designated in the MOVA configuration data set Where a detector is not designated it will be displayed as inactive Care should therefore be taken when verifying a MOVA installation if a detector is displayed as inactive when a vehicle crosses it then this may be because the MOVA configuration is wrong and not that the detector is defective The detector operation should be ...

Страница 100: ...n be allocated as required across the streams assuming the total does not exceed 64 CAUTION The 64 detector inputs are shared by all streams and so the MOVA configurations should reflect this i e In MOVA Setup the detectors for MOVA1 should be allocated to different detector numbers to those for MOVA2 7 6 1 2 Stage Confirms The stage confirms can be mapped as required on the OSE Config screens wit...

Страница 101: ...convention for numbering streams from 0 these would be called MOVATO0 MOVATO1 in IC4 The take over bit for a stream should be configured in the outstation and driven by the MOVATO function for that stream The bit will be activated by the outstation when MOVA is in control The bit can be used in special conditioning in the controller to differentiate between MOVA and UTC control e g to light a LED ...

Страница 102: ...thin these limits the control and reply functions can be mapped as required using the OSE Config screens see section 6 11 1 7 6 3 MOVA Linking In certain installations it may be of benefit to allow one stream to have some knowledge of traffic flow in the other To fulfil this requirement the MOVA lane over saturation SAT and link end of saturation ESLI codes have been made available to the control ...

Страница 103: ...low having been reached The output functions are as shown in the following table MOVA End Saturation Outputs ESLI Function Meaning when set MOVAES1LIn Normal end of saturation MOVAES2LIn End of saturation due to a combination of codes 5 and 6 if link persistently over saturated 1 cycle MOVAES3LIn End of saturation due to a queue on the X detector green being wasted MOVAES4Lin MOVAES5Lin MOVAES6LIn...

Страница 104: ...In Selected from pulldown list depending on the End Saturation conditions to be detected as detailed in the table above No Link number Link number is from 1 to N where N is the max configured link number Card Port csi cond out 1 or csi control out 1 To match the controller conditioning Bit As required to match the controller conditioning ...

Страница 105: ...e same stage green confirms but MOVA will require extra phase green confirms where there are phase overlaps These extra confirms would normally be configured after the stage confirms The extra confirms should be configured in the UTC database so that they can be monitored and checked even though they are not required for UTC SCOOT control 7 7 3 Detector Inputs MOVA 6 For the semi integral OTU ther...

Страница 106: ...ll confirm that MOVA is in the on or off line condition 7 7 7 ML MOVA Online Reply Bit Condition 1 means that MOVA is on line and controlling the traffic controller If MOVA is not available this value is set to 0 7 7 8 MF MOVA Fault Reply Bit Condition 1 means that MOVA has detected a fault this is equivalent to the MOVA Phone Home condition The MOVA unit will report this fault when the MOVA error...

Страница 107: ... 4 MOVA streams The F bits and G bits can be used by UTC or MOVA MOVA Stream 1 The MO function is generally mapped to a bit which is not used by the controller The MO bit is used internally by the OTU to switch between MOVA UTC 0 UTC 1 MOVA NB The controller should not use the MO bit directly as it will default to 0 if UTC comms fails The controller can use the MOVATO bit to distinguish between MO...

Страница 108: ... 667 HB 31601 000 Page 108 Issue 5 MOVA Stream 2 Each MOVA stream provides MR MO confirm reply ML MOVA on line MF MOVA fault reply bits Map these to internal as they are generated directly by the MOVA software within the OTU ...

Страница 109: ...UTMC OTU MOVA Handbook 667 HB 31601 000 Page 109 Issue 5 MOVA Stream 3 MOVA Stream 4 ...

Страница 110: ...ry or equivalent see section 5 6 3 on page 38 Exercise great care when handling old batteries which may be leaking and during replacement of new ones to ensure no damage occurs to either WARNING OLD BATTERIES MUST BE DISPOSED OF IN ACCORDANCE WITH THE CONTROL OF SUBSTANCES HAZARDOUS TO HEALTH REGULATIONS 2002 SPENT BATTERIES MUST BE DISPOSED THROUGH AN APPROVED HAZARDOUS WASTE DISPOSAL CONTRACTOR ...

Страница 111: ... IP address already exists on the network and the conflict of addresses will need to be resolved Network Connectivity Fault Use the ping command see reference 1 3 1 to check if the outstation can transmit to a known IP address on the network e g the Gateway address From the instation use the ping command to check IP connectivity to the outstation IP address If the ping command works then the Ether...

Страница 112: ...e Network Administrator that all IP ports required by the application e g see E 2 are opened and are not blocked by a Network Router or Firewall Outstation Configuration Fault Check the System Log web screen to determine which application functions are being affected Check if the configuration of the application matches that expected by the instation ...

Страница 113: ...ndications are correct replace the Processor card If the fault persists replace the unit Digital output failed Monitor the relevant output s using the dout command If the output does not function as displayed replace the relevant IO cable and card If the fault persists replace the unit Unit not able to read the inputs and outputs on certain groups of ports belonging to an IO card Check that the ad...

Страница 114: ...ections failed Remove the unit Check by removing the protective cover from the PSU and battery area that the Faston tags are connected correctly Refit if necessary Unit Support Battery failed When the Mains power is switched off or has failed If the battery fuse is not blown and the battery cables connections are sound then replace the Unit s support battery see section 8 2 on page 110 c Invalid D...

Страница 115: ... drawings that are available as separate PDF files Hyperlinks to each file are available with some distributions of the handbook The drawings may be included with hard copy printouts of the handbook A 2 DRAWING LIST a 667 GA 32600 000 Gemini2 Traffic Outstation General Assembly b 667 GA 26577 000 Traffic Outstation Unit Mounting Details ...

Страница 116: ...ady been configured using GeminiConnect then proceed as follows 1 Make sure the System LED on the Gemini unit is flashing 2 Connect the Handset serial Cable between the Front handset connector on the outstation and the Serial Port on the Laptop Desktop If using Bluetooth connect the Bluetooth dongle to the Front handset connector on the outstation 3 Click on the desktop shortcut created by GeminiC...

Страница 117: ...re the Serial port is connected and working 2 Open Phone and Modem Options from the Control Panel 3 Click on the Modems tab at the top of the window 4 Click Add 5 Select the Don t detect my modem option click Next 6 From the left hand pane select Standard Modem Types 7 From the right hand pane select Communications cable between two computers 8 Click Next 9 Select All Ports click Next 10 Click Fin...

Страница 118: ...imum speed bps to 115200 18 Un click all Hardware features Click OK 19 Select Options tab 20 Un Click Prompt for name and password certificate etc 21 Select Networking tab 22 Select Internet Protocol TCP IP 23 Click Properties 24 Click Advanced 25 Un Click Use default gateway on remote network Click OK on the Advanced TCP IP settings window 26 Click OK on the Internet Protocol TCP IP Properties Wi...

Страница 119: ...ream1 or similar 3 Right click and select Properties 4 Add the Target parameters pcmova TCP 169 254 33 31 12001 and click OK See example below On firmware versions 3 0 and above the base port number used by MOVA can be configured on the ConfigStatus outstation web page If the base port has been changed the port numbers 12001 etc will need to be updated accordingly 5 Repeat the above steps for each...

Страница 120: ...r Bluetooth serial connection 1 Start the new connection wizard Start Settings Network Connections New connection wizard 2 Select Set up an advanced connection on the first screen and click Next 3 Select Connect directly to another computer and click Next 4 Select Guest and click Next 5 Name the connection Bluetooth link to Gemini and click Next 6 If you know the COM port of the serial Bluetooth c...

Страница 121: ... icon and select Refresh Services 8 Wait for the status bar at the bottom of the window to read Service Discovery finished and then right click on the adaptor icon again to start the Bluetooth serial service Right click device icon Connect Bluetooth serial 9 If presented with a dialogue box click Yes and make a note of the new COM port If no dialogue box is presented the COM port information will ...

Страница 122: ... to finish the wizard 7 Right click the AIRserial3X connection icon in the Bluetooth settings window and select the Connect option Enter the PIN code if prompted 8 Upon a successful connection the icon should change indicating a successful link 9 If the connection Bluetooth link to Gemini has already been set up then go to Setting up the PPP over Bluetooth serial connection Step 9 otherwise go to ...

Страница 123: ...h to the design and implementation of Intelligent Transport Systems The UTMC system seeks to make it possible for local authorities to integrate its existing applications for example UTC with other systems such as VMS and to expand and introduce new applications The following diagram illustrates how the system components are integrated within a UTMC system ...

Страница 124: ...rmation Bases MIBs which provide the open mechanism for communication to on street equipment Access to and support for other management and information systems are also achieved via adapters with information shared and exchanged through UTMC standard data objects CORBA is the acronym for Common Object Request Broker Architecture an open vendor independent architecture and infrastructure that compu...

Страница 125: ...ady existing service providers technology etc The network must meet certain requirements defined in Appendix E Traffic Control Computer Hub Operator Workstation Roving Terminal Data Transmission System Telephone Exchange Modem OTU Hub Modem OTU Legacy OTU s Connections to other Systems including CDBAS server RMS Siespace printer and other operator workstations RAS Remote Access Server Instation Eq...

Страница 126: ...e per hour e Software upgrade 1 5 Mbytes Where the network bandwidth is low e g lease line operation at 19 2Kbps then the transfer of large amounts of data will delay the SNMP control and reply messages Although full UTC UTC type 2 is more tolerant of delays than simple UTC it can still be affected by significant delays Putting the outstation off control before performing such transfers will preve...

Страница 127: ...able due to maintenance work Normally this will occur at off peak times such as during the night The traffic manager should seek assurance from the cellular network operator as to when this will happen ideally with pre warning and implement a suitable fall back plan There are a number of types of network service such as via private or public APN that are available to a customer over a cellular net...

Страница 128: ... notification 8 0 0 J11991 MR 1 In MR reply to confirm that MO control bit seen 9 0 0 J11991 ML 1 In ML reply to confirm MOVA operating normally up to 4 mins after MR 10 0 0 J11991 MF 1 In MF MOVA detected a fault 11 0 0 D11991 VC 1 In VC1 Vehicle count bit 12 2 0 D11991 VO 1 In VO Vehicle occupancy bit 13 0 0 Q11991 VQ 1 In VQ Queue detected bit 14 0 0 Q11991 DF 1 In DF Detector fault 15 0 0 X119...

Страница 129: ...StreamID MOVADETn 61 In MOVA detector 61 0 0 0 csi det in 1 61 StreamID MOVADETn 62 In MOVA detector 62 0 0 0 csi det in 1 62 StreamID MOVADETn 63 In MOVA detector 63 0 0 0 csi det in 1 63 StreamID MOVADETn 64 In MOVA detector 64 0 0 0 csi det in 1 64 G 2 Freestanding Global Assignment StreamID MOVADETn 1 In MOVA detector 1 0 0 0 busmova1 in 1 1 StreamID MOVADETn 2 In MOVA detector 2 0 0 0 busmova...

Страница 130: ...reamID MOVADETn 63 In MOVA detector 63 0 0 0 csi det in 1 63 StreamID MOVADETn 64 In MOVA detector 64 0 0 0 csi det in 1 64 G 4 Freestanding per Stream Assignment StreamID MOVADETn 1 In MOVA detector 1 0 0 0 busmova1 in 1 1 StreamID MOVADETn 2 In MOVA detector 2 0 0 0 busmova1 in 1 2 StreamID MOVADETn 3 In MOVA detector 3 0 0 0 busmova1 in 1 3 StreamID MOVADETn 4 In MOVA detector 4 0 0 0 busmova1 ...

Страница 131: ... you want it that you can change the software or use pieces of it in new free programs and that you know you can do these things To protect your rights we need to make restrictions that forbid anyone to deny you these rights or to ask you to surrender the rights These restrictions translate to certain responsibilities for you if you distribute copies of the software or if you modify it For example...

Страница 132: ...Program and copy and distribute such modifications or work under the terms of Section 1 above provided that you also meet all of these conditions a You must cause the modified files to carry prominent notices stating that you changed the files and the date of any change b You must cause any work that you distribute or publish that in whole or in part contains or is derived from the Program or any ...

Страница 133: ...urce or binary form with the major components compiler kernel and so on of the operating system on which the executable runs unless that component itself accompanies the executable If distribution of executable or object code is made by offering access to copy from a designated place then offering equivalent access to copy the source code from the same place counts as distribution of the source co...

Страница 134: ... may add an explicit geographical distribution limitation excluding those countries so that distribution is permitted only in or among countries not thus excluded In such case this License incorporates the limitation as if written in the body of this License 9 The Free Software Foundation may publish revised and or new versions of the General Public License from time to time Such new versions will...

Страница 135: ... THE PROGRAM TO OPERATE WITH ANY OTHER PROGRAMS EVEN IF SUCH HOLDER OR OTHER PARTY HAS BEEN ADVISED OF THE POSSIBILITY OF SUCH DAMAGES As a special exception if other files instantiate templates or use macros or inline functions from this file or you compile this file and link it with other works to produce a work based on this file this file does not by itself cause the resulting work to be cover...

Страница 136: ...s 48 input lines In addition 8 inputs for detectors etc are available on the CPU card b Semi integral OTU The capacity is limited by the controller serial interface and by the controller configuration up to 32 control bits up to 32 reply bits up to 64 SCOOT MOVA detector bits In addition 8 inputs for detectors etc are available on the CPU card 2 Instation Control Reply Capability The Siemens UTC i...

Страница 137: ...ever is now configurable via the OTU On Street Equipment OSE Config screens see section 6 11 1 DETECTOR INPUTS Card 1 MOVA I O CONNECTOR 1 PL1 BOTTOM FORCE BITS OUTPUTS 50 49 4 3 2 8 7 6 5 24 23 22 21 20 19 18 17 16 15 14 13 12 11 10 9 0v 0v F2 F1 F6 F5 F4 F3 F2 F1 F6 F5 F4 F3 1 F8 F7 F8 F7 2 1 MORE DETS CONFIRM INPUTS MORE FORCE BITS OUTPUTS Card 1 MOVA I O CONNECTOR 2 PL2 TOP 2 1 T0 T0 0v 0v F10...

Страница 138: ... stage and phase confirm outputs Confirms and Controller Ready Inputs The stage and phase confirm outputs from the controller should be configured as held closed opening when the stage phase is active The Controller Ready Bit should be closed when the controller is ready Therefore being physically normally open contacts if the controller fails then the MOVA unit will see the controller ready bit d...

Страница 139: ...ndbook 667 HB 31601 000 Page 139 Issue 5 An alternative cableform is available which simplifies connecting the MOVA unit up to a Siemens T400 traffic controller and this is described on page Error Bookmark not defined ...

Страница 140: ... 16 Confirm Bit 7 Detector 48 Confirm Bit 18 17 Blue Orange Detector 17 Confirm Bit 8 Detector 49 Confirm Bit 19 18 Blue Slate Detector 18 Confirm Bit 9 Detector 50 Confirm Bit 20 19 Green Orange Detector 19 Confirm Bit 10 Detector 51 Confirm Bit 21 20 Green Brown Detector 20 Detector 52 Confirm Bit 22 21 Green Slate Detector 21 Detector 53 Confirm Bit 23 22 Brown Slate Detector 22 Detector 54 Con...

Страница 141: ...hus only requires two wires to be connected to the controller s 24V and 0V supplies It cannot however replace the detector cables and these still have to be connected during installation Note that the colours of these wires are the same as the colours used in the standard cableform that is detailed on the previous page PL2 MOVA 0v 24v Commoning Terminal Block Mounted on the back of the 19 rack 667...

Страница 142: ...lerance of TX errors 4 999 15 Intermittent 1 hour clearance limit 4 999 15 Persistent Tolerance for TX errors 4 99 15 Persistent Clearance reset time 30 3600 seconds 180 Hourly Report Threshold 0 99 1 UTMC Settings SNMP Timeout 10 1500ms 1500 SNMP Retry Count 0 5 0 UTMC Type 2 Specific Settings SCOOT Sample reporting interval 1 8 sec 4 Resend hold off interval 1 9 sec 1 Keep alive interval 0 9 sec...

Страница 143: ... Display Site data 86 E Earth Continuity 32 Environmental Specification 20 Equipment failures 114 Ethernet Port 22 F Fault finding 35 111 FI MOVA Menu Finish 91 97 First line maintenance 34 Fuse Part numbers 38 G GVP Installation 23 Introduction 15 GVP Digital IO Card Connector 31 H Handset Port 22 Health and Safety Information 23 111 HIC Outstation Hardware Identity Code 82 I Inputs see Digital I...

Страница 144: ...rs 37 PL1 and PL2 31 PL5 30 Power failures 115 Processor Card 16 37 Processor Card Connector 30 PSTN see Modem PSU Description 18 Specification 19 PSU Connectors 27 R RS MOVA Menu Read in Site data 85 RS232 Handset Interface 29 S SF MOVA Menu Set Flags 98 Spares 37 System LED 36 T TR0141 see Controller V VM MOVA Menu View MOVA Messages 99 W Warning 23 111 Watchdog check 28 Watchdog LED 36 LAST PAG...

Отзывы: